Wednesday, June 28, 2017

Dial Phone Calls Directly from iOS Calendar Events

Dial Phone Calls Directly from iOS Calendar Events

Imagine that you’re adding a calendar event for a meeting with a contractor, and you want to make it easy to call them if you are running late. Or perhaps you want to embed conference call details into an event. Simply enter a phone number into an event’s Location or Notes field in the Calendar app. 

Then, whenever you’re viewing the event later on your iPhone, you can tap the number to dial it directly. To add a meeting code to a conference call number, append a semicolon, the meeting code, and the pound symbol—after the iPhone dials the phone number, you can press a button to dial the code at the right moment. The whole thing would look like 518-555-0101;123456#. For a more automated but potentially error-prone approach, replace the semicolon with one or more commas, each of which causes the iPhone to pause for 2 seconds before dialing the rest of the numbers.

Thursday, June 22, 2017

Use This Site to Troubleshoot Netflix Streaming Problems

Use This Site to Troubleshoot Netflix Streaming Problems

fast.com-iconWhether you watch Netflix on your iPhone, iPad, Mac, or Apple TV, the quality of the video—and whether it stutters or skips—is determined by the bandwidth of your Internet connection. Netflix recommends 25 megabits per second (Mbps) of download speed for Ultra HD quality, 5 Mbps for HD, and 3 Mbps for SD. On the slow end, Netflix says that 1.5 Mbps is the lowest recommended speed for a broadband connection and notes that 0.5 Mbps is the absolute minimum required. 

So how do you tell what your real-world download performance is right now? Visit Netflix’s fast.com Web site for a quick report on how much bandwidth you have. If what you see doesn’t match with what you think you’re paying for, call your Internet service provider (ISP) and make sure your connection is working properly.

Here are some contacts:
AT&T Uverse - Internet customer service - 800.288.2020

Spectrum (Formally Time Warner Cable) - 1-888-892-2253
Cox Cable - North: 1-760-599-6060 - South: 1-619-262-1122

Wednesday, June 21, 2017

Supercharge Your iPhone’s Keyboard with Google’s Gboard


As much as Apple keeps improving typing on the iPhone and iPad, most people find tapping characters on the on-screen keyboard slower and more error-prone than on a physical computer keyboard. Voice dictation is one solution, but there are plenty of places where it’s inappropriate to talk to your iPhone, and some people just don’t like dictating. iOS 8 first allowed third-party software keyboards, and while developers have released lots of interesting keyboards that aim to improve your typing experience, most have proved quirky and disappointing.

Bucking that trend is the free Gboard keyboard from search giant Google, which combines a highly competent keyboard with the innovative feature of being able to search Google from the keyboard in any app. Why would searching from the keyboard be 
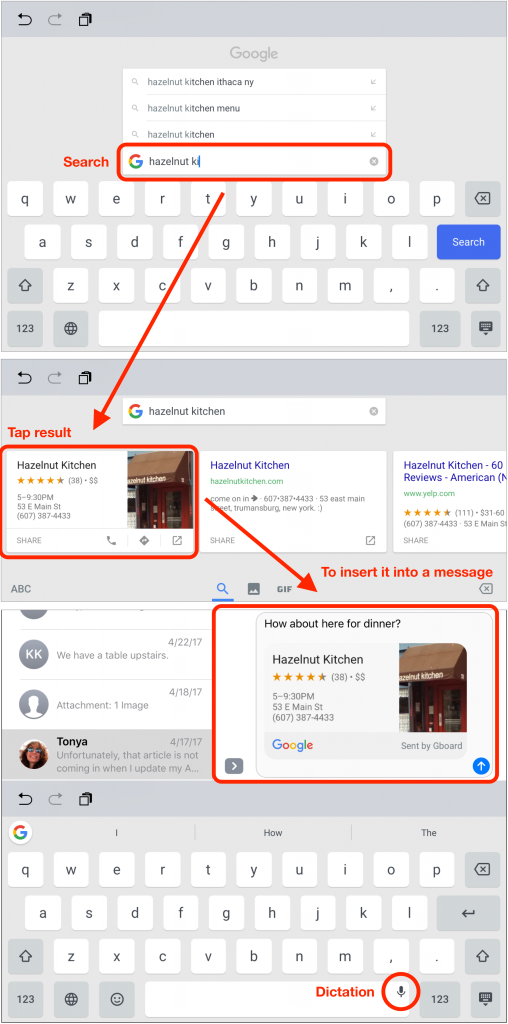
useful? Imagine you’re meeting a friend for dinner, and you need to text her the location of the restaurant. Rather than searching for the address via Siri or in Safari and then laboriously copying and pasting it into Messages, you can just tap Gboard’s Google button, search for the restaurant, and tap the result card to insert the restaurant’s linked address into a message.


You aren’t limited to location searches, so Gboard is great for sending links to news articles, images, YouTube videos, or anything else you can bring up in a Google search. Google is transparent about the privacy aspects of Gboard—it collects search queries and anonymous statistics, but nothing else you type.

Speaking of which, Gboard’s basic text entry works as you’d expect, complete with suggestions like Apple’s keyboard. However, Gboard also supports “glide typing,” where you slide your finger from letter to letter in a word without picking up until you’ve completed the word. The order of the characters you swipe over enables Gboard to guess at the word you mean, and it’s highly accurate.
If Gboard guesses wrong, or if it doesn’t know a word at all, a single tap on the Delete key removes the entire word so you don’t have to backspace over every character. When you type a word manually, Gboard learns it for future use. Even better, if you want to edit what you’ve written, just slide your finger left or right along the Space bar to move the insertion point within the text—far easier than trying to tap between characters on IOS keyboard!

Although Gboard doesn’t include the standard iOS dictation button, it provides its own, in the corner of the Space bar. Press it for a little longer than a normal tap to invoke Google’s transcription engine, which might even work better for you.

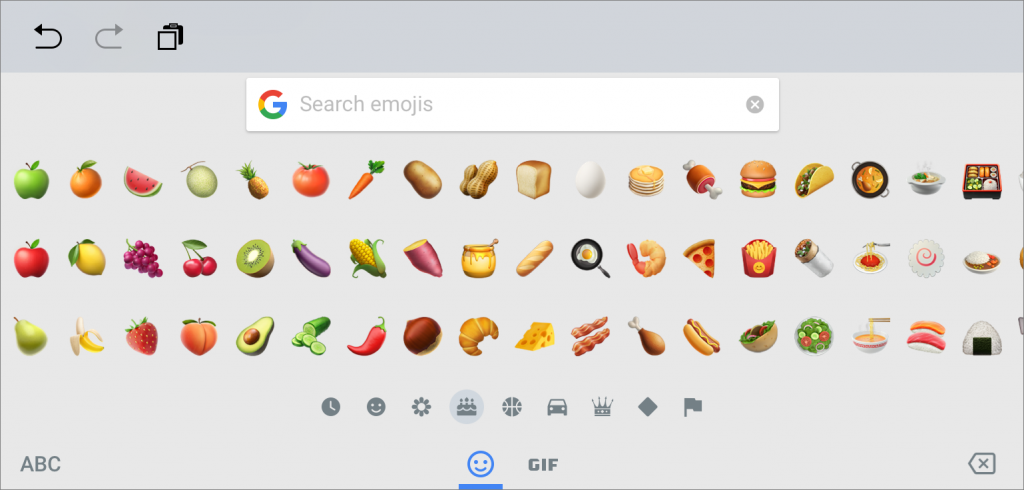
For those who like dressing up their messages, a tap on the smiley face Gboard-emoji-button button displays Gboard’s built-in emoji keyboard. If you have trouble finding the right picture to accompany your latest witticism, Gboard suggests emoji and lets you search for emoji. Take it one step further by tapping the GIF button below the emoji keyboard, which enables you to search for and insert animated GIFs. Gboard won’t display GIFs that are NSFW, so you don’t have to worry about what might pop up.


To install and use Gboard, first download it from the App Store to your iPhone or iPad. Then tap Settings > General > Keyboard > Keyboards > Add New Keyboard, and under the Third-Party Keyboards heading, tap Gboard to add it to the list of active keyboards. Next, tap Gboard in the active list and enable Allow Full Access. Then, in any app in which the keyboard appears, tap the Next Keyboard Gboard-keyboard-button button in the lower-left corner, which usually looks like a globe or indicates that the next keyboard is a letter Gboard-ABC-button keyboard. You’ll know you’re in Gboard when you see the round Google search Gboard-Google-search-button button in the upper-left corner of the keyboard.

The main downside of using Gboard? Although Gboard does have a trackpad mode (press and hold on the keyboard to move the insertion point), it lets you move only left and right, not up and down, and it doesn’t let you select text like Apple’s trackpad mode. But that may be a minor annoyance given all of Gboard’s other benefits—it offers the best third-party typing experience in iOS. Give it a try!

Friday, June 16, 2017

Say “Cheese!” Tips for Taking Mac and iOS Screenshots

Say “Cheese!” Tips for Taking Mac and iOS Screenshots

Did you ever want to capture a picture of what’s on your screen, or at least a part of it? Screenshots aren’t just for technical writers trying to document app behavior—you might also use them to provide feedback on a photo, to document an error message for someone who helps you with your Mac, or to record a particularly funny auto-correct fail in Messages on your iPhone.

macOS and iOS have both long included built-in screenshot features that make it easy to take a high-resolution picture of what you see onscreen. (You can, of course, use a camera to take a photo of your screen, but that will never look as good.)

Taking a screenshot in iOS is super simple, and it works the same on an iPhone, iPad, or iPod touch. Just press the Home and Sleep/Wake buttons simultaneously. The screen flashes, and iOS saves the screenshot to your Photos app—look at the bottom of the Photos collection or, if you’ve turned on iCloud Photo Library, the All Photos album.

The same technique works on the Apple Watch, where you press both the digital crown and the side button simultaneously. (Accidental presses of those buttons explains why random Apple Watch screenshots might appear in Photos.)

On the Mac, you can take your pick from three built-in methods of taking screenshots:

 
If you take a lot of screenshots, consider memorizing macOS’s keyboard shortcuts. For a full-screen screenshot, press Command-Shift-3. For a screenshot of an arbitrary size, press Command-Shift-4 and drag out a rectangle. To capture just an object like a window, press Command-Shift-4, hover the pointer over the window, press the Space bar to show the camera cursor over the highlighted object, and then click to take the screenshot.
A few notes:
  • The Command-Shift-4 shortcut is the only way to capture a menu.
  • On a MacBook Pro with a Touch Bar, after you press Command-Shift-4, notice the helpful buttons on the Touch Bar.
  • All screenshots are saved as PNG files on your Desktop and named with the date.
Grab-iconIf those keyboard shortcuts sound hard to remember, try Apple’s Grab app, which is hidden away in the Utilities folder inside your Applications folder. It’s a simple app, but it can take full-screen, window, and selection screenshots, and it walks you through the process. You can also use Grab to capture a full-screen screenshot with a timer, which is handy if what you want to record appears only while you’re dragging an icon or another object, for instance. Captured screenshots appear in Grab as Untitled TIFF documents that you can close, copy, save, or print.

PDF-Preview-iconWant to mark up a screenshot with circles and arrows and a paragraph of text? For that, use Apple’s surprisingly powerful Preview app, which takes screenshots as editable graphic documents. Choose File > Take Screenshot > From Selection, From Window, or From Entire Screen. That last option takes a timed screenshot so you can set up any temporary conditions while the timer counts down. It’s the only way to capture the pointer in a screenshot. To access the tools you need to add shapes or text to your screenshot, choose View > Show Markup Toolbar. When you’re done, you can save the screenshot in a variety of formats. For more about what you can do with Preview, read Take Control of Preview.

You can also take screenshots using a cornucopia of third-party screenshot utilities. In general, they don’t offer much more than Apple’s options when it comes to capturing screenshots. Where they stand out is providing better tools for marking up and manipulating screenshots, and in offering an interface for managing and sharing screenshots. Choosing among them is largely a matter of personal preference, but check out Evernote’s free Skitch (My Favorite), the free Monosnap, and Global Delight’s $29.99 Capto

Whatever method you choose, remember that a picture may be worth a thousand words, but the right screenshot is even more valuable.

Monday, June 12, 2017

Apple Wows at WWDC with the New HomePod, iMacs, iPad Pros, and OSes


Apple used the keynote address at its annual Worldwide Developer Conference (WWDC) in early June to unveil new versions of macOS, iOS, and watchOS, new iMacs and faster notebooks, and new iPad Pros. In a “one last thing” announcement that hearkened back to the days of Steve Jobs, the company also gave a sneak peek at its first major new product since the Apple Watch: the HomePod smart speaker. Some of the new hardware is available now, the new operating systems are due this fall, and the HomePod and the workstation-class iMac Pro are scheduled for December 2017. Here’s what you should know.

HomePod

The much-rumored HomePod is Apple’s answer to the popular Amazon Echo and Google Home smart speakers. In classic Apple fashion, however, the wireless HomePod speaker is focused first on delivering amazing audio quality that competes with the top Wi-Fi speakers available on the market. Setup will be as simple as setting up AirPods; just hold your iPhone next to a HomePod to configure it.

Physically, the HomePod is a 7-inch high cylinder covered in a 3-D acoustic mesh and available in black or white. Inside, it features a 4-inch Apple-designed woofer for deep, clean bass, and an array of seven beamforming tweeters that provides pure high-frequency acoustics.

The smarts in Apple’s smart speaker come from Apple’s A8 chip, which powered the iPhone 6. Thanks to the A8 chip and a six-microphone array, the HomePod can optimize its audio quality for its position in a room. If you put a pair of HomePods in the same room, they detect each other automatically and balance the audio to deliver an immersive listening experience.


Those microphones also let you control the HomePod via Siri. It’s designed to work with an Apple Music subscription, and Siri will be able to respond to many more music-related queries and commands. You can also ask Siri for weather forecasts, sports scores, traffic reports, stock prices, and even unit conversions. Thanks to the HomePod’s integration with the Apple ecosystem, you’ll also be able to send messages, make reminders, set alarms and timers, and control HomeKit devices.
Because it’s Apple, protecting your privacy is paramount, so the HomePod sends nothing to Apple until you say “Hey Siri,” and even then, what you say is both anonymized and encrypted.
When it ships in December for $349, the HomePod will be more expensive than the Amazon Echo or Google Home, neither of which have particularly good sound, but cheaper than many high-quality wireless speakers. We’re looking forward to listening to our music and podcasts on the HomePod, and to seeing how successfully Siri responds to us.

New iMacs and Faster Notebooks

For those who have been waiting patiently to buy a new iMac or Mac notebook, now’s the time. Apple refreshed the entire iMac line with Intel’s latest processors, faster storage, higher performance graphics, and brighter, more colorful screens. They all provide a pair of Thunderbolt 3 ports for driving external displays and connecting to speedy external storage.

The most-improved award goes to the 21.5-inch iMac with 4K Retina display, which should see the most performance gains from faster CPUs and high-performance Radeon Pro graphics processors. Plus, that model can now take up to 32 GB of RAM, up from 16 GB — it’s far more compelling than before, if you don’t need the larger screen and better performance of the 27-inch model.


You can buy a 21.5-inch non-Retina iMac starting at $1099, a 21.5-inch iMac with 4K Retina display starting at $1299, and a 27-inch iMac with 5K Retina display starting at $1799.
Looking for more performance than even a tricked-out 27-inch Retina iMac can provide?. Wait for December, when Apple promises to release the new iMac Pro. It’s a workstation-class machine that retains the form factor of the 27-inch Retina iMac but swaps the brushed aluminum look for a space gray finish. It will be the fastest Mac ever, thanks to 8-core, 10-core, or 18-core Intel Xeon CPUs. Other performance enhancements include a next-generation Radeon Pro Vega graphics chip, up to 128 GB of RAM, a 1 TB SSD upgradeable to 4 TB, four Thunderbolt 3 ports, and 10 Gbps Ethernet. It won’t come cheap, with prices starting at $4999 and rising quickly with build-to-order options.


Apple’s top-of-the-line MacBook Pro notebooks should run a bit more quickly thanks to the addition of Intel’s latest processors running at slightly higher clock speeds. These models also get new graphics processors that improve rendering performance. The 13-inch MacBook Pro still starts at $1299 or $1799 for a model with a Touch Bar and beefier specs. The 15-inch MacBook Pro with Touch Bar starts at $2399.


For those who value portability over all else, the MacBook has become more attractive due to improvements that address its previously underwhelming performance. Along with sprightlier CPUs, it has a new SSD that Apple claims is up to 50% faster, and you can now buy it with 16 GB of RAM, up from the previous limit of 8 GB. It’s still a bit pricey for its performance, with two models priced starting at $1299 and $1599.

If you don’t have much to spend, consider the $999 13-inch MacBook Air. Apple gave it a minor speed bump, replacing the stock 1.6 GHz Intel Core i5 processor with a 1.8 GHz version. It remains upgradeable to an Intel Core i7 running at 2.2 GHz.

By the way, if you’ve been jonesing for a full-size wireless keyboard, you’ll be pleased to learn that Apple also just released the new wireless Magic Keyboard with Numeric Keypad. It’s $129.

New iPad Pros

Although these days Apple is putting more emphasis on the Mac, particularly for professional use, the company certainly isn’t ignoring pro iPad users. If you’ve been holding off on an iPad Pro purchase, there’s no reason to wait any longer. Apple introduced a new 10.5-inch iPad Pro that’s just a hair taller and wider than the 9.7-inch iPad Pro it replaces, despite having a larger screen that’s 20% larger. The company also enhanced the 12.9-inch iPad Pro with a variety of new hardware capabilities.


All motion on the screens of both iPad Pros will be smoother and more responsive, thanks to a previously unheard of 120 Hz refresh rate. It will make drawing with the Apple Pencil even more fluid. The screens are also brighter, can display more colors, and have low reflectivity. Both models get new cameras that match those in the iPhone 7: a 12-megapixel rear-facing camera with optical image stabilization and True Tone flash, plus a 7-megapixel FaceTime HD camera on the front.
Since professionals care about performance, the new iPad Pros rely on Apple’s new processor, the A10X Fusion chip. Apple claims that the A10X is 30% faster than the A9X used by the previous generation of iPad Pros, and it also delivers 40% faster graphics rendering.

You can buy an iPad Pro with 64 GB, 256 GB, or 512 GB of storage, significantly more than last year’s models. The 64 GB 10.5-inch iPad Pro with Wi-Fi costs $649; jumping to 256 GB increases the price to $749, and going to 512 GB raises it to $949. For the 12.9-inch iPad Pro, a 64 GB configuration starts at $799, with 256 GB at $899 and 512 GB at $1099. Add $130 to any configuration to get cellular connectivity as well.

Although the iPad Pros are available starting this month, you can look forward to them becoming significantly more useful when Apple releases iOS 11 in the fall. That’s because iOS 11 promises to bring a number of iPad-specific features, including:
  • A customizable Dock that holds more than six apps
  • A new App Switcher that includes split-screen app combinations
  • A new Files app for managing documents
  • Drag-and-drop capability for moving data between apps
  • Instant Notes, which opens the Notes app with an Apple Pencil tap on the Lock screen
  • Inline drawing with the Apple Pencil in Notes and Mail
  • Handwritten text recognition so you can search what you write

iOS 11

At WWDC, Apple gave us a peek at iOS 11, due as a free update this fall (which likely means September). Although it offers numerous changes, iOS 11 won’t seem like a huge revision, since most of the changes are refinements rather than new apps or wholesale rewrites.
Perhaps the most noticeable change is Control Center, the panel that appears when you drag up from the bottom of the Lock screen or Home screen. Apple has redesigned it so that the audio and HomeKit controls fit on one screen, even on the iPhone. In iOS 10, you may have to scroll sideways to see all the controls, which is awkward. The new design also takes advantage of 3D Touch to let you do more than toggle settings on and off. 


I'm looking forward to the new Messages, which takes advantage of iCloud to sync messages (including deletions!) between your devices. What’s most important about this is that older messages will be stored only in iCloud so they won’t occupy precious storage space on your device.
Siri will receive new voices that sound more natural, and it will also sync what it knows about you between devices to personalize responses better. Siri is also getting smarter, or at least more observant. Thanks to a technology called Siri Intelligence, Siri will better understand your interests and the context in which you’re speaking. So, if you search for information about Paris, the News app may start recommending articles about France, and if you type “bor” in an app, the iOS keyboard may suggest “Bordeaux” as an auto-completion.

Apple will introduce new formats to the Camera app in iOS 11, which should result in photos and videos that take up much less space. iPhone 7 Plus users will also appreciate improvements in the two-camera Portrait mode. If you like Live Photos, don’t miss new features in Photos for trimming and editing the underlying movies — you can even apply looping and reversing effects.
Although Maps may always be playing catch-up with more established mapping companies, we’re still pleased to see Apple adding features like indoor maps of malls and airports in major cities. It will also inform you of speed limits and offer lane guidance on large roads.

If splitting a restaurant bill is awkward, you’ll be able to use Apple Pay in iOS 11 to send money directly to another person. It goes into an Apple Cash Card found in the Wallet app, and money stored there can be transferred to a bank account or used to pay for Apple Pay purchases.
Last, but certainly least, is a potentially life-saving feature: Do No Disturb While Driving. When enabled, it will detect that you’re riding in a car and shut off all notifications to your iPhone. You’ll be able to set an auto-reply text message in case anyone messages you, which the sender can break through by stating that the message is urgent. You can also turn off Do Not Disturb While Driving if you’re a passenger.


iOS 11 requires a 64-bit device, which means that it won’t be available to the iPhone 5, iPhone 5c, and fourth-generation iPad, but it will run on all other iOS devices Apple has released since 2013.

macOS 10.13 High Sierra

When Apple releases macOS 10.13 High Sierra this fall, it will include big behind-the-scenes improvements and a few upfront changes in core Apple apps like Safari, Mail, and Photos. The upgrade will be free, and High Sierra will run on all Macs that can run 10.12 Sierra now.


The most important change under the hood is a new file system called APFS (Apple File system), which is designed for modern needs like fast backups of massive amounts of data and optimal behavior when storing files on solid-state drives. The file system is the smarts beneath the Mac’s Finder, helping your Mac to keep track of all its data. The Finder itself won’t change much, but certain tasks like duplicating lots of data will be much faster.

Other low-level technology changes will enable developers to bring faster video streaming and playback to the Mac. Plus, they’ll be able to create graphically demanding apps that have even more realistic images, which is important for the fields of virtual reality and gaming.
More obviously, you can look forward to Safari providing a more enjoyable Web browsing experience, with fewer ads, articles opening in the less-cluttered Reader view, and no more auto-playing audio. You can customize all these settings, as well as the text zoom percentage, on a per-site basis. 

Searching in Mail will be significantly faster, with a Top Hits area that Apple says will learn from you over time and get smarter about suggesting ideal results. Mail will also feature a redesigned split screen option that puts the compose window next to your messages, and your Mail archive will consume less drive space than before, thanks to better compression.

Photos gets a lot of attention from Apple in High Sierra, with a refined interface that should make it easier to find tools, syncing of facial recognition training between your Apple devices, new editing tools for fine-tuning and saturation, and fun choices for enhancing Live Photos. Also, Photos will finally allow integration with third-party editing apps like Photoshop and Pixelmator, along with support for printing projects to non-Apple print services, so you’ll have more choices in that area.
Overall, High Sierra looks like it will be a solid refinement on Sierra, with some core improvements for pro users and a nice collection of enhancements to apps that the rest of us use every day.

tvOS and watchOS 4

Although Apple gave tvOS the lead announcement at WWDC, it was just to get it out of the way quickly before making all their other announcements. The news is that Amazon Prime Video will be coming to the Apple TV sometime later this year, and better yet, it will integrate with the TV app. It’s likely that there will be additional changes in tvOS before Apple’s big OS release in the fall.
watchOS, on the other hand, received quite a bit of love during the WWDC keynote. watchOS 4, due for free this fall, will feature a new Siri watch face that feeds you relevant information based on the time of day, your activities, and data from apps like Activity, Calendar, Maps, News, Reminders, and Wallet. Other new watch faces are for fun: Toy Story characters with tiny animations and a Kaleidoscope face that draws ever-changing patterns. 


Since fitness tracking is important for the Apple Watch, Apple has made watchOS 4 pushier to help you stay on the exercise wagon. It will send morning notifications to encourage you to match the previous day’s activity levels or reach a new Achievement. It also nudges you in the evening to complete your activity rings and issues monthly exercise challenges tailored to your situation.
The Workout app will help pool swimmers track sets, pace, and distance for different stroke types. Triathletes will like being able to switch between workout types and later combine them into a single session for better tracking. Apple will also add motion and heart-rate algorithms for High Intensity Interval Training (HIIT). And if you work out in a gym, you’ll be able to sync exercise data with sufficiently capable gym equipment like treadmills, ellipticals, indoor bikes, and stair climbers.


If you listen to music while you work out, improvements to the Music app will be welcome. It will sync your most-listened music from your iPhone automatically, and if you subscribe to Apple Music, it will also pick up your favorite mixes.

Finally, watchOS 4 will make it easier for developers to connect the watch to more Bluetooth devices, such as for continuous glucose monitoring, analyzing your serve via a sensor on a tennis racket, or recording wave height and calorie burn via a sensor on your surfboard. Let us know if you have a sensor-enabled surfboard!

Happily, watchOS 4 will be compatible with both the original Apple Watch and the Apple Watch Series 2, so all Apple Watch owners will be able to enjoy these new features. Apple said nothing about new Apple Watch hardware, but we wouldn’t be surprised to see some before the holiday shopping season.

Sunday, June 4, 2017

So What Is a Retina Display, Anyway?

So What Is a Retina Display, Anyway?

You’ve seen the term in Mac names—iMac with 5K Retina display, MacBook Pro with Retina display, and so on. But what is a Retina display, and why should you care? The short answer is Retina displays are high-resolution screens on which graphics are extra sharp and text is super crisp. Here’s the longer technical answer.

First off, a little background. The LCD screens used in Apple’s displays use a grid of “pixels”—the smallest possible dot whose color can be controlled—to create all the text and graphics you see. The first Mac needed 72 pixels in each direction to draw a 1-inch square, giving it a pixel density of 72 pixels-per-inch (ppi). Thanks to manufacturing advances in screen technology since 1984, the iPhone 7 Plus screen can fit a stunning 401 pixels into each inch. As pixel density goes up, the pixels get smaller. With a 72 ppi screen, it’s easy to see each individual pixel in a character, but the higher the pixel density, the harder it becomes to pick out separate pixels.

Low-and-High-resolution

When Steve Jobs unveiled the iPhone 4 in 2010, he said that for a screen that’s held 10 to 12 inches from the eye—about the distance at which many people hold their iPhones— the human eye can’t resolve individual pixels if it’s about 300 ppi. At longer distances, it becomes harder to discern small details, so most people won’t be able to pick out pixels on a screen viewed at arm’s length, such as an iMac display, if it’s about 220 ppi.

A “Retina display,” then, is any screen whose pixel density is high enough that someone with 20/20 vision cannot see individual pixels at the standard viewing distance used for that device.
For the Mac, the necessary pixel density for a Retina display is about 220 ppi. Larger iPads have a pixel density of 264 ppi, and the iPad mini checks in at 326 ppi. From the iPhone 4 through the iPhone 7, pixel density stayed at 326 ppi, but the iPhone 6s Plus and iPhone 7 Plus are 401 ppi. The tiny Apple Watch screen is about 330 ppi.

Practically speaking, a Retina display looks better than a non-Retina display. Put a 27-inch iMac with 5K Retina display (218 ppi) next to a non-Retina 27-inch Thunderbolt display (109 ppi), and the difference will be noticeable, particularly with text. If you suffer from eyestrain, reading on a Retina display will likely be easier and less tiring, since the words will be clear and crisp, without any of the fuzziness on the edges that you see on lesser displays.

Happily, there are few decisions to make when it comes to Retina displays. All recent models of the iPad, iPhone, iPod touch, and Apple Watch have Retina displays, so you’re good there. In the Mac world, however, not all MacBook models have switched, and Apple still sells some non-Retina iMacs. Plus, not all Macs can drive an external display that would be equivalent to a Retina display, even if Apple were to update the Thunderbolt Display to Retina. So if you’re buying a Mac now and there’s a choice between a Retina and a non-Retina option, be sure to compare them in person before deciding.

One last thing. It’s important to realize “Retina display” is an Apple trademark. So you won’t see any other manufacturers claiming that their products as having Retina displays.