Wednesday, February 28, 2018

Graphic Alphabet Soup: What Are Different Formats Good For?


When it comes to graphics on the Internet, it’s easy to feel as though you’re swimming for your life in a giant bowl of alphabet soup, surrounded by shouting acronyms: GIF! JPEG! PNG! TIFF! What do those names mean? Why does your camera spit out JPEGs? What’s the best format for a Web graphic? Grab onto a capital O and let’s get some answers.

First off, don’t worry about the acronyms, because expanding them doesn’t explain much. For example, JPEG stands for Joint Photographic Experts Group, which is the standards body that invented the JPEG format. Helpful? Not really. So think of them just as names, like Gabriela or Jayden. That said, it can be helpful to know how they’re pronounced:
  • GIF: Either “jif,” as in jiffy, or “gif” as in “gift” — it’s an interesting story.
  • JPEG: “jay-peg”
  • PNG: “ping”
  • TIFF: “tiff”
Here’s the lowdown on each.

GIF
The oldest of these formats, GIF was long the standard for computer-generated images. It worked well for graphics and logos with large areas of solid color, but less so for photos. Due in part to a patent licensing kerfuffle, GIF has been superseded by PNG in all ways but one.

GIF’s remaining use lies in flipbook-style animations, where each frame is a separate GIF image. Animated GIFs that run in short loops have become wildly popular on the Internet because they’re small and easy to embed in a Facebook or Twitter post, email message, or Web page. Numerous utilities exist for turning a short movie clip into an animated GIF; check out GIF Brewery on the Mac or Giphy Cam for an iPad or iPhone.


JPEG
The most common graphics format on the Internet, JPEG owes its popularity to being the default format for photos created by all digital cameras, including (until iOS 11) those in iPhones and iPads. JPEG works well for photos because it can compress file sizes significantly while barely affecting the image quality.

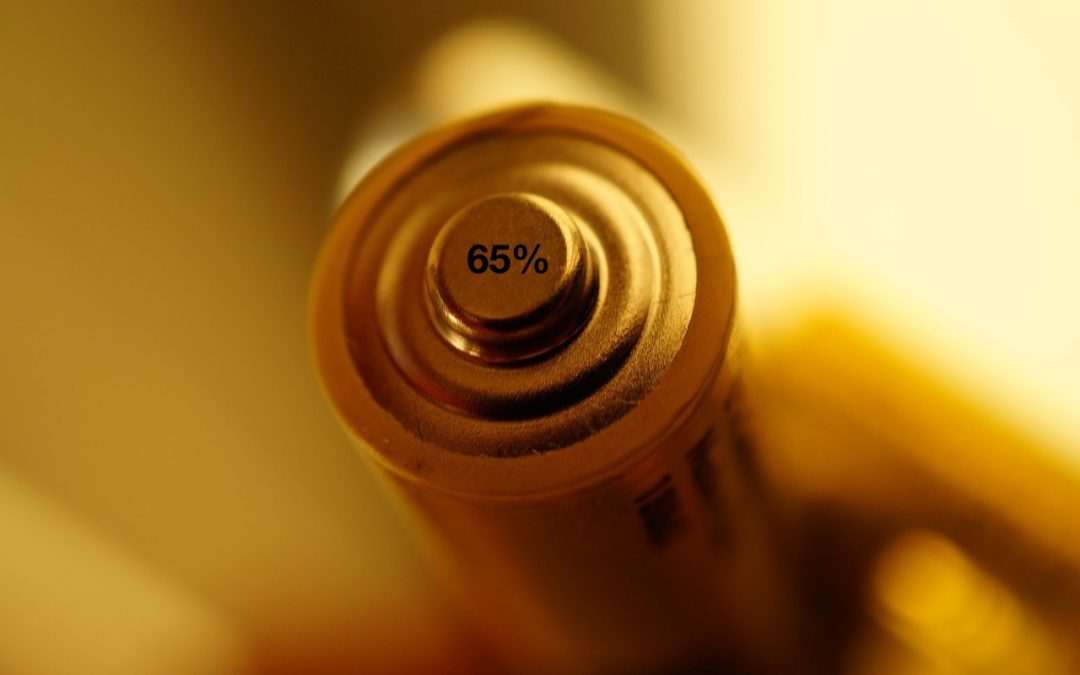
For instance, a 20 MB photo saved in JPEG format might end up as only 4 MB, with reductions in image quality that most people would never notice. Most graphics software lets you adjust a slider to specify different quality levels, and while the results vary by the photo, saving at a 75% quality level is usually a good compromise between quality and file size.

The downside of JPEG is that it achieves these minuscule file sizes by throwing away data in the file, which limits how it can be edited in the future. That’s why professional photographers generally shoot in what are called “raw” formats (which contain all the image data the camera sensor recorded when the shutter was opened). Raw files are huge but can be edited in ways that aren’t possible with a JPEG file. Once edits have been made, photographers save a copy as a JPEG for sharing or posting online.


PNG

Conceived as an improved, patent-free alternative to GIF, PNG is now the go-to format for online graphics that have large areas of solid color, such as buttons, logos, and screenshots That’s because PNG can compress such images well without introducing fuzziness, as can happen with JPEG. Similarly, you can edit PNG images repeatedly without hurting image quality.

In another contrast with JPEG, PNG supports transparency, which means you can define one color in an image as “transparent” rather than an actual color. When the image is displayed on a Web page, the transparent pixels are rendered in whatever the background color is. That’s tremendously handy for creating images that seem to float over the background.

Don’t use PNG for photos, since a photographic image saved in PNG format will be much larger than the corresponding JPEG.

TIFF
Like PNG, TIFF files can be compressed without losing any data. Because of this, TIFF is used extensively for archiving original photos instead of JPEG; TIFF files may be much larger, but that’s acceptable when it comes to preserving originals from which you could later make edited copies.
TIFF also boasts some additional color-related features that PNG lacks, making TIFF useful in the print world—if you were to write a book that was going to be printed professionally, the publisher might ask for any photos or other illustrations in TIFF format. Useful as TIFF can be, for most people, most of the time, JPEG and PNG are all you need.

Back and Forth

Nearly any graphics program can open images in these formats and convert to the other formats, but look no further than the Preview app from Apple on your Mac for basic image conversion features. For more info about using Preview, check out Take Control of Preview, by Adam Engst and Josh Centers.

Now that you know the basics of the Mac’s most important graphics formats, you’re ready to put your best foot forward whenever you need to pick a file format for your images.

One last thing! You might start hearing about a new format that iOS 11 and macOS 10.13 High Sierra introduced this year: HEIF, or High Efficiency Image File Format (we don’t know what happened to the extra F either). HEIF provides tight compression, transparency support, animations, and much more. But you probably won’t interact with HEIF files, since Apple plans to use HEIF only behind the scenes. Instead, when you save or share an image, the operating system will automatically convert it to one of the more standard formats.


Monday, February 26, 2018

Quick Tip - Having Trouble Switching Apps on the iPhone X? Try This.

Since the iPhone X lacks a Home button to press twice for the app switcher, you’ll need to switch apps in a new way. To bring up the app switcher, swipe up from the bottom of the screen to about halfway, and then pause until the app thumbnails appear. Then you can scroll through your launched apps by swiping horizontally and switch to an app by tapping its thumbnail. While in the app switcher, you can also force-quit a frozen app: press a thumbnail to get a red minus button and tap that button. 

Alternatively, you can skip the app switcher entirely. Instead, swipe right on the very bottom of the screen to switch to the previous app—swiping left switches to the next app. Hope these tips help!

Wednesday, February 21, 2018

Goldilocks and the Three PDF Apps: Which Is Right for You?

Goldilocks and the Three PDF Apps: Which Is Right for You?

PDFs are everywhere these days. Scanners generally create documents in PDF, ebooks are often distributed in PDF, and government agencies make their paper forms available as interactive PDFs.
So it’s essential to have an app on your Mac that can work with PDFs, and in fact, such an app is included: Preview. But as good as Preview is, it can’t do everything you might want, and just like in the fairy tale of Goldilocks and the Three Bears, there are three popular apps for working with PDF: Preview is the first, and while it’s decent and free, Smile’s PDFpen and PDFpenPro offer quite a few more features but cost $75 or $125. The high-end spot is occupied by Adobe’s Acrobat Pro DC, which is priced at a hefty $450. Which PDF app is right for you?


PDF-Preview-icon


You won’t go wrong starting with Preview, which enables you to rearrange pages in a PDF, copy pages from one PDF into another, delete pages, and even import new pages from a scanner. Preview lets you navigate PDFs via the table of contents or thumbnails, and can display the pages in a grid. If you’re trading a PDF back and forth with a collaborator, you can use Preview to highlight text and add annotations. Preview even makes it possible to fill out interactive forms and sign documents with a stored photo of your signature. It has a search capability, although it’s a little weak, and you can bring up an inspector window that displays metadata about the PDF, although you can’t change anything in there apart from keywords.


PDF-PDFpenPro-icon


PDFpen and PDFpenPro can do everything Preview can, and quite a bit more. When scanning a page, they can perform optical character recognition (OCR), which adds searchable and editable text to the scanned image of the document. Speaking of text, both apps can add to and change the text of a PDF, which is handy when you want to make a quick correction or update an old document. They also let you move, resize, and delete images in PDFs, redact sensitive information, find and replace text, add file and audio attachments, and export to Microsoft Word format. PDFpenPro goes even further, making it possible to turn a Web site into a PDF, export to Microsoft Excel and PowerPoint formats, create and edit a PDF’s table of contents, create links from URLs in a document, and more.


PDF-Acrobat-icon


What more do you get with Acrobat Pro DC for more than three times the price of PDFpenPro? (It’s also included with an Adobe Creative Cloud subscription.) Since it comes from Adobe, the company that created PDF, Acrobat will work with complex and involved PDFs that might stymie the other apps. Acrobat offers high-end print production features, integration with Microsoft Office, and a side-by-side view for fixing suspected text recognition errors in an OCRed scan. Most important, if you need to edit PDFs frequently, Acrobat can reflow text across an entire page, add new lines to existing bulleted or numbered lists without reformatting, and clean up document photos to remove the background and adjust perspective.

My recommendation? Start with Preview and see whether you need more features. If PDFpen or PDFpenPro will resolve your problems, they’re solid performers that don’t cost too much. But if you find yourself spending your days working on PDFs, particularly in a collaborative environment or with a lot of text editing, Acrobat Pro DC may be worth the money.


Tuesday, February 20, 2018

Take Advantage of Extra Features in Messages Group Conversations


Using Messages on the Mac or in iOS is simple. Start a new conversation, enter someone’s phone number or email address, and start chatting. And if you want to talk with several people at once, type a couple of phone numbers or email addresses when you begin.


What you may not realize is that if everyone in your group is using an Apple device and iMessage—this is the case if your messages to them appear in blue bubbles—extra features become available when you click or tap the Details button in the upper-right corner of Messages. Did you know that:
  • You can give the conversation a name that’s more descriptive than the truncated names of the people in the conversation. On the Mac, type in the Name field at the top; in iOS, tap in Enter a Group Name and then type.
  • At any time, you can add more people to the conversation; click Add Member (Mac) or tap Add Contact (iOS) and type the desired phone number or email address.
  • You can remove people from the conversation. On the Mac, click the person’s name and press Delete; in iOS, swipe left on a name and tap Delete. Be careful since there’s no opportunity to confirm the deletion, so you’d have to add any mistakenly deleted people back manually. (In iOS, Messages doesn’t always let you remove people.)
  • You can even “delete” yourself by clicking or tapping Leave This Conversation at the bottom of the Details screen. Once you’ve left, you can’t get back in without someone else adding you.
  • Is leaving a little drastic? Perhaps the conversation is being too chatty while you need to get work done. To mute notifications from the conversation, enable the Do Not Disturb option; disable it when you’re ready to be alerted to new messages again.
  • Everyone in the conversation can send or share their location from an iPhone or iPad. Sending a location is like posting a message saying “I’m at the library now” along with a map to where you are. Sharing your location allows the others to see where you are at all times, for one hour, until the end of the day, or indefinitely. Of course, if you opt to share indefinitely, you can revoke that sharing later.
  • When anyone in the conversation is sharing their location, a map appears at the top, showing the locations of those who have shared. This is fabulous for keeping track of relatives during family reunions where different groups head out on separate outings.
  • Finally, the bottom of the Details screen displays all the pictures that people have shared within the conversation. Messages gives you control over these images, letting you copy, save, open, and delete them. It’s all easy; on the Mac, select photos and Control/right-click to see a contextual menu that includes an Add to Photos Library command or press the Space bar to invoke Quick Look for a bigger view and a Share option. In iOS, touch and hold on a photo to see additional options—tap Save to copy the image to the Photos app.
Alas, if you include even one green-bubble friend who doesn’t have an iPhone with an iMessage account set up and instead relies on plain old SMS text messaging, these features disappear. It’s just another way Apple encourages your friends and relatives to use iPhones or iPads.


Monday, February 19, 2018

Quick Tip - Here’s How to Teleport to a Specific Mac Folder While Opening or Saving


Ever wanted to jump to a particular folder on your Mac while opening or saving a file? You can, thanks to a clever Finder trick. Whenever you have an Open or Save dialog open in an app, switch to the Finder, find the folder you want to access, and drag its icon into the dialog. Presto—instant navigation to that folder! This trick even works if you drag the proxy icon—the little icon in the title bar of any window—for any folder.

dropping-icon-Save-dialog

Saturday, February 17, 2018

Who Should Buy the New iMac Pro?

Apple’s new iMac Pro has started shipping, and it’s an astonishing machine. Put simply, it’s the most powerful Mac ever, a title it will likely retain until Apple releases a new version of the Mac Pro, promised for sometime in 2018. But for now, what’s special about the iMac Pro, and should you buy one?
The main thing to know about the space gray iMac Pro is that it’s aimed at high-end professionals, and as a result, it gets pricey fast. The base configuration starts at $4999, and if you max out all its options, you’ll spend over $13,000. That’s a lot of money, but you get a lot of bang for your buck.
The power starts with the processor, an 8-core Intel Xeon W. If that’s not enough performance for you, there are also 10-core, 14-core, and 18-core options. Apple didn’t skimp on RAM either—32 GB comes standard, and you can bump it to either 64 GB or 128 GB. The default storage is a 1 TB solid-state drive, but you can increase that to 2 TB or 4 TB. You can’t upgrade the iMac Pro in any way yourself, but you can take it to an Apple Store or Apple Authorized Service Provider (Or contact me) to have more RAM installed after the fact.
The screen is a stunning 27-inch Retina 5K 5120-by-2880 P3 display, and the iMac Pro drives all those pixels with a Radeon Pro Vega 56 graphics card with 8 GB of memory, though you can get even more graphics processing power from an optional Radeon Pro Vega 64 card with 16 GB.
Most of the iMac Pro’s other specs are similar to the existing 27-inch iMac with Retina display—a 1080p FaceTime camera, 802.11ac Wi-Fi, Bluetooth 4.2, an SDXC card slot, four USB 3 ports, and a headphone jack—but it also boasts four Thunderbolt 3 ports for driving external displays and large storage arrays, along with 10 Gb Ethernet for lightning-fast network access.
It comes with a space gray Magic Keyboard with Numeric Keypad and a space gray Magic Mouse 2. You can switch to a space gray Magic Trackpad for $50 or buy both input devices for $149, which you might want to do because the space gray peripherals aren’t sold separately.
Many of the iMac Pro’s options come with eye-watering price tags—$2400 for the 18-core processor and another $2400 for 128 GB of RAM—but those stratospheric costs make the purchasing decision fairly easy. If you’re in a line of work where increased performance translates directly to increased productivity, you’ll want an iMac Pro as soon as you can get one. It’s ideal for video editors who need to work with 8K video, engineers using complex modeling software, and developers suffering through long compile times. Put simply, if time is money for you, you’ll want an iMac Pro.
And if you’re a professional whose needs aren’t nearly so rarefied, you can rest easy knowing that the regular 27-inch iMac can give you more than enough performance for a lot less money.


Monday, February 12, 2018

Quick Tip - Find the Battery Percentage Indicator on the iPhone X

Wondering what happened to the numeric battery percentage indicator on the iPhone X? The notch takes up enough space at the top of the screen that there was room only for the battery icon, which can be hard to interpret. If you want to see precisely what percentage of your battery is left, swipe down slightly from the top-right corner of the screen. That gives you the full set of indicators, including battery percentage. You don’t have to keep swiping down enough to show Control Center, but if you do, all the indicators will be there too.

Friday, February 9, 2018

Apple’s HomePod Smart Speaker Coming Soon

Thursday, February 8, 2018

Call 911! Or, with an iPhone or Apple Watch, Invoke Emergency SOS.

Have you ever needed to call emergency services from your or someone else’s iPhone? Almost by definition, such calls take place at stressful times, and it can be hard to remember what to do. Or, if you’ve been in an accident, it might be difficult or impossible to navigate the iPhone’s interface. In iOS 10.2 and watchOS 3 and later, Apple added the Emergency SOS feature to help.
Emergency SOS does three things:
  • First, it calls emergency services, using whatever number is appropriate for your location, which could be particularly helpful when you’re traveling abroad.
  • After your emergency call ends, Emergency SOS sends a text message with your location to emergency contacts that you’ve set up previously in the Health app.
  • Finally, it displays your Medical ID for first responders so they can be aware of things like medication allergies. You create your Medical ID in the Health app as well.
How you invoke Emergency SOS varies slightly depending on which Apple device you have:
  • On the iPhone 8, iPhone 8 Plus, and iPhone X, press and hold the side button and either of the Volume buttons until the Emergency SOS slider appears. Either drag the Emergency SOS slider to call emergency services right away, or just keep holding the side and Volume buttons. If you continue holding the buttons down, a countdown begins and an alert sounds; at the end of the countdown, the iPhone automatically places the call, a feature that Apple calls Auto Call.
  • On the iPhone 7 and earlier, rapidly press the side button five times to bring up the Emergency SOS slider. Drag the slider to call emergency services. (The quintuple-click can work on the new iPhones too; it’s an option in Settings > Emergency SOS.)
  • The Apple Watch acts like the newer iPhones. Press and hold the side button to bring up the Emergency SOS slider, or keep holding the side button to start a countdown after which the Apple Watch will call emergency services automatically via Auto Call. The Apple Watch must be connected to your iPhone, be on a known Wi-Fi network and have Wi-Fi Calling enabled, or be an Apple Watch Series 3 with a cellular plan.
It’s only human to want to test this in a non-emergency situation, and you can do so without actually placing the call. On both the iPhone and the Apple Watch, there will be a red hangup button you can tap, followed by an End Call or Stop Calling button. Similarly, you can cancel notifications of your emergency contacts.
You’ll also want to stop calls if they’re placed accidentally—we know someone who had his hand in his pocket in such a way as to press the Apple Watch’s side button long enough to start the call, and since he was in a noisy environment, he didn’t hear the alert or notice anything until the 911 service called his iPhone back.
To add emergency contacts—the people who you’d want notified if you were in an accident, for instance—follow these steps on your iPhone:
  1. Open the Health app, and tap the Medical ID button at the lower right.
  2. Tap Edit, and then scroll down to Emergency Contacts.
  3. Tap the green + button to add a contact.
  4. Select the desired person, and when prompted, pick their relationship to you.
  5. Tap Done to save your changes.
Two notes. First, if you’re concerned about activating the Auto Call feature inadvertently, you can turn it off in Settings > Emergency SOS on the iPhone, and for the Apple Watch in the Watch app, in My Watch > General > Emergency SOS.
Second, bringing up the screen with the Emergency SOS slider also automatically disables Touch ID and Face ID, such that you must enter your passcode to re-enable them.
I sincerely hope that you never have to use Emergency SOS, but that if you do, it proves to be a faster and more effective way of contacting emergency services.


Wednesday, February 7, 2018

Ransomware: Should You Be Worried, and What Protective Steps Should You Take?

Malware makes headlines regularly these days, and although Macs are targeted far less than Windows PCs, Mac users still need to remain vigilant. A particularly serious type of malware is called “ransomware” because once it infects your computer, it encrypts all your files and holds them for ransom.
Luckily, despite the virulence of ransomware in the Windows world, where there have been major infections of CryptoWall and WannaCry, only a few pieces of ransomware have been directed at Mac users:
  • The first, called FileCoder, was discovered in 2014. When security researchers looked into its code, they discovered that it was incomplete, and posed no threat at the time.
  • The first fully functional ransomware for the Mac appeared in 2016, a bit of nastiness called KeRanger. It hid inside an infected version of the open source Transmission BitTorrent client and was properly signed so it could circumvent Apple’s Gatekeeper protections. As many as 6500 people may have been infected by KeRanger before Apple revoked the relevant certificate and updated macOS’s XProtect anti-malware technology to block it.
  • In 2017, researchers discovered another piece of ransomware, called Patcher, which purported to help users download pirated copies of Adobe Premiere and Microsoft Office 2016. According to its Bitcoin wallet, no one had paid the ransom, which was good, since it had no way of decrypting the files it had encrypted.
Realistically, don’t worry too much. But it’s likely that malware authors will unleash additional Mac ransomware packages in the future, so I encourage you to be aware, informed, and prepared.
First, let me explain a few key terms and technologies. Apple’s Gatekeeper technology protects your Mac from malware by letting you launch only apps downloaded from the Mac App Store, or those that are signed by developers who have a Developer ID from Apple. Since malware won’t come from legitimate developers (and Apple can revoke stolen signatures), Gatekeeper protects you from most malware. However, you can override Gatekeeper’s protections to run an unsigned app. Do this only for apps from trusted developers. Even if you never override Gatekeeper, be careful what you download.
Apple’s XProtect technology takes a more focused approach, checking every new app against a relatively short list of known malware and preventing apps on that list from launching. Make sure to leave the “Install system data files and security updates” checkbox selected in System Preferences > App Store. That ensures that you’ll get XProtect updates. Similarly, install macOS updates and security updates soon after they’re released to make sure you’re protected against newly discovered vulnerabilities that malware could exploit.
Also consider running anti-malware software like Malwarebytes or Mac Internet Security X9. That’s not absolutely necessary, like anti-malware solutions are for Windows, but doing so can provide peace of mind, particularly if you regularly visit sketchy parts of the Internet or download dodgy software.
Although regular backups with Time Machine are usually helpful, KeRanger tried to encrypt Time Machine backup files to prevent users from recovering their data that way. Similarly, a bootable duplicate updated automatically by SuperDuper or Carbon Copy Cloner could end up replacing good files with encrypted ones from a ransomware-infected Mac, or a future piece of ransomware could try to encrypt other mounted backup disks as well.
The best protection against ransomware is a versioned backup made to a destination that can be accessed only through the backup app, such as an Internet backup service like Backblaze (home and business), CrashPlan (business only) or my favorite, Carbonite (home and business). The beauty of such backups is that you can restore files from before the ransomware encrypted them. Of course, that assumes you’ve been backing up all along.
If you ever are infected with ransomware, don’t panic, and don’t pay the ransom right away. Contact me so I can help you work through your options, which might entail restoring from a backup or bringing files back from older cloud storage versions. There are even descriptors for some Windows ransomware packages, and such utilities might appear for hypothetical Mac ransomware as well.
To reiterate, there’s no reason to worry too much about ransomware on the Mac, but letting Apple’s XProtect keep itself up to date, staying current with macOS updates, and using an Internet backup service will likely protect you from what may come.