This will be a multi part post. Rather than post one huge gigantic tip, trying to cover all the reasons, tips, and solutions at once, I thought I would break this into a multi-part tip, and cover each reason/solution a bit more in depth. This will be a 3-4 part series, and when its finished, you should have a plethora of information that will assist you in reducing your "Beach Ball of Death". Check back every couple of days for the next installment of this series.
 Part 2 - System Maintenance
This series of posts is intended to give the information you need to reduce and attempt to minimize the dreaded "Beach ball of death". In part one we touched on the need to have ample RAM for your machine. In general I recommend a minimum of 1GB of RAM for the light user ( Email, web, occasional text document ) and 4GB minimum for graphic artists and video/sound editors. You should determine what your level of usage is and increase your RAM accordingly . Obviously some laptops cannot reach the 4GB minimum. If your doing professional graphic arts or professional video/sound editing then you probably should be using a tower G5 or Mac Pro anyway.
In this installment we are going to touch base on System Maintenance. Something alot of people forget about. I have met many users that just think the computer should operate perfectly all the time. If it doesnt, somethings got to be wrong with the hardware, or they got a lemon. Alot of these issues can be attributed to corrupt data, preferences or permissions due to lack of system maintenance.
Just like your car needs a tune up and oil change on occasion to keep it running in tip top condition, so does your computer. Failure to perform these basic maintenance operations, your computer can slow to crawl, freeze up and even go so far as to fail to boot normally. Simple, regularly performed maintenance can keep your machine running its best.
Many users and technicians have their favorite tools, or own techniques for performing this maintenance. I am going to give you some tools to help you perform your own general maintenance.
The first basic operation would defiantly be Disc Utility., Repair Permissions. Every file and folder on your hard drive has permissions associated with it, that tell the system who can read, write, modify, open, execute and otherwise manipulate the file/folder in question. Sometimes these permissions can get out of whack and need to be repaired. Corrupt and incorrect permissions can lead to excessive beachballing, inability to open certain files or save to folders and more. Fortunately Apple has provided us a way of correcting system and other Apple program permissions. The application "Disc Utility" is typically located in your Applications/Utilities folder (Unless someone moved it) and can also be found on your OS or system restore CD/DVD's (More on that in the next part of this series - Checking Your Hardware) This is the first thing you should run when experiencing excessive beachballing.
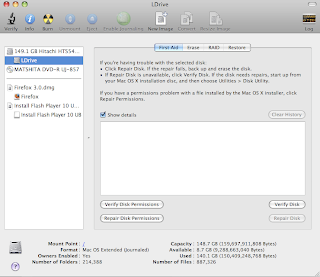
When you launch Disc Utility you should see a screen similar to the following:

Highlight your hard drive on the left pane and click the "Repair Permissions" button. Disc Utility will then scan your drive, and repair permissions as needed. Its that easy. The process can take anywhere from a minute or two, up to 15-25 minutes for very large drives or drives with severe permission problems.
There are several programs on the market that perform this function and more. One of my favorites is Onyx. Onyx is widely known and been on the market for a number of years. Best thing about Onyx is its free! One of the problems with Onyx however, is the fact that it can be quite confusing to a general user, and misuse of its other tools can actually lead to problems. If you follow these directions, and do not dabble in the other functions of Onyx, you can successfully utilize it to assist in reducing the dreaded beachball. Onyx can be downloaded here --> LINK - Make sure you download the correct version for your system.

One of the first things Onyx does is check your drive itself. It will perform a startup test on the drive before it lets you use its functions. No good can come of running Onyx on a damaged drive. This drive check can take some time and may appear to be frozen. Dont be fooled however. Let the check run and eventually it will finish. I have seen the check take 5 minutes of more on some drives. If the drive checks out, the next thing you should see is an authentication box. Onyx requires administrator rights in order to perform its functions. You cannot run Onyx under a standard user. The user must be an administrator of the system in order to work. Simply type in the password and off you go.
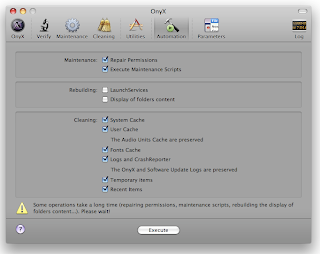
On the navigation bar you will see a number of icons. The one we want is "Automation". If your in the Automation tab, your window should look similar to this:

As you can see, Onyx too repairs permissions but also many others. If you look at the screenshot provided, it displays the services I recommend running for dealing with the beachball problem. Repair Permissions, Execute Maintenance Scripts, User Cache and Temporary Items at the bare minimum. When your ready just click the "Execute" button and let Onyx do its thing.
This should help you with some general maintenance functions that you can perform to keep your Mac happy and beachball free (or at the very least reduce it to a manageable level) Check back in a couple days for part 3 of this series - Checking your Hardware.
 Part 2 - System Maintenance
This series of posts is intended to give the information you need to reduce and attempt to minimize the dreaded "Beach ball of death". In part one we touched on the need to have ample RAM for your machine. In general I recommend a minimum of 1GB of RAM for the light user ( Email, web, occasional text document ) and 4GB minimum for graphic artists and video/sound editors. You should determine what your level of usage is and increase your RAM accordingly . Obviously some laptops cannot reach the 4GB minimum. If your doing professional graphic arts or professional video/sound editing then you probably should be using a tower G5 or Mac Pro anyway.
In this installment we are going to touch base on System Maintenance. Something alot of people forget about. I have met many users that just think the computer should operate perfectly all the time. If it doesnt, somethings got to be wrong with the hardware, or they got a lemon. Alot of these issues can be attributed to corrupt data, preferences or permissions due to lack of system maintenance.
Just like your car needs a tune up and oil change on occasion to keep it running in tip top condition, so does your computer. Failure to perform these basic maintenance operations, your computer can slow to crawl, freeze up and even go so far as to fail to boot normally. Simple, regularly performed maintenance can keep your machine running its best.
Many users and technicians have their favorite tools, or own techniques for performing this maintenance. I am going to give you some tools to help you perform your own general maintenance.
The first basic operation would defiantly be Disc Utility., Repair Permissions. Every file and folder on your hard drive has permissions associated with it, that tell the system who can read, write, modify, open, execute and otherwise manipulate the file/folder in question. Sometimes these permissions can get out of whack and need to be repaired. Corrupt and incorrect permissions can lead to excessive beachballing, inability to open certain files or save to folders and more. Fortunately Apple has provided us a way of correcting system and other Apple program permissions. The application "Disc Utility" is typically located in your Applications/Utilities folder (Unless someone moved it) and can also be found on your OS or system restore CD/DVD's (More on that in the next part of this series - Checking Your Hardware) This is the first thing you should run when experiencing excessive beachballing.
When you launch Disc Utility you should see a screen similar to the following:

Highlight your hard drive on the left pane and click the "Repair Permissions" button. Disc Utility will then scan your drive, and repair permissions as needed. Its that easy. The process can take anywhere from a minute or two, up to 15-25 minutes for very large drives or drives with severe permission problems.
There are several programs on the market that perform this function and more. One of my favorites is Onyx. Onyx is widely known and been on the market for a number of years. Best thing about Onyx is its free! One of the problems with Onyx however, is the fact that it can be quite confusing to a general user, and misuse of its other tools can actually lead to problems. If you follow these directions, and do not dabble in the other functions of Onyx, you can successfully utilize it to assist in reducing the dreaded beachball. Onyx can be downloaded here --> LINK - Make sure you download the correct version for your system.

One of the first things Onyx does is check your drive itself. It will perform a startup test on the drive before it lets you use its functions. No good can come of running Onyx on a damaged drive. This drive check can take some time and may appear to be frozen. Dont be fooled however. Let the check run and eventually it will finish. I have seen the check take 5 minutes of more on some drives. If the drive checks out, the next thing you should see is an authentication box. Onyx requires administrator rights in order to perform its functions. You cannot run Onyx under a standard user. The user must be an administrator of the system in order to work. Simply type in the password and off you go.
On the navigation bar you will see a number of icons. The one we want is "Automation". If your in the Automation tab, your window should look similar to this:

As you can see, Onyx too repairs permissions but also many others. If you look at the screenshot provided, it displays the services I recommend running for dealing with the beachball problem. Repair Permissions, Execute Maintenance Scripts, User Cache and Temporary Items at the bare minimum. When your ready just click the "Execute" button and let Onyx do its thing.
This should help you with some general maintenance functions that you can perform to keep your Mac happy and beachball free (or at the very least reduce it to a manageable level) Check back in a couple days for part 3 of this series - Checking your Hardware.


