Friday, March 16, 2018

Quick Tip - Don’t Use These Products to Clean Your iPhone (Or You’ll Wish You Hadn’t)

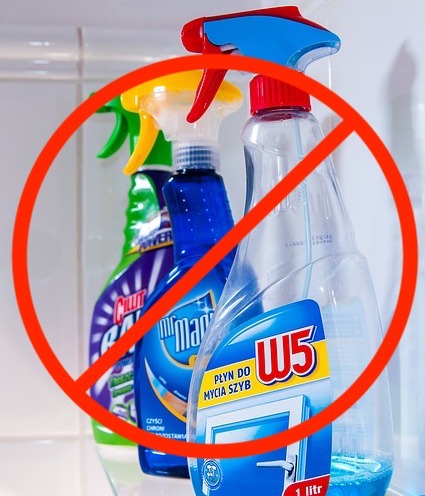
All iPhones pick up fingerprints, and it’s all too easy to get your iPhone dirty with ink, lotion, makeup, dirt, food, and oil. If you’re faced with an iPhone that needs cleaning, resist the urge to spray it with window cleaner, rubbing alcohol, or ammonia, or, even worse, to scrub it with baking soda or Borax. 

That’s because all iPhones have oleophobic—oil repellent—coatings on their glass surfaces that make it easy to wipe off fingerprints. You don’t want to remove that coating any faster than it will wear off normally, and cleaning products will strip it quickly. Instead, Apple recommends a soft, lint-free cloth such as you would use for glasses or camera lenses. You can even save over $18 and get a 6 pack from Amazon for less than $6 here.

By the way, even though the iPhone 7 and later have some level of dust and water resistance, it’s important to avoid getting moisture in the openings—most of the time, a lens cloth should be all you need. 

Wednesday, March 14, 2018

Block Telemarketing Calls Automatically on Your iPhone

Junk calls are one of the great annoyances of the modern world. You’re minding your own business when your iPhone vibrates in your pocket. You pull it out, curious as to who’s calling, but don’t recognize the number. You may notice that it’s in the same exchange as your phone number, suggesting that it’s a neighbor. But no. When you answer, it’s “Heather,” a pre-recorded voice wanting to sign you up for a resort vacation, give your business a loan, or help with your credit card debt. Angered by the intrusion, you tap the red hangup button, wishing you had an old-style telephone receiver to slam down.
There’s no way to retaliate against these scum-sucking bottom feeders, and the best option is to hang up immediately. For quite a few versions of iOS, you’ve been able to block a caller manually—just tap the i button next to the call in the Recents screen in the Phone app, scroll to the bottom, and tap Block This Caller. But that’s seldom worth doing since telemarketers often spoof the numbers they call from, so it’s unlikely you’d get a second call from the same number.
Instead, I recommend taking advantage of a feature Apple introduced in iOS 10 that enables apps to block calls for you. Quite a few of these apps have appeared, with some of the best reviewed being Nomoro, HiyaMr. NumberRoboKiller, and Truecaller. Hiya and Mr. Number are both free and from the same company—Mr. Number is a stripped-down version of Hiya—whereas RoboKiller and Truecaller require an in-app purchase for a monthly membership. I, personally use Nomorobo, and have for both my home phone, and IOS phone. If your on AT&T you can also get "Call Protect" which is free and actually an AT&T branded version of Hiya.
In general, these apps work by receiving caller ID information from iOS and comparing it against both your local contacts (to identify good calls) and a constantly updated database of numbers used by telemarketers (bad calls). Calls from your contacts ring through normally, as do calls from phone numbers not in either of those sets. That’s key, since your doctor might call back from a secondary number, or your kid’s new teacher might call to talk about an upcoming snack day. But if you receive a call from a number known to be used by a telemarketer, the app can either identify it on the incoming call screen or block it automatically, sending it to voicemail.
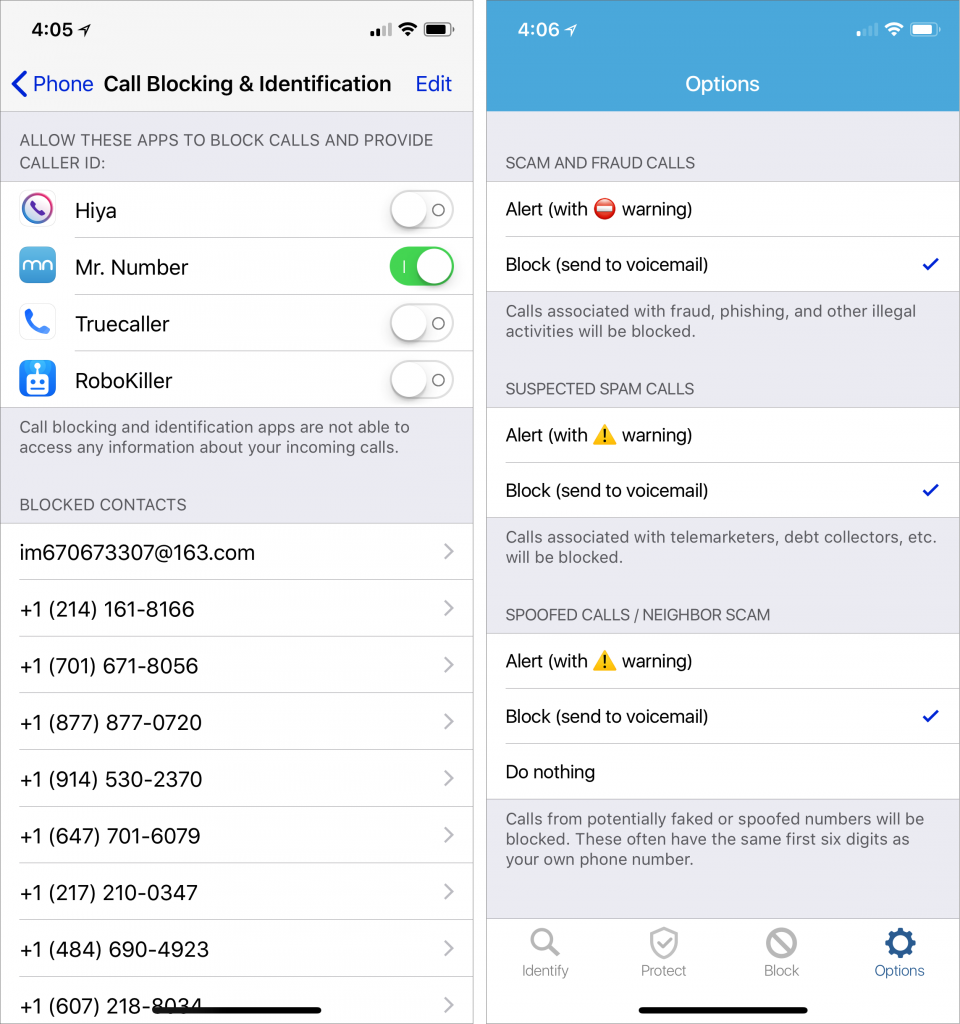
To enable one of these apps, after you download it from the App Store, go to Settings > Phone > Call Blocking & Identification and enable its switch. You’ll probably also have to do some setup in the app itself, providing your phone number, perhaps creating an account, and determining what should happen with different calls (Mr. Number is shown below, right).
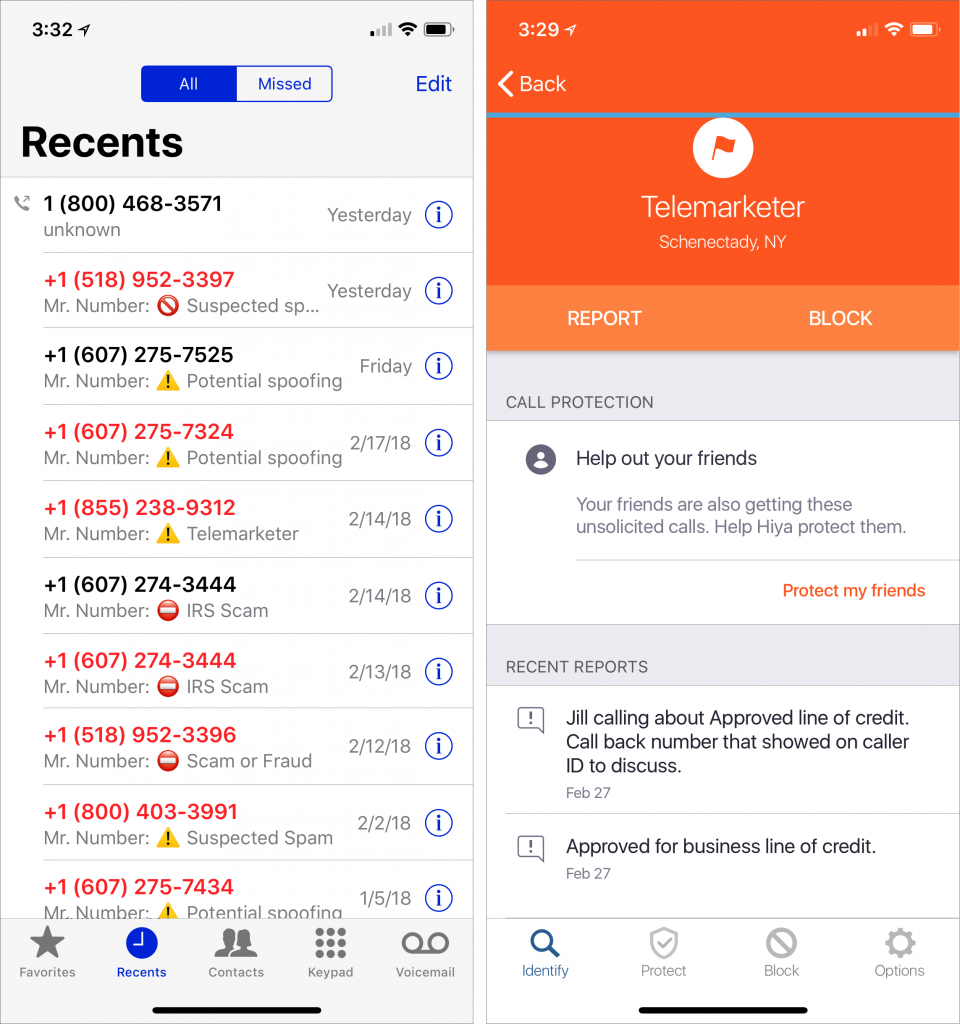
With Hiya and Mr. Number, you can copy a number from the Phone app’s Recents screen (tap the i button for a call, and then press the number to access a Copy button) and then look it up to learn more and see comments other users have made. And if you get a telemarketing call from a number that the app doesn’t recognize, you can submit it to protect others.
RoboKiller claims that it wastes the telemarketers’ time by playing pre-recorded “Answer Bots” conversations to keep them on the line, preventing them from calling more people.
Details vary by app, but the only real downside to using one of these apps is that it may ask for information about you or your contacts to improve its services. If that feels intrusive, investigate one of the apps that requires a membership, like RoboKiller, to see if it better answers your concerns.
In the end, it comes down to how many telemarketing calls you receive each day, week, or month. If you’re lucky and get only one or two per month, it’s probably not worth messing with a call blocking app—maybe just send unidentified (and unexpected) calls to voicemail. But if you’re interrupted by multiple junk calls per day or week, give one of these apps a try and let it reduce the onslaught.


Sunday, March 11, 2018

Quick Tip - Stop Paying Too Much for a Family’s iCloud Drive Storage

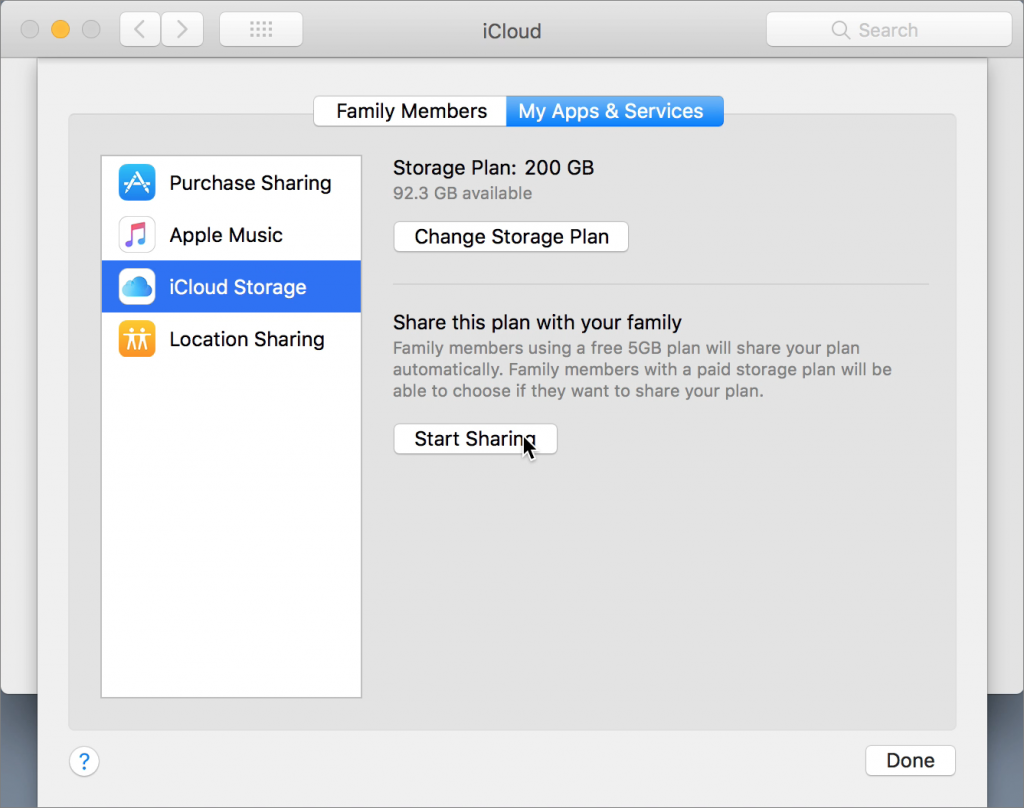
Apple gives iCloud users 5 GB of free storage, but that fills up fast with iCloud Photo Library, iOS backups, iBooks, and more. Until iOS 11 and macOS 10.13 High Sierra, each person in a family had to buy extra iCloud space separately. Happily, Apple has now made it so everyone in a Family Sharing group can share a single 200 GB ($2.99 per month) or 2 TB ($9.99 per month) plan. 

The family organizer can start sharing storage in High Sierra or iOS 11 as follows: on the Mac, go to System Preferences > iCloud > Manage Family > My Apps & Services > iCloud Storage; in iOS, go to Settings > Your Name > Family Sharing > iCloud Storage. Any other family member can then cancel their paid plan and join the Family Sharing plan using their iCloud Storage screen. Its a great money saving tip!

Tuesday, March 6, 2018

10 Things You Need to Know about Apple’s New HomePod Speaker

After months of anticipation, Apple’s new HomePod smart speaker finally shipped in mid-February. Reviews of its audio quality have been positive, and for the most part, it works both as advertised and as you’d expect. However, there were some surprises, most good but some bad. Whether you have a HomePod on your credenza (which may be a bad spot for it!) or you’re still deciding if you want to buy one, here are ten things you should know:
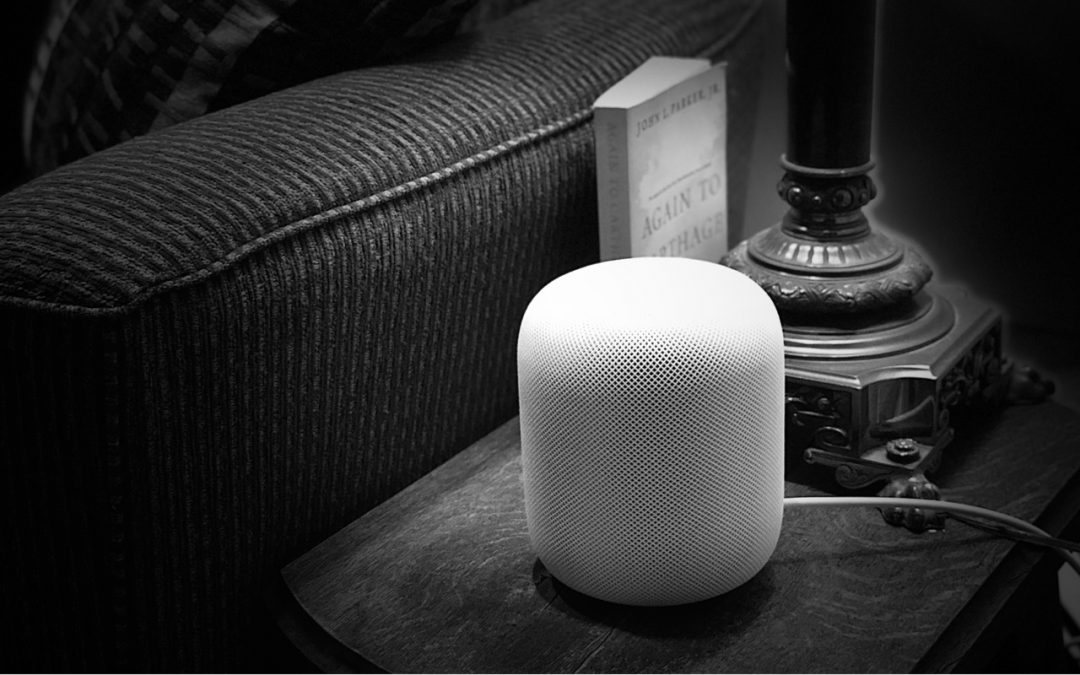
  1. Furniture rings. Let’s get this one out of the way. The HomePod can leave rings on oil-finished wood furniture because the silicone base can react with certain wooden surfaces. That has to be embarrassing for a company that prides itself on materials expertise like Apple. The solution is easy—just put something under it.
  2. Single user. Anyone in the room can give Siri commands, but when it comes to account-based connections, the HomePod is a single-user device. So if you set it up, which is astonishingly easy, it will connect to your Apple Music account, your iMessage account, your iCloud account for Reminders, and so on. That’s fine for you, but your family members won’t be able to access their Apple Music playlists, for instance.
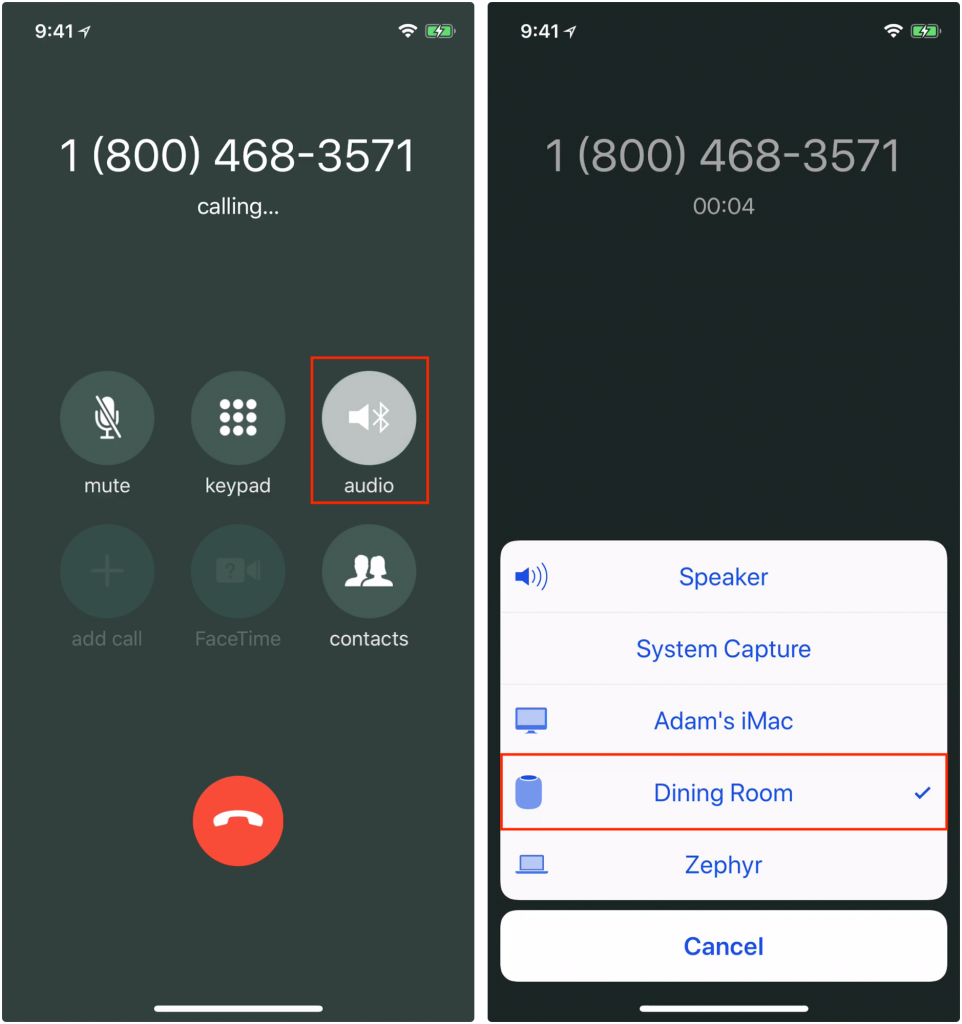
  3. Speakerphone. The HomePod may be the best speakerphone you’ve ever used. Alas, you can’t initiate a call on it, but once you start one on your iPhone, you can transfer the call by tapping the new Audio button that replaced the Speaker button in iOS 11.2.5 and selecting the HomePod.

  4. Apple Music. The HomePod can act as an AirPlay speaker, and can thus play audio from your other Apple devices. But when you control it via Siri, the music must come from Apple Music, your iTunes Store purchases, or be matched in your iCloud Music Library. To send Mac audio from apps other than iTunes to the HomePod, get Rogue Amoeba’s Airfoil.
  5. Audio power. It may be small, but the HomePod has plenty of power. At 6 feet, we measured the sound output at 100% volume at 80 decibels, which is louder than is comfortable.
  6. Volume control. Speaking of volume, you control it by percentages, as in “Hey Siri, set the volume to 15 percent.” You can also tap the + and – buttons on the top of the HomePod to adjust the volume in 5% increments.
  7. Electrical usage. The HomePod may be turned on all the time—it has no power switch—but it uses very little electricity. In our testing, it used 2.5 to 3 watts when it was idle but has been used recently, and 4 to 7 watts when playing. Leave it alone in a quiet room for a while, and its power usage drops to 0 watts with just an occasional 1.5-watt spike.
  8. Good listener. The HomePod hears your commands remarkably well, even when it’s playing music at a high volume. You shouldn’t have to shout at it.
  9. Hey Siri. If you’re within earshot of a HomePod and want to give Siri a command on your iPhone or Apple Watch, don’t say “Hey Siri” right away. Instead, to use your iPhone, unlock it first. Or, to use your Apple Watch, raise your wrist. Apple has an explanation of how Hey Siri works with multiple devices.
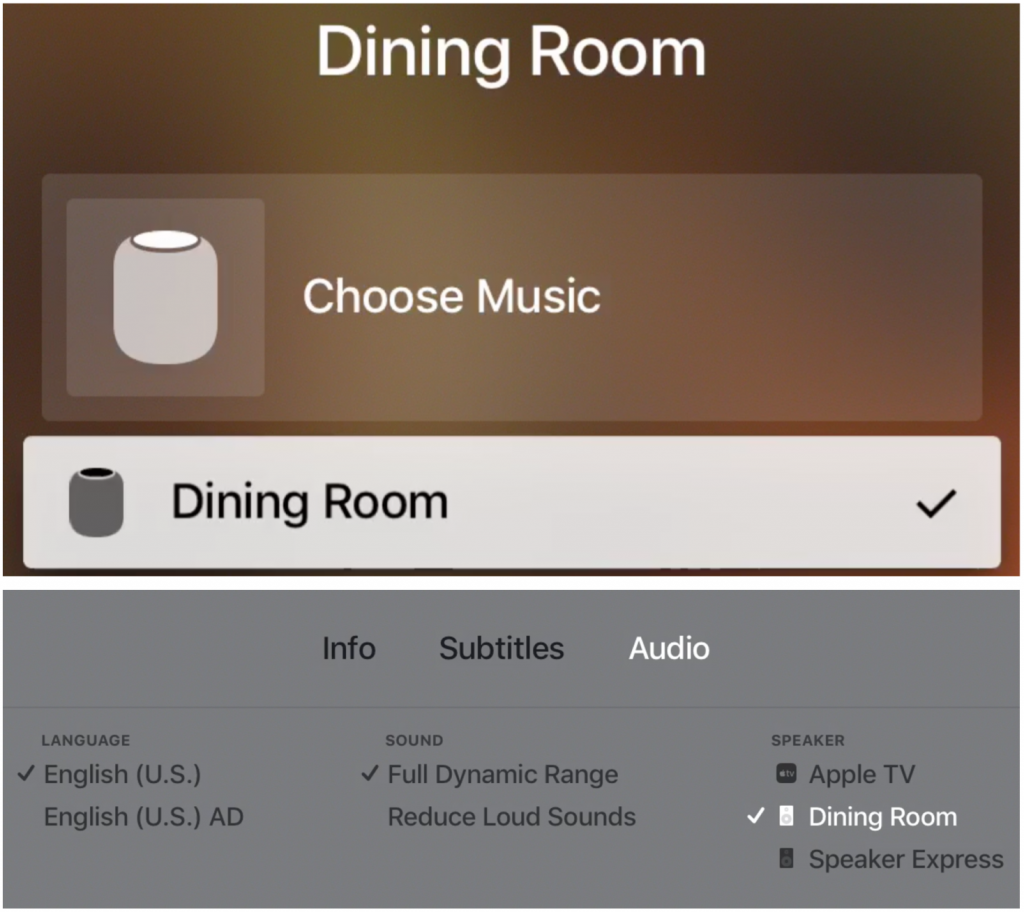
  10. Apple TV. You can play audio from your Apple TV through your HomePod. On the main screen of the Apple TV, press and hold the Play/Pause button on the Siri Remote, and then select the HomePod before playing a show. Or, while playing video, swipe down on the Siri Remote, swipe right to select Audio, and then select your HomePod in the Speaker list. 


    Once you’ve transferred audio to the HomePod, you can use Hey Siri commands to pause and play the Apple TV content, change volume, and even rewind and fast-forward by a certain amount of time (“Hey Siri, rewind 10 seconds”). However, other things that Siri on the Apple TV can do, like tell you who stars in a movie, work only when you press and hold the Siri button on the Siri Remote.
Much as the HomePod works well right now, it will improve in the coming year. Apple plans to release software updates that will enable two HomePods in the same room to provide true stereo sound, and that will let you control multiple HomePods simultaneously for multi-room audio.


Thursday, March 1, 2018

Warning - iCloud Photo Library Users: Do NOT Turn Off iCloud

File this warning under “unless it’s absolutely necessary.” If you use iCloud Photo Library on your Mac, don’t sign out from iCloud. Also, don’t deselect the iCloud Photo Library checkbox in either the Photos options of the iCloud pane of System Preferences or in the iCloud preferences in Photos itself. Why not? Because, when you re-enable iCloud or iCloud Photo Library, Photos will re-upload all your photos, which could take days. (It’s not really re-uploading all of them, but even just resyncing will take a long time.) 

Worse, if you don’t have enough space in iCloud for your entire Photos library again, you’ll have to upgrade to a larger plan temporarily, resync, and then downgrade to your previous plan. Apple will refund you the cost of the upgrade, but you’ll have to work with support to get reimbursed. Adam C Engst details the hell he experienced over at TidBITS.

Wednesday, February 28, 2018

Graphic Alphabet Soup: What Are Different Formats Good For?


When it comes to graphics on the Internet, it’s easy to feel as though you’re swimming for your life in a giant bowl of alphabet soup, surrounded by shouting acronyms: GIF! JPEG! PNG! TIFF! What do those names mean? Why does your camera spit out JPEGs? What’s the best format for a Web graphic? Grab onto a capital O and let’s get some answers.

First off, don’t worry about the acronyms, because expanding them doesn’t explain much. For example, JPEG stands for Joint Photographic Experts Group, which is the standards body that invented the JPEG format. Helpful? Not really. So think of them just as names, like Gabriela or Jayden. That said, it can be helpful to know how they’re pronounced:
  • GIF: Either “jif,” as in jiffy, or “gif” as in “gift” — it’s an interesting story.
  • JPEG: “jay-peg”
  • PNG: “ping”
  • TIFF: “tiff”
Here’s the lowdown on each.

GIF
The oldest of these formats, GIF was long the standard for computer-generated images. It worked well for graphics and logos with large areas of solid color, but less so for photos. Due in part to a patent licensing kerfuffle, GIF has been superseded by PNG in all ways but one.

GIF’s remaining use lies in flipbook-style animations, where each frame is a separate GIF image. Animated GIFs that run in short loops have become wildly popular on the Internet because they’re small and easy to embed in a Facebook or Twitter post, email message, or Web page. Numerous utilities exist for turning a short movie clip into an animated GIF; check out GIF Brewery on the Mac or Giphy Cam for an iPad or iPhone.


JPEG
The most common graphics format on the Internet, JPEG owes its popularity to being the default format for photos created by all digital cameras, including (until iOS 11) those in iPhones and iPads. JPEG works well for photos because it can compress file sizes significantly while barely affecting the image quality.

For instance, a 20 MB photo saved in JPEG format might end up as only 4 MB, with reductions in image quality that most people would never notice. Most graphics software lets you adjust a slider to specify different quality levels, and while the results vary by the photo, saving at a 75% quality level is usually a good compromise between quality and file size.

The downside of JPEG is that it achieves these minuscule file sizes by throwing away data in the file, which limits how it can be edited in the future. That’s why professional photographers generally shoot in what are called “raw” formats (which contain all the image data the camera sensor recorded when the shutter was opened). Raw files are huge but can be edited in ways that aren’t possible with a JPEG file. Once edits have been made, photographers save a copy as a JPEG for sharing or posting online.


PNG

Conceived as an improved, patent-free alternative to GIF, PNG is now the go-to format for online graphics that have large areas of solid color, such as buttons, logos, and screenshots That’s because PNG can compress such images well without introducing fuzziness, as can happen with JPEG. Similarly, you can edit PNG images repeatedly without hurting image quality.

In another contrast with JPEG, PNG supports transparency, which means you can define one color in an image as “transparent” rather than an actual color. When the image is displayed on a Web page, the transparent pixels are rendered in whatever the background color is. That’s tremendously handy for creating images that seem to float over the background.

Don’t use PNG for photos, since a photographic image saved in PNG format will be much larger than the corresponding JPEG.

TIFF
Like PNG, TIFF files can be compressed without losing any data. Because of this, TIFF is used extensively for archiving original photos instead of JPEG; TIFF files may be much larger, but that’s acceptable when it comes to preserving originals from which you could later make edited copies.
TIFF also boasts some additional color-related features that PNG lacks, making TIFF useful in the print world—if you were to write a book that was going to be printed professionally, the publisher might ask for any photos or other illustrations in TIFF format. Useful as TIFF can be, for most people, most of the time, JPEG and PNG are all you need.

Back and Forth

Nearly any graphics program can open images in these formats and convert to the other formats, but look no further than the Preview app from Apple on your Mac for basic image conversion features. For more info about using Preview, check out Take Control of Preview, by Adam Engst and Josh Centers.

Now that you know the basics of the Mac’s most important graphics formats, you’re ready to put your best foot forward whenever you need to pick a file format for your images.

One last thing! You might start hearing about a new format that iOS 11 and macOS 10.13 High Sierra introduced this year: HEIF, or High Efficiency Image File Format (we don’t know what happened to the extra F either). HEIF provides tight compression, transparency support, animations, and much more. But you probably won’t interact with HEIF files, since Apple plans to use HEIF only behind the scenes. Instead, when you save or share an image, the operating system will automatically convert it to one of the more standard formats.