Monday, April 24, 2017

Mute Audio-playing Tabs in Safari


Do Web sites that auto-play ads or videos drive you crazy? Especially when you reopen Safari and several of them in remembered tabs start playing simultaneously? Since OS X 10.11 El Capitan, Safari can put an end to that cacophony on your Mac. Whenever audio is playing in a tab, an audio icon appears next to the name of the tab and at the right of Safari’s Smart Search field. Click either one to mute the tab. If you’ve ended up with multiple tabs playing, you can mute all those except the current tab by Option-clicking either of those audio icons. And, finally, click and hold the audio icon in the Smart Search field for a menu with Mute and Unmute commands, and a list of all tabs that contain audio.


Thursday, April 20, 2017

Use Your iPhone as a Personal Wi-Fi Hotspot for Your Mac or iPad


You’re on a trip, accompanied by your trusty iPhone and MacBook Air. Suddenly there’s an emergency at work, and you need to get online with your Mac. You can pick up a cell signal with the iPhone, but there’s no Wi-Fi to be found—what do you do?

Never fear, since you can use your iPhone’s cellular data plan to create a personal Wi-Fi hotspot that lets your Mac access the Internet through your iPhone. Also called “tethering,” it’s fast, easy, and can be a life-saver when you just have to get online with a Mac (or a Wi-Fi–only iPad).

First, note that most, but not all, cellular carriers allow tethering on existing plans. For some, you might have to pay more for tethering. Regardless, any data consumed by your Mac while tethered will count against your data allowance and may generate overage fees. Carriers with “unlimited” data often limit the amount of data you can use via tethering or throttle your bandwidth to slower speeds if you use too much data.

Along those lines, if you use a file-sharing service like  Dropbox or Google Drive, or an Internet backup service like CrashPlan or Backblaze, turn them off before connecting. Particularly if they haven’t checked in for some time, those services can transfer a lot of data quickly, which could result in a hefty overage charge or awkward data throttling for the rest of the month.

With those warnings out of the way, follow these steps to turn on Personal Hotspot:
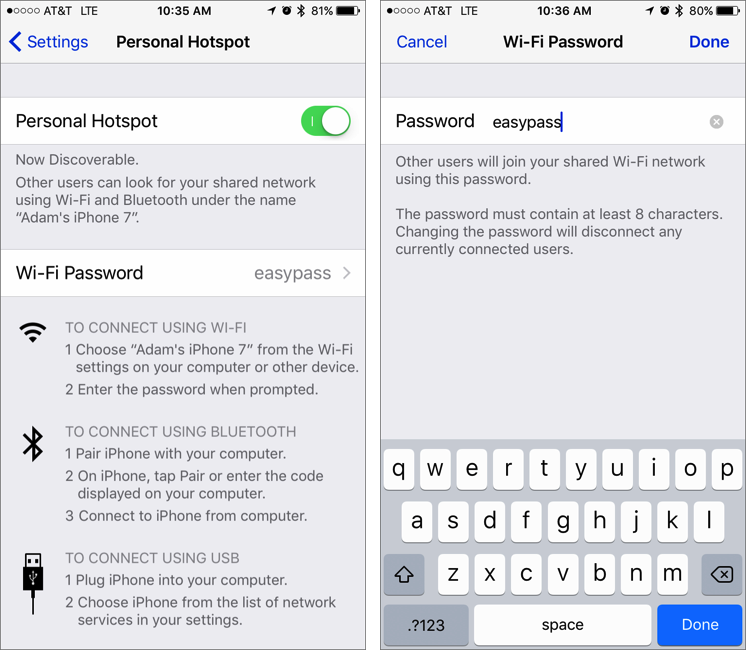
  1. On your iPhone, if you’ve never enabled the feature before, go to Settings > Cellular > Personal Hotspot. Once you’ve turned Personal Hotspot on once, it moves up a level so you can access it from Settings > Personal Hotspot.
  2. Tap Wi-Fi Password and enter a password that’s at least 8 characters long and easy to type. It doesn’t need to be super secure because you can keep Personal Hotspot turned off unless you’re using it. But you do want a password so random people nearby can’t connect and use your data.
  3. Once you’ve entered a password, enable the Personal Hotspot switch.
That’s it! The Personal Hotspot screen provides basic instructions for connecting to the iPhone via Wi-Fi, Bluetooth, and USB. Stick with Wi-Fi, since it’s the easiest and most reliable in most cases.
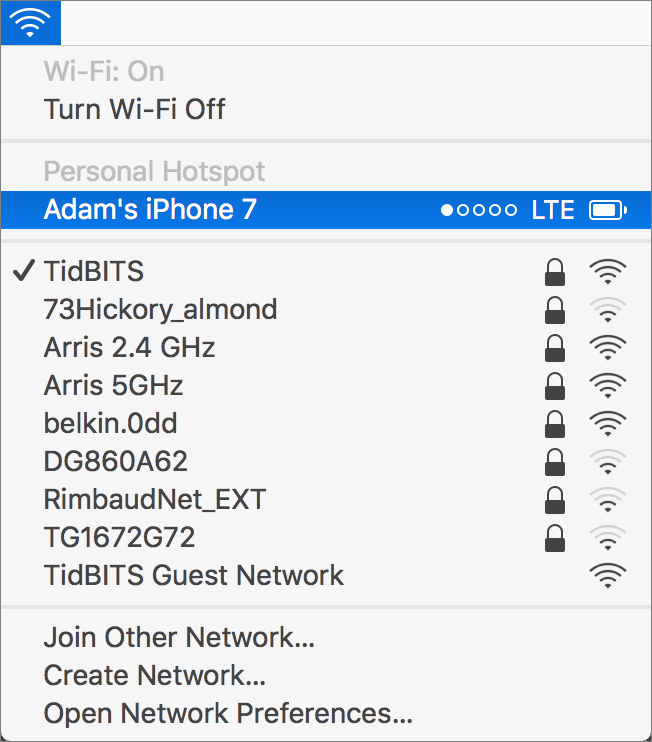
  1. On your Mac, click the Wi-Fi icon in the menu bar and choose your iPhone’s name.
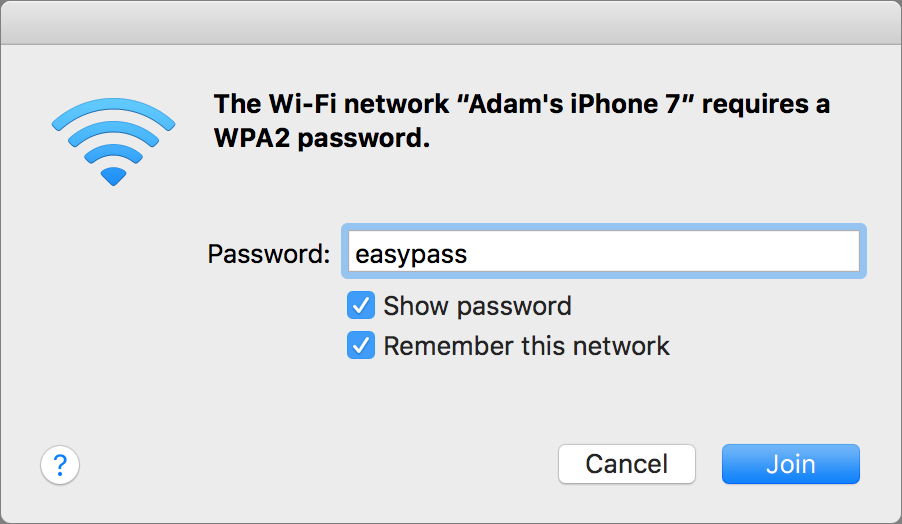
  2. Enter your password when prompted, making sure to select “Remember this network.” That way, you won’t have to enter your password the next time.

  3. The Mac then connects to your iPhone, showing a hotspot icon instead of the usual wave icon for the Wi-Fi menu.


Could it get any simpler? When you’re done, the safest thing to do, to ensure you don’t accidentally end up using too much of your data allowance, is to turn off the Personal Hotspot switch on your iPhone in Settings > Personal Hotspot. Your Mac will automatically disconnect.

Tuesday, April 18, 2017

Apple makes iLife and iWork apps free! - How to get older versions for your older devices!


Not only did Apple update the apps, but today changed the pricing for its iLife and iWork apps to free! This applies to both the iOS and MacOS versions of the apps.

iMovie for Mac was priced at $14.99 and GarageBand for Mac for $4.99. Pages, Keynote, and Numbers for Mac each were priced at $19.99 for new customers on older hardware. The apps came preinstalled on brand new computers, but if you purchased a used computer or wiped the hard drive without registering the apps before hand, you had to purchase the apps at full price to use them. That is a savings of over $49 for MacOS users.

For iOS users both iMovie and GarageBand were $4.99 each if you were using iOS devices not purchased in the last few years. Pages, Keynote, and Numbers for iOS each cost $9.99 for new customers on older hardware. That is a savings of over $39 for iOS users

The trick to getting the new free apps for your older devices is this. First download the new version of the app on your up to date current iOS or MacOS device. Then on your older device hop on over to the app store and search for the app (Or click the links below). When the older device goes to download the newer version of the app, you will be prompted to download the older appropriate version for your device.

Here are direct download links to all the apps:

MacOS

iOS


Monday, April 17, 2017

Find My Phone nabs Coachella thief holding over 100 stolen phones!


I can not stress enough, the value of locking your iPhone and turning on Find My Phone with iCloud. Not only can it stop a thief from getting into your phone, but from wiping it and reselling it too. Its also helped people get reunited with lost or stolen phones. Well this weekend, Find My Phone also helped nab a pickpocket thief with over 100 stolen phones in his backpack.

After noticing their phones missing, a number of concert goers activated "Find My Phone" to track their missing devices. The victims then worked with security to detain the individual that apparently was in possession of their phones. Once Indio Police apprehended Reinaldo De Jesus Henao, 36, of New York, he was found to have more than 100 stolen phones in his backpack. He was then booked suspicion of grand theft and possession of stolen property.

Many concert goers were reunited with their phones, but some were still unclaimed. If you know of anyone missing their phone from Coachella this last weekend, direct them to the Coachella online lost and found.

https://www.coachella.com/guidebook/lostandfound/

Friday, April 14, 2017

Build Travel Time into Your Calendar Alerts

Build Travel Time into Your Calendar Alerts

We’ve all done it. You swing into a meeting late, and as everyone looks up at you accusingly, you mutter, “Sorry. Traffic was terrible.” Maybe it was, but if you’d left at the right time for the traffic conditions, you could have arrived on time. Happily, the Calendar apps in both macOS and iOS can build travel time into event alerts so you can leave at the right time. There’s a bit of setup, but once you form the habit of attaching locations to your events, you’ll get a reputation for punctuality.

First, if you’re working on an iOS device, make sure Calendar can access your location by going to Settings > Privacy > Location Services > Calendar and selecting While Using the App.
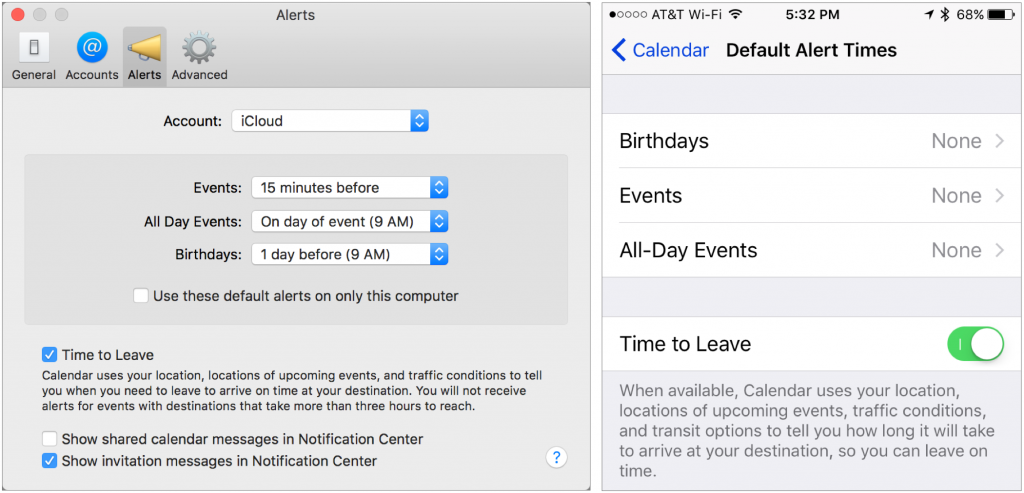
Next, you need to make sure the Time to Leave option is turned on. On the Mac, choose Calendar > Preferences > Alerts and select the Time to Leave checkbox. In iOS, go to Settings > Calendar > Default Alert Times and enable Time to Leave.


Now follow these steps:
  1. Create a new event, and enter a title and the start time. Travel time doesn’t work with all-day events.
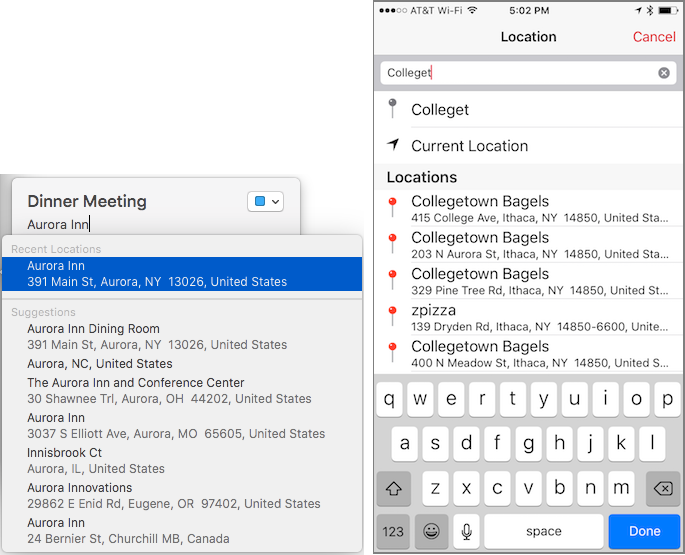
  2. In the Location field, start typing your destination’s name or address. You must be able to reach the destination within 3 hours to receive alerts about when to leave. 
    Calendar is smart about this, offering matches from your contacts, from recently visited places, and then from place names and addresses near you. So you could type a friend’s name and pick their card from Contacts, or a place name like “Tompkins County Public Library,” or even a specific address, like “806 State Street.”
    Calendar-PickLocation

  3. Regardless, after typing a partial name or address, you must pick one of Calendar’s suggestions so it knows the exact location of your destination.
  4. The next step is a bit different between the Mac and iOS:
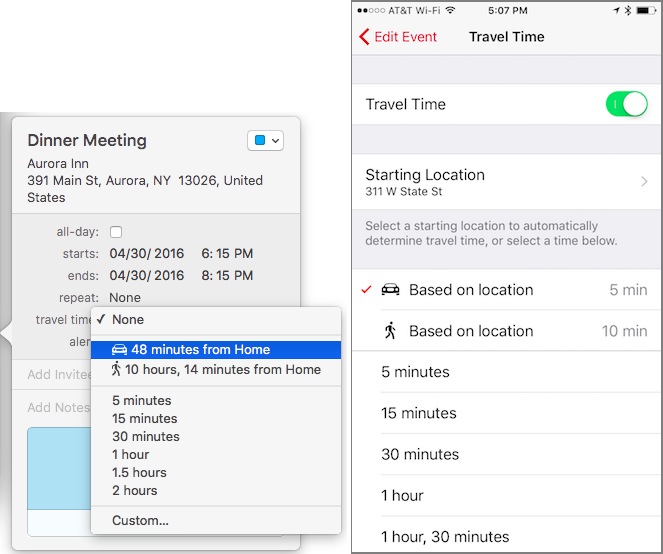
    • On the Mac, in the Travel Time pop-up menu (click once to reveal it), choose the automatically generated travel time for driving or walking, or, if your city is supported, public transit. You can’t change your starting location, which is based on the location of events in the previous 3 hours (it assumes you’re there!), your work address during work hours, your home address during off hours, or your computer’s location if all else fails. (The addresses come from the card in the Contacts app that is open when you choose Card > Make This My Card.)
    • In iOS, tap Travel Time and in the Travel Time screen, enable the Travel Time switch. A starting location may be picked for you, based on your current location and time of day, or based on a previous event, but you can always tap Starting Location and pick a different spot. Then tap a travel time based on location for walking, driving, or transit, which will reflect both your starting and ending locations, plus the traffic conditions.
      Calendar-SetTravelTime

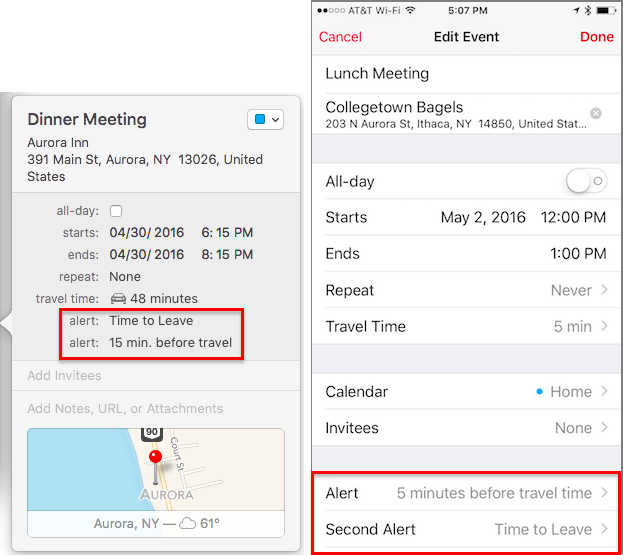
  5. Now it’s time to back out of the Travel Time screen and set alerts based on the travel time, which may take traffic conditions into account. By default, setting travel time creates an alert for Time to Leave, although you may wish to set a second alert that gives you a few minutes to get ready beforehand.
    Calendar-FinalEvent

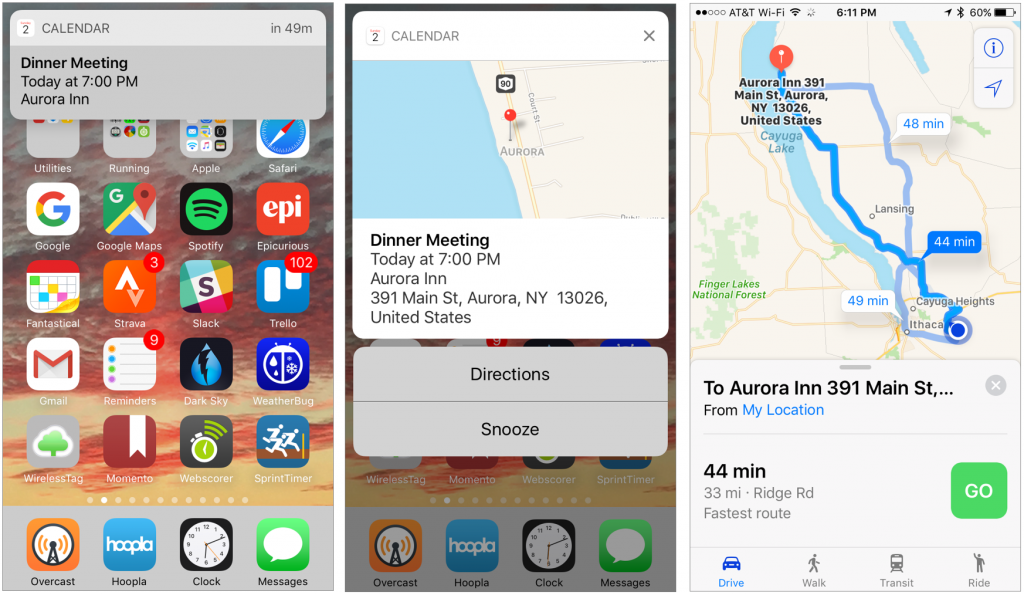
That’s it, but with one important bonus. When you see the alert on an iPhone 6s or later, you can 3D Touch the alert to open a preview that has a link for directions; tap Directions to view the travel directions in the Maps app. If your iPhone doesn’t support 3D Touch, tap the alert to open the event in Calendar, after which you can tap the map preview to open the location in Maps.


Once you get the hang of setting up the events, getting alerts that are sensitive to travel time and include directions is like living in the future!

Tuesday, April 11, 2017

Use Styles to Be Nice to Future You.

Use Styles to Be Nice to Future You

You’ve been asked to create a document for work. Perhaps it’s a report, a form, or even a brochure. And it doesn’t matter whether you’re using Microsoft Word, Adobe InDesign, Apple’s Pages, or even Google Docs. The best thing you can do to be nice to Future You is to take a few extra minutes to use named styles.

Future You? That’s right, imagine what’s going to happen next week, when your colleagues or your boss or your board of directors sees your document and says, “That’s great, but could you add this?” Or perhaps, “We love what you’ve written, but the text is too small—can you make it larger?” Sure, it’s no problem to make the change once, but what if there’s another change, and then another, and then another group wants something else. Before long, Future You has spent way too much time getting all that new text to fit, trying different fonts, and fussing with the document.

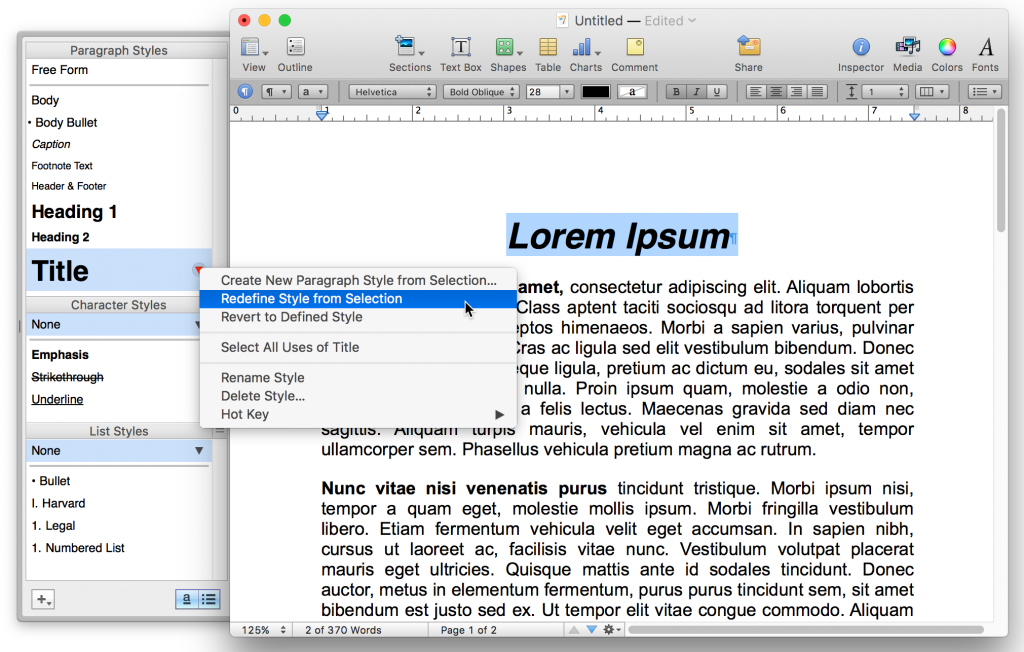
Here’s the solution: named styles. We’re not talking about simple text styles like bold and italic, but styles that define how different types of content are formatted, things like Heading, Subhead, and Body. Many apps include a full set of default named styles whose visual style you can modify, and if you want something specific, like Sidebar Caption, you can create your own named style for that.
The beauty of named styles is that once you’ve assigned the Subhead style to all the subheads in your document, for instance, you can tweak the look of all those subheads simultaneously with a change to the style. Plus, some apps like Word and Google Docs can even make an outline of your document if you use their heading styles.

Details vary by app, of course, but every notable word processor and page layout program supports named styles of various types. The most common are “paragraph styles,” which apply at the paragraph level and are good for adjusting details like the amount of white space after each paragraph. “Character styles” work down to the level of a single character, and are useful for things like warning text, so if your supervisor decides that should be not just bold but also red, you can change every instance in seconds.


Fancier programs even have “table styles” so you can format table headers and table bodies consistently throughout a long report, and layout programs may have “object styles” that let you specify that all the graphics should have a 3 point thick chartreuse line around them, and then change that to a 1 point black line after your graphic designer complains.

I'll make no bones about it—setting up styles takes a little time and thought when you’re getting started with a document, but that effort will pay off big time in the long run. Styles are your friend, and if you’re not using them now, you owe it to Future You to give them a try.