Thursday, February 8, 2018

Call 911! Or, with an iPhone or Apple Watch, Invoke Emergency SOS.

Have you ever needed to call emergency services from your or someone else’s iPhone? Almost by definition, such calls take place at stressful times, and it can be hard to remember what to do. Or, if you’ve been in an accident, it might be difficult or impossible to navigate the iPhone’s interface. In iOS 10.2 and watchOS 3 and later, Apple added the Emergency SOS feature to help.
Emergency SOS does three things:
  • First, it calls emergency services, using whatever number is appropriate for your location, which could be particularly helpful when you’re traveling abroad.
  • After your emergency call ends, Emergency SOS sends a text message with your location to emergency contacts that you’ve set up previously in the Health app.
  • Finally, it displays your Medical ID for first responders so they can be aware of things like medication allergies. You create your Medical ID in the Health app as well.
How you invoke Emergency SOS varies slightly depending on which Apple device you have:
  • On the iPhone 8, iPhone 8 Plus, and iPhone X, press and hold the side button and either of the Volume buttons until the Emergency SOS slider appears. Either drag the Emergency SOS slider to call emergency services right away, or just keep holding the side and Volume buttons. If you continue holding the buttons down, a countdown begins and an alert sounds; at the end of the countdown, the iPhone automatically places the call, a feature that Apple calls Auto Call.
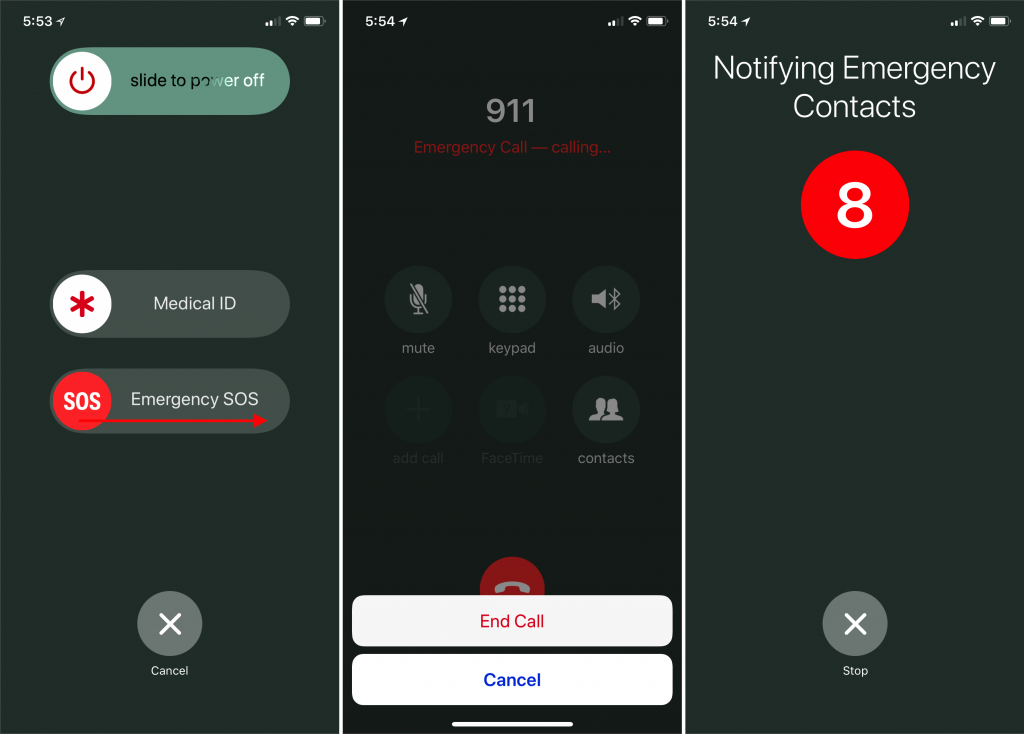
  • On the iPhone 7 and earlier, rapidly press the side button five times to bring up the Emergency SOS slider. Drag the slider to call emergency services. (The quintuple-click can work on the new iPhones too; it’s an option in Settings > Emergency SOS.)
  • The Apple Watch acts like the newer iPhones. Press and hold the side button to bring up the Emergency SOS slider, or keep holding the side button to start a countdown after which the Apple Watch will call emergency services automatically via Auto Call. The Apple Watch must be connected to your iPhone, be on a known Wi-Fi network and have Wi-Fi Calling enabled, or be an Apple Watch Series 3 with a cellular plan.
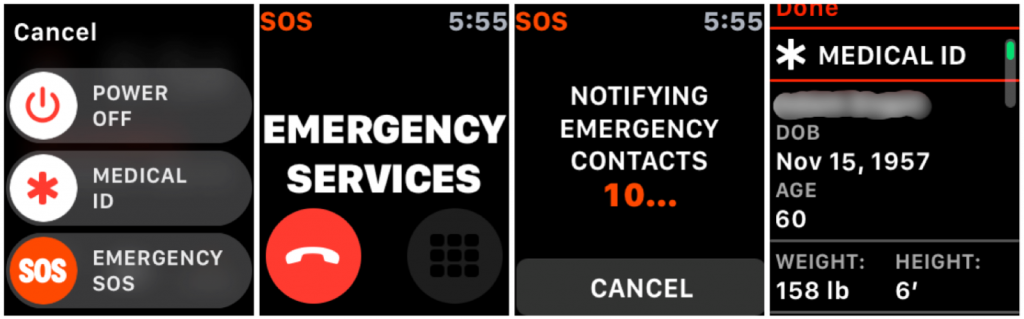
It’s only human to want to test this in a non-emergency situation, and you can do so without actually placing the call. On both the iPhone and the Apple Watch, there will be a red hangup button you can tap, followed by an End Call or Stop Calling button. Similarly, you can cancel notifications of your emergency contacts.
You’ll also want to stop calls if they’re placed accidentally—we know someone who had his hand in his pocket in such a way as to press the Apple Watch’s side button long enough to start the call, and since he was in a noisy environment, he didn’t hear the alert or notice anything until the 911 service called his iPhone back.
To add emergency contacts—the people who you’d want notified if you were in an accident, for instance—follow these steps on your iPhone:
  1. Open the Health app, and tap the Medical ID button at the lower right.
  2. Tap Edit, and then scroll down to Emergency Contacts.
  3. Tap the green + button to add a contact.
  4. Select the desired person, and when prompted, pick their relationship to you.
  5. Tap Done to save your changes.
Two notes. First, if you’re concerned about activating the Auto Call feature inadvertently, you can turn it off in Settings > Emergency SOS on the iPhone, and for the Apple Watch in the Watch app, in My Watch > General > Emergency SOS.
Second, bringing up the screen with the Emergency SOS slider also automatically disables Touch ID and Face ID, such that you must enter your passcode to re-enable them.
I sincerely hope that you never have to use Emergency SOS, but that if you do, it proves to be a faster and more effective way of contacting emergency services.
Wednesday, February 7, 2018

Ransomware: Should You Be Worried, and What Protective Steps Should You Take?

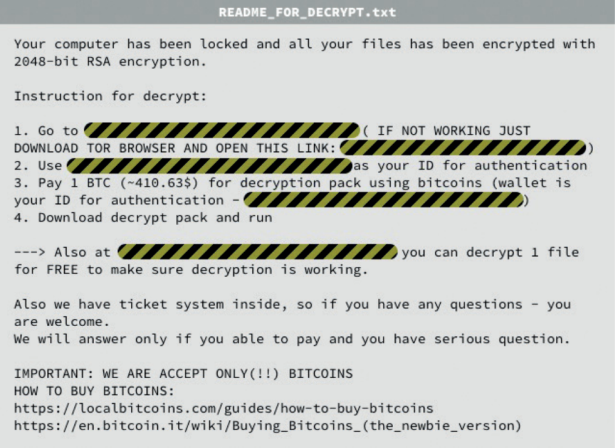
Malware makes headlines regularly these days, and although Macs are targeted far less than Windows PCs, Mac users still need to remain vigilant. A particularly serious type of malware is called “ransomware” because once it infects your computer, it encrypts all your files and holds them for ransom.
Luckily, despite the virulence of ransomware in the Windows world, where there have been major infections of CryptoWall and WannaCry, only a few pieces of ransomware have been directed at Mac users:
  • The first, called FileCoder, was discovered in 2014. When security researchers looked into its code, they discovered that it was incomplete, and posed no threat at the time.
  • The first fully functional ransomware for the Mac appeared in 2016, a bit of nastiness called KeRanger. It hid inside an infected version of the open source Transmission BitTorrent client and was properly signed so it could circumvent Apple’s Gatekeeper protections. As many as 6500 people may have been infected by KeRanger before Apple revoked the relevant certificate and updated macOS’s XProtect anti-malware technology to block it.
  • In 2017, researchers discovered another piece of ransomware, called Patcher, which purported to help users download pirated copies of Adobe Premiere and Microsoft Office 2016. According to its Bitcoin wallet, no one had paid the ransom, which was good, since it had no way of decrypting the files it had encrypted.
Realistically, don’t worry too much. But it’s likely that malware authors will unleash additional Mac ransomware packages in the future, so I encourage you to be aware, informed, and prepared.
First, let me explain a few key terms and technologies. Apple’s Gatekeeper technology protects your Mac from malware by letting you launch only apps downloaded from the Mac App Store, or those that are signed by developers who have a Developer ID from Apple. Since malware won’t come from legitimate developers (and Apple can revoke stolen signatures), Gatekeeper protects you from most malware. However, you can override Gatekeeper’s protections to run an unsigned app. Do this only for apps from trusted developers. Even if you never override Gatekeeper, be careful what you download.
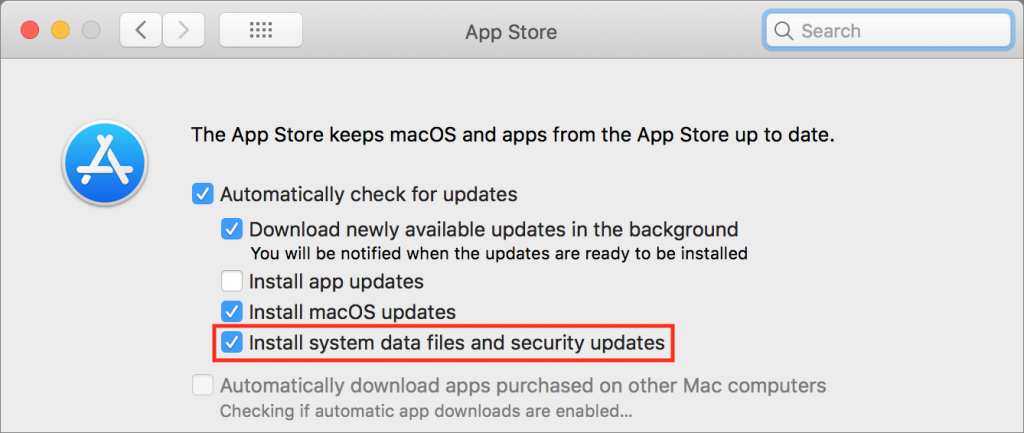
Apple’s XProtect technology takes a more focused approach, checking every new app against a relatively short list of known malware and preventing apps on that list from launching. Make sure to leave the “Install system data files and security updates” checkbox selected in System Preferences > App Store. That ensures that you’ll get XProtect updates. Similarly, install macOS updates and security updates soon after they’re released to make sure you’re protected against newly discovered vulnerabilities that malware could exploit.
Also consider running anti-malware software like Malwarebytes or Mac Internet Security X9. That’s not absolutely necessary, like anti-malware solutions are for Windows, but doing so can provide peace of mind, particularly if you regularly visit sketchy parts of the Internet or download dodgy software.
Although regular backups with Time Machine are usually helpful, KeRanger tried to encrypt Time Machine backup files to prevent users from recovering their data that way. Similarly, a bootable duplicate updated automatically by SuperDuper or Carbon Copy Cloner could end up replacing good files with encrypted ones from a ransomware-infected Mac, or a future piece of ransomware could try to encrypt other mounted backup disks as well.
The best protection against ransomware is a versioned backup made to a destination that can be accessed only through the backup app, such as an Internet backup service like Backblaze (home and business), CrashPlan (business only) or my favorite, Carbonite (home and business). The beauty of such backups is that you can restore files from before the ransomware encrypted them. Of course, that assumes you’ve been backing up all along.
If you ever are infected with ransomware, don’t panic, and don’t pay the ransom right away. Contact me so I can help you work through your options, which might entail restoring from a backup or bringing files back from older cloud storage versions. There are even descriptors for some Windows ransomware packages, and such utilities might appear for hypothetical Mac ransomware as well.
To reiterate, there’s no reason to worry too much about ransomware on the Mac, but letting Apple’s XProtect keep itself up to date, staying current with macOS updates, and using an Internet backup service will likely protect you from what may come.

Monday, January 22, 2018

Five Things You Should Never Do with Passwords (and Three You Should)

Passwords are the bane of our modern existence. Nearly anything you want to do, it seems, calls for a password. As the Internet’s reach extends beyond computers and into phones, TVs, appliances, and even toys, we have to enter passwords with increasing frequency and in ever more annoying ways.
To make dealing with passwords easier and more secure, everyone should use a password manager like 1Password (my personal favorite) or LastPass. Such apps generate random long passwords like kD*SSDcCl7^6FN*F, store those passwords securely, and automatically enter them for you when you need to log in to a Web site. They are essential in today’s world.
You’ll still need a few passwords you can remember and type manually—for instance, the master password for your password manager and your Apple ID password. Make sure those passwords are at least 12 characters, and we recommend going to at least 16 characters.
If you’re unsure of the best way to create a strong password, try taking the first letter of each word in a sentence you can remember, and also change a few words to digits. Then “Now is the time for all good men to come to the aid of the party!” becomes a password along the lines of Nitt4agm2c2ta0tp!. So that no eavesdroppers learn your password, avoid saying your sentence out loud whenever you enter it! Or, combine four or five unrelated dictionary words, like correct-horse-battery-staple, that add up to at least 28 characters. (Don’t use the examples in this paragraph!)
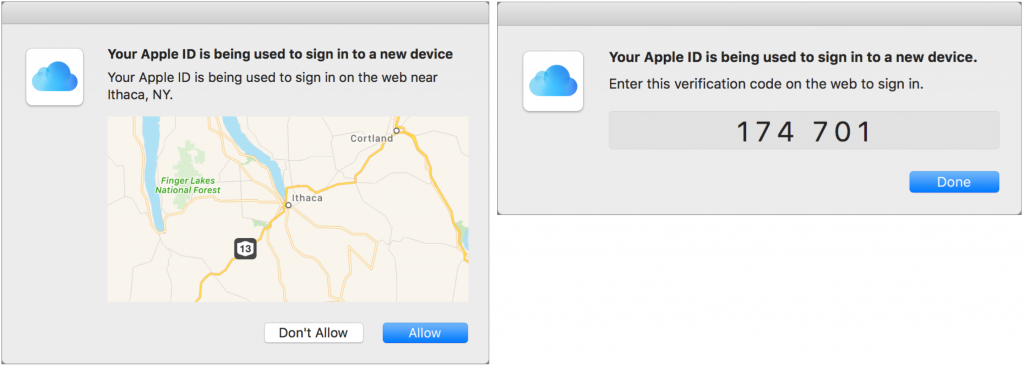
When possible, take advantage of two-factor authentication on sites like Apple, Google, Dropbox, Facebook, Twitter, and more. Accounts protected by two-factor authentication essentially require that you enter a second, time-expiring password as part of the login process. You’ll get that second password via text message, authenticator app, or other notification method when you log in.
But what I really want to talk about today is what you should not do with passwords. Follow these tips to avoid making mistakes that can undermine even the security provided by a password manager.
  1. Don’t use the same password twice. This is key, because if the bad guys get your password—no matter how strong—for one site, they’ll try it on other sites.
  2. Don’t share passwords with anyone you don’t trust completely. That’s especially true of passwords to accounts that contain sensitive information or that can be used to impersonate you, like email and social media. However, sometimes you have to share a password, such as to a club blog with multiple authors. In that case…
  3. Don’t send passwords to shared sites via email or text message. If someone hacks into your recipient’s email or steals their phone, the password could be compromised. Instead, use a site like One-Time Secret to share a link that shows the password only once, after which the recipient should put the password into their password manager.
  4. Don’t write your passwords on sticky notes. Yeah, it’s a cliché, but people still do it. Similarly, don’t put all your passwords in a text file on your computer. That’s what password managers are for—if someone steals your computer, they can’t break into your password manager, whereas they could open that text file easily.
  5. Don’t change passwords regularly if you don’t have to. As long as every site has a strong, unique password, changing a password is a waste of time, especially if doing so makes you write down the password or communicate it insecurely. If you do have to update a password regularly, a password manager makes the task much easier.
I realize that it’s tempting to take the easy road and share a password with a friend via email or write a particularly gnarly one on a sticky note. But today’s easy road leads directly to identity theft and is paved with insecure password habits. You might think no one would pay attention to little old you, but times have changed, and organized crime is interested in any Internet account that can be cracked.

Monday, January 15, 2018

How to Split Restaurant Checks with Apple Pay Cash

You’re out to lunch with tech-savvy friends, one of whom picks up the check and says, “Just send me your share via Apple Pay Cash.” Say what?
Apple Pay Cash is Apple’s new person-to-person payment service, designed to make it easy for individuals to send and receive money. It’s perfect for repaying a friend who buys concert tickets or a relative who picks up some groceries for you. Or rather, it’s perfect if your friends and relatives use iPhones with iOS 11.2 or later—for green-bubble Android acquaintances, you can instead rely on cross-platform services like VenmoCircle, and Square Cash. Here’s how to start using Apple Pay Cash.
First, if you haven’t yet enabled Apple Pay, go to Settings > Wallet & Apple Pay > Add Credit or Debit Card, and follow the prompts to add at least a debit card. You’ll also need two-factor authentication turned on in Settings > Your Name > Password & Security—regardless of Apple Pay, two-factor authentication is essential for security. With Apple Pay enabled, tap Settings > Wallet & Apple Pay > Apple Pay Cash and run through the setup process. You might also be asked to verify your identity after setup—it’s necessary to send or receive more than $500 in total.
When you’re done, you’ll end up with a new Apple Pay Cash card in the Wallet app. It’s a virtual card that stores money you receive and works like any other debit card for payments. If it doesn’t have enough money on it to cover a payment, you can choose any other debit or credit card you’ve added to Apple Pay. You can also add money to it or withdraw money to a linked bank account. You’ll want to use a debit card when adding money or paying beyond your balance with Apple Pay Cash, since then there is no transaction fee. A credit card incurs a 3% fee.
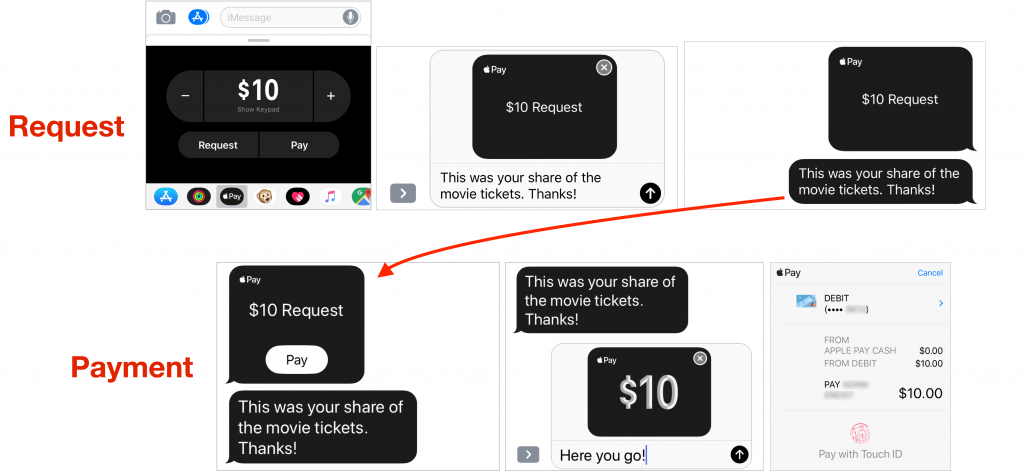
To send or request money via Apple Pay Cash, you use its Messages app, which is installed automatically. While in an iMessage thread (blue bubbles) with the person with whom you want to exchange money, make sure the app drawer is showing (tap the app button if necessary) and then tap the Apple Pay button in the drawer.
A panel appears with a dollar amount, + and – buttons, and buttons for Request and Pay. Use the + and – buttons to set the amount, or tap the dollar amount to show a keypad where you can enter an exact amount, with cents if necessary. Then tap Request or Pay to insert the transaction into the message. It won’t be sent until you tap the black send button, so if you change your mind, you can tap the little x to delete. Lastly, you’ll be prompted to verify the transaction in the usual Apple Pay fashion, which means authenticating with Face ID on the iPhone X or Touch ID on all other iPhones.
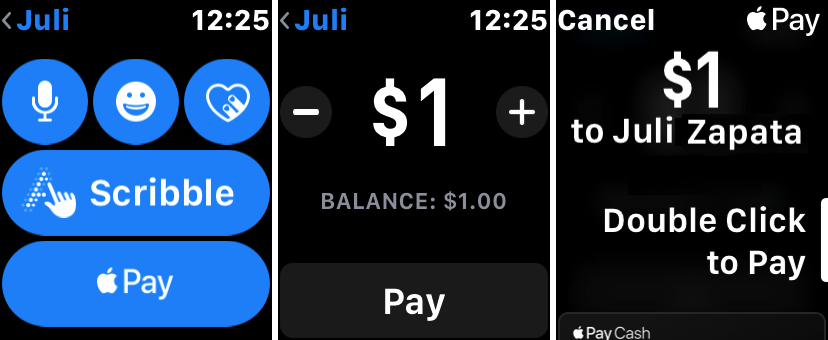
You can even use Siri to initiate transfers—“Send my mother $15.” or “Ask my sister for $4.99.” And if you have an Apple Watch with watchOS 4.2 or later, you can also send money from the Messages app, or send or request money via Siri. On the watch, double-press the side button to confirm the transaction.
Honestly, the only downside to Apple Pay Cash is that it works only within the Apple world. But as long as you want to exchange money with Apple-using friends and relatives, it’s fast, easy, reliable, and one less reason to visit the ATM.


Saturday, January 13, 2018

Quick Tip - Apple Lowers Battery-Replacement Pricing for iPhone 6 and Later

Did you hear about the battery-related controversy swirling around Apple at the end of 2017? There has been much hue and cry about how, starting with iOS 10.2.1, iOS has been slowing down iPhones with old, weak batteries to avoid unexpected shutdowns. 
In response, Apple posted A Message to Our Customers about iPhone Batteries and Performance to explain what was going on. Apple announced that it would reduce the price of out-of-warranty battery replacements for the iPhone 6 and later from $79 to $29 through December 2018. The company also said that an upcoming iOS update would give users more visibility into the health of their iPhone battery. 
The practical upshot of this is that if you have an iPhone 6 or later that suffers from short battery life or unexpected shutdowns, make sure to take advantage of the $29 replacement price this year. (There have even been reports of iPhone 7 battery replacements.)
If you would like to check the health of your battery now, check out CoconutBattery.

Quick Tip - Amazon Prime Video Finally Comes to the Apple TV

A $99-per-year Amazon Prime membership provides various perks, including free 2-day shipping from the Amazon online store and streaming access to Amazon’s media libraries. But for Apple TV users, accessing Prime Video content has been frustrating, because there was no Amazon app for the Apple TV. That has all changed now, and if you have an Amazon Prime membership and an Apple TV, it’s time to download the new Amazon Prime Video app. It gives you a boatload of additional video content, including Amazon’s original programming (like The Marvelous Mrs. Maisel, which is hilarious). Find it on your fourth-generation Apple TV or Apple TV 4K in the App Store app. If you are still using a third-generation Apple TV, Amazon Prime Video should appear automatically on your Apple TV Home screen.