Thursday, April 6, 2017

Drone flyover shows Apple Spaceship Campus almost complete

A new drone flyover by Matthew Roberts, shows that the new Apple Park campus is almost complete. Employees will start moving in this month, however it will take almost six months to move in the complete 12,000 employees that will call Apple Park home.

The R & D facility is almost ready for staff. Tables and chairs can be seen through the windows. Landscaping is moving along at a furious pace, though much is still to be done. It will probably continue for months and work on the pond is just beginning.

Most of the solar panels appear to be in place, and the Parking structure known as Lantau Avenue appears to be ready for cars.

Take a look at the video for yourself.


Monday, April 3, 2017

Use Quick Look to Peek inside Files and Folders on Your Mac

Use Quick Look to Peek inside Files and Folders on Your Mac

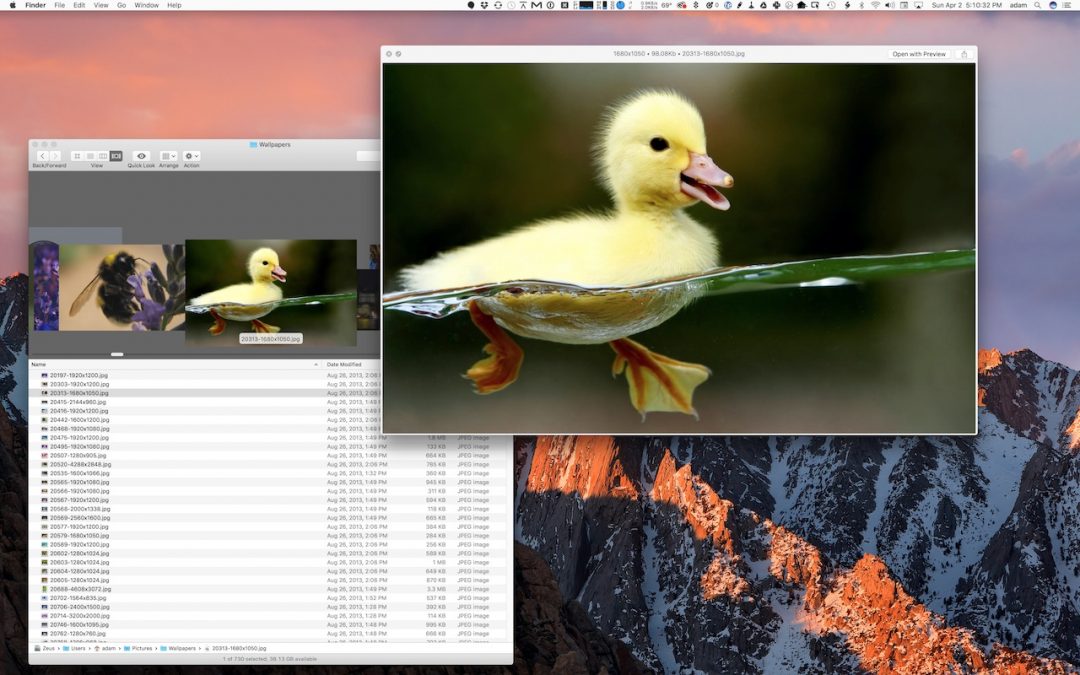
Finder icons sometimes hint at their file’s contents, but if you find yourself opening file after file to look at the contents quickly, the Mac has a little-known feature just for you: Quick Look. To give it a spin, find a file in the Finder, click it once to select it, and press the Space bar. Its that simple. If it’s a supported type of file, Quick Look displays a window showing the contents of the file. Press the Space bar again to close the window.

Quick-Look-Excel

If the document you’re previewing has multiple pages, you’ll see thumbnails that you can scroll through using your mouse or trackpad, or by pressing the Page Up/Page Down keys. But you aren’t limited to just viewing a file: click the Open With button to open the file in its default app, or click the Share button in the upper right to send the file to someone else via email, Messages, or another sharing service.
If you need to scan through a set of files in a folder, you can navigate between them using the arrow keys while the Quick Look window remains open—how you move among the files depends on the Finder window’s view. In List view, for instance, using the Up and Down arrow keys can be a great way to browse through a collection of pictures. You can even interact with the Finder while using Quick Look, which means you can delete an unwanted photo by pressing Command-Delete while previewing it.
Quick Look works well for comparing multiple similar files. Select a bunch of files and press the Space bar to open them all in Quick Look. The Left and Right arrow keys let you cycle through your selection; there are also Forward and Back buttons that appear near the top left of the Quick Look window. Next to those buttons is a Thumbnail button that displays the selected files in a grid—click any thumbnail to focus on just that item. To remove the distraction of your Desktop, click the Zoom button in a Quick Look window. You can start a slideshow from there. Another way to get to a zoomed Quick Look window is to select the files in the Finder and then press Option-Space.

Quick-Look-penguins

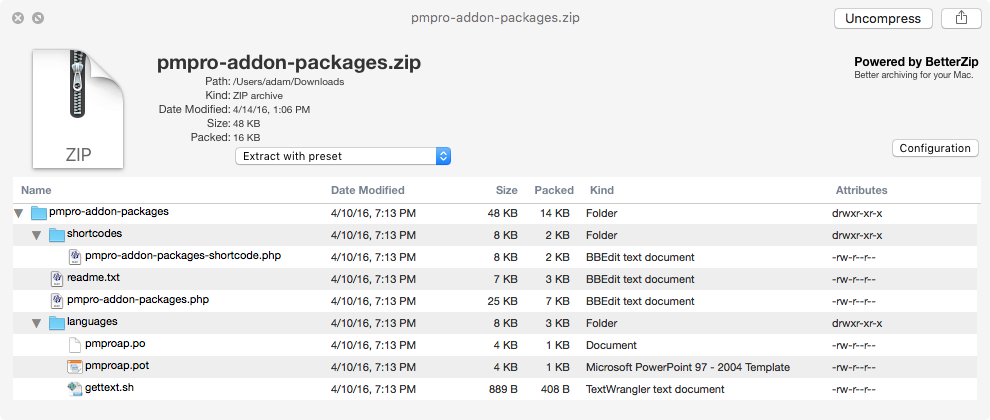
So what file types does Quick Look work with? Not everything, but out of the box, Quick Look supports text files, RTF files, HTML files, images, audio, video, PDFs, iWork documents, Microsoft Office files, and even fonts. Third-party apps can extend Quick Look to support proprietary formats, too, and developers have even released independent Quick Look generators, as they’re called. If you want to look inside Zip archives and other compressed files, check out BetterZip, for instance, and if you write in the Markdown formatting language a lot, QLMarkdown is worth installing.

Quick-Look-BetterZip

Although it’s used mostly in the Finder, Quick Look is available elsewhere. For example, if you’re in an  Open dialog, you can select a file and press the Space bar to preview it right there. When restoring a file in Time Machine, use Quick Look to see if it’s the version you want. Most Internet file transfer apps, such as Cyberduck, Fetch, and Transmit, support Quick Look, making it easy to preview a file on a remote FTP server. You can also preview an attachment in Messages by selecting it and pressing the Space bar.
Finally, note that if your Mac has a newer Apple trackpad, such as the Magic Trackpad 2, you can invoke Quick Look by force-touching a Finder icon (press deeply until you feel a click) instead of pressing the Space bar.
Quick Look takes just a moment to learn, but it can save you hours of time poring through files on your Mac!

Saturday, April 1, 2017

RIP Airport Extreme, Eero is here to take your place.


On the heels of the news that Apple has disbanded the Airport team at Cupertino, a new player has stepped up to take the place of the beloved wireless staple of many an Apple user.

My clients are always looking for wireless solutions. Most are new clients that have not had good coverage or are needing a wireless solution for the first time. Normally if they were a majority Mac or Apple household, then the go to product was usually Apple Airport Extreme as the basestation and router, and then Apple Airport Expresses used to boost the signal to other parts of the house. This usually did the trick, gave them decent coverage, and stopped the Netflix buffering.

But lately the writing has been on the wall, that the Airport solution just wasn't going to cut it much longer. There has not been an update to the Airport line since 2013. Now the news of the team that worked on it, being disbanded and moved to other projects seems to be the nail in the coffin. How can I confidently offer a solution to my clients, that may no longer be sold by Apple tomorrow. I had to search for a new solution.

Knowing my clients, it had to work well with Apple products. Not only connecting with, but ability to configure and maintain. It had to have good coverage. I could not recommend eight devices for one house. Number three, it had to have a nice aesthetic. (Lets face it, Apple products are sleek, modern and minimalist at the same time, and just plain sexy. I could not recommend some big monolithic looking beast of a wireless system with 12 antennas hanging off it, and bulky repeaters that look like some miniature cellular tower hanging off their wall plugs. My clients would probably fire me for that.)

After some research into various products, I settled on one that looked the best match. Eero, touted as "WiFi that actually works."

Eero promised to provide everything I was looking for in a Wireless system I could recommend to my clients. Simple, good coverage, worked with Apple products, and looked nice. It appeared that it could have even been made by Apple. Eero allowed me to either hardwire the satellites or allow them to boost the signal via wireless. They have two Ethernet ports on the back, that gave an added benefit I was used to in the Airport Express's. I could grab the wireless signal and then provide network connectivity to wired devices. It seemed the perfect match, but I needed to test them somehow. Luckily for me, I had a client that was willing to take the leap and test out the product. We purchased on Amazon, knowing that if it did not work out, we could return the system, and I would research a new solution.

The client has a 3400sqf home, that is three stories. Main floor is the middle floor, and where the cable modem was located. Unfortunately this was also in the back corner of the house and in a small AV closet surrounded by wood and under the staircase to the upstairs. I was worried from the start, as the Eero setup says they work best if the units are in line of sight. There was no way to accomplish this here. Another issue to overcome was the upstairs master bedroom, in the opposite side of the house, has a small AV setup as well, that needed 3 devices be hardwired. Previously serviced by an Airport Express which fed the wireless signal to a 5 port switch via the Ethernet port. This was going to be a real test of the Eero's capabilities. Finally the client wanted to provide wireless not only outside on the deck (Which wasnt great with the Airport setup) but also downstairs in the guest bedrooms.


Concern was expressed at the beginning, that the three Eero setup would not be enough for the clients needs. At $399 for the three unit starter pack, and a single Eero running $199, this was a tad more expensive than the Airport configuration currently in place and might get even more expensive.

The good news here was that three Eeros completely did the trick. With the main unit next to the modem in the AV closet in one corner of the home, the second was placed in the family room on the same middle floor in the center of the house. Lastly we placed the third on the top floor, in the opposite side of the house as the main unit, connected to the Master Bedroom AV system.Wireless signal was just fine downstairs in the guest bedrooms. None of the Eeros are within line of sight of each other. The price of the starter pack might be a tad more than most people are accustomed to, but as they say, "You get what you paid for". And in this case, you get product that does exactly what it says "Wifi that actually works"!
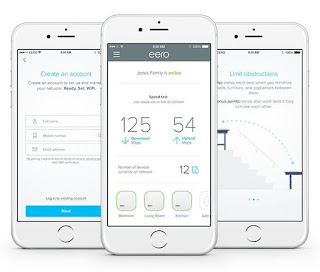

Since this install I have recommended and installed Eero systems in 2 other clients and all are enjoying hassle free, fast wireless connections. Full disclosure, I am not compensated for this post, nor my recommendation of Eero systems. All of my client installs have been fully paid for by the client themselves. This recommendation comes purely from my need to provide the best solution I can find for my clients.

The system will learn your needs and uses, then adjust its mesh network according. As such the first few days of the using the system, you may experience it learning what your using it for and it adjusting to your needs. After that, it seems to be dialed in and problem free.

If you have any questions, feel free to drop me a line or comment below. As of now Eero will be my go to WiFi recommendation.

Eero website is HERE
Order Eero on Amazon HERE

Thursday, March 30, 2017

Dont get scammed by fake Apple Support calls!


If you get a call from someone claiming to be from Apple Support, and that your iCloud account has been compromised, Hang Up immediately. They are FAKE!

Reports are flying across the web and twitter about fake Apple Support calls trying to piggy back on the "iCloud Hack" news of last week. Including MacWorld writer Glen Fleishman, who says his wife was called at least 6 times: 


"Earlier on Monday, my wife let me know that “Apple Support” had called about iCloud security. She was dubious, and rightly so. “Apple” then called five more times (and counting). Suffice it to say, it wasn’t Apple, but fraudsters trying to piggyback on reports that a major breach of iCloud credentials could render hundreds of millions of accounts vulnerable."

KIRO 7 news in Seattle reported the victims were then asked for personal information to verify the account. RED FLAG!

Victims have reported an automated call, that claims to be "Apple Support" and warns their account has been compromised. The victim is then routed to a human or "advisor" for "help".

Per Apple
 

  • Always confirm the caller's identify before you provide any sensitive information over the phone. If you get an unsolicited call from someone claiming to be from Apple, hang up and contact us directly.
  • never provide personal account information—including your Apple ID password, credit card info, or other personal information—by email or text message, and use extreme caution when clicking links in messages or sharing information over the phone. Instead, visit the company's website directly or call them yourself.
Apple can be reached at 1-800-275-2273

People who have fallen for this scam have apparently been bilked and had bank accounts drained


Spread the news and share this post!! And if you get a call from "Apple Support", Hang Up!

Wednesday, March 29, 2017

4 New Apple OS Features You Can Use Today

Apple just released new versions of all its operating systems—iOS, macOS, watchOS, and tvOS—fixing bugs, plugging security holes, and, best of all, adding a few new features. Here are four things you can do once you’ve updated. (If you’re concerned that installing the updates may cause other problems, check with me first.)

1: Sleep better after using your Mac late at night.

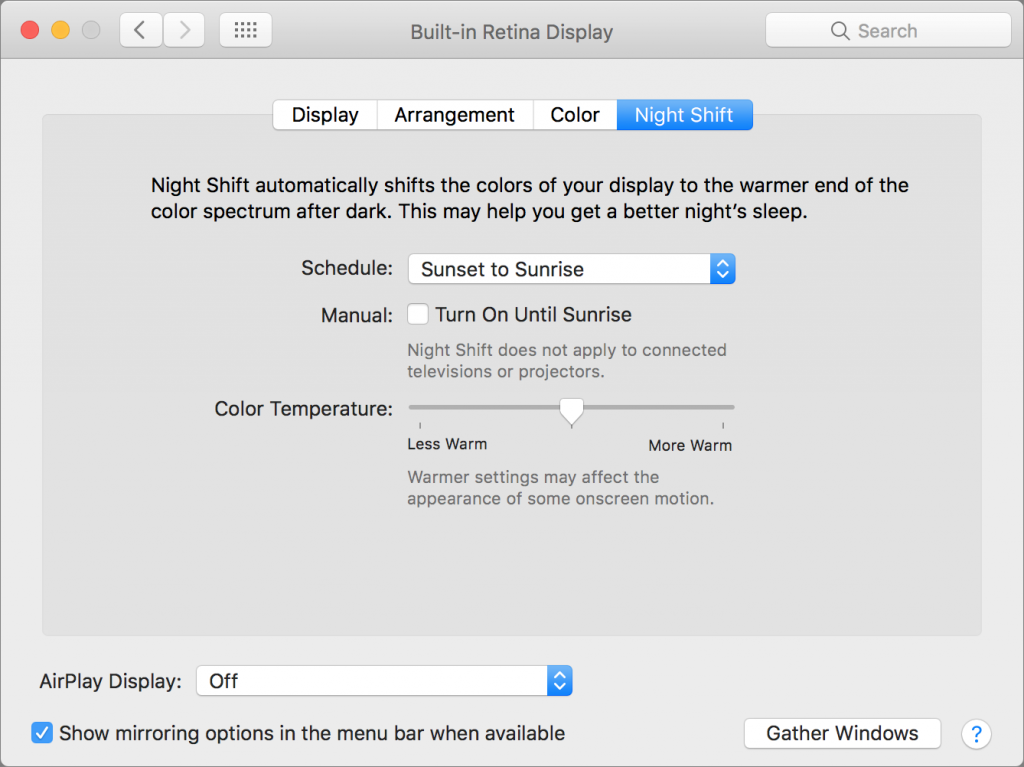
macOS 10.12.4 Sierra has gained Night Shift, a feature from iOS that automatically shifts the colors of the screen to the warmer end of the spectrum after dark. Night Shift may help you sleep better by reducing the amount of blue light that tricks your body into thinking it’s earlier than it is.
To set up Night Shift, open System Preferences > Displays > Night Shift and choose Sunset to Sunrise from the Schedule pop-up menu. Night Shift knows when the sun rises and sets wherever you are, but if you prefer, you can also set custom on and off times. (If you don’t see the Night Shift button in the Displays preference pane after upgrading to 10.12.4, your Mac is unfortunately too old to support Night Shift.)


If you’re working with graphics at night, or if video looks odd, you can turn off Night Shift manually. Do that either in the Displays preference pane or by scrolling down in Notification Center (click it in the upper-right corner of the screen) to see the Night Shift switch.

2: Find the AirPod that fell between the couch cushions.

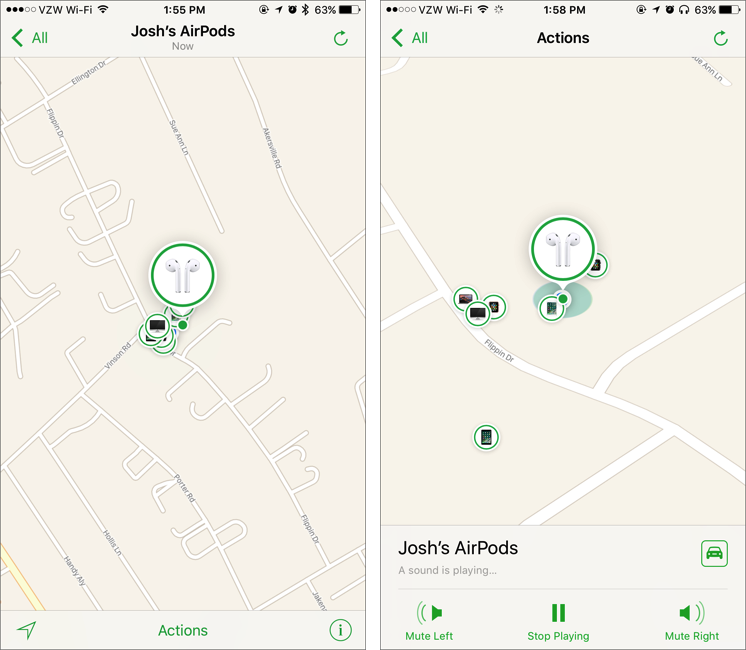
Apple’s wireless AirPods earbuds are cute, but they’re also easy to misplace. If you can’t find yours, iOS 10.3’s Find My iPhone app can help. Bring it up, tap the AirPods icon in the display, and then tap the Play Sound button to make them play a locator sound. If you’ve lost only one AirPod, you can mute the other so it’s easier to hear where the sound is coming from.


Note that Find My AirPods works only when in range of a paired iOS device, so it may not help if you lose an AirPod while running.

3: Don’t be “that person with the Apple Watch” at the theater.

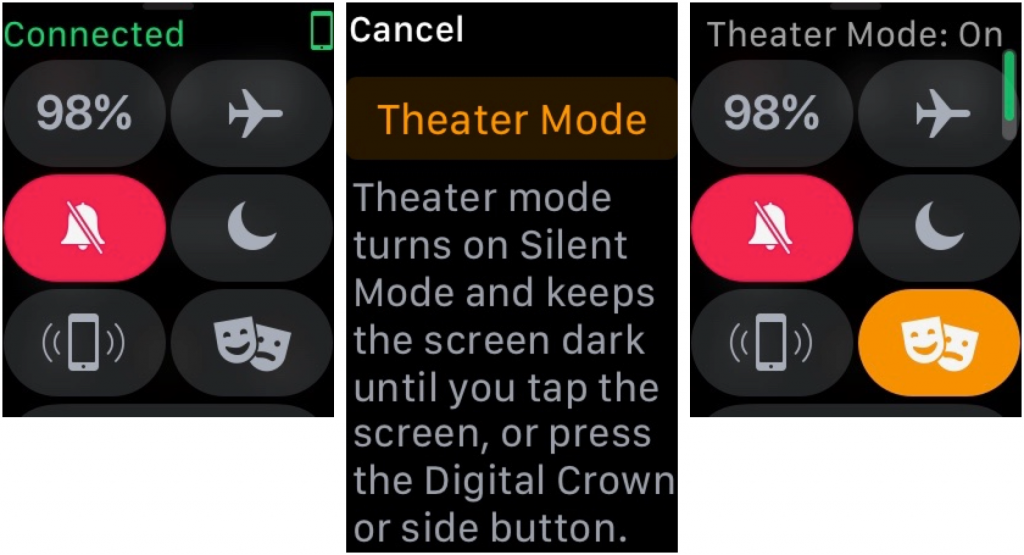
You’re in a darkened theater, at a movie or a play, and when you move in your seat or cover your mouth to cough, your Apple Watch’s screen turns on, annoying the people around you. Even worse is when a notification rolls in, causing the watch to make a sound. Embarrassing, we know. Happily, watchOS 3.2 adds Theater Mode, which turns on Silent mode and keeps the screen dark by disabling its standard “raise to wake” behavior.
To enable Theater mode, open Control Center by swiping up from the bottom of the screen. Then tap the Theater Mode button, which is emblazoned with theater masks. After the performance, you’ll need to disable Theater mode manually by tapping its button again.


If you do need to check the time surreptitiously (who knew this performance would go so long!), tap your Apple Watch’s screen, or press the Digital Crown or side button.

4: Ask Siri to find your car in a humongous parking lot

We’ve all been there. You parked at the mall, but got turned around while you were inside, and now you can’t find your car in the sea of automobiles. In iOS 10.3, you can now search for “parked car” in Maps, or just ask Siri, “Where did I park?”


And if you ever lose your car at a place like Disney World, this feature alone will be worth the price of the iPhone!

Note of caution - I typically tell my clients to wait a minimum of two weeks before installing any new updates such as these. Keep in mind the new releases are DAYS old (as of this post). May want to hold off on installing and see if there are any bugs that need worked out. But at least you know about some new features you can look forward to. Feel free to drop me a line if you are interested if its safe yet. ;-)

Monday, March 27, 2017

Breathe new life into an old Mac

I understand. That MacBook Pro you bought a few years back doesn’t seem like it should need replacing, but performance has started to lag, and you don’t have the money for a shiny new Touch Bar model. Adding RAM up to 8 or 16 GB can help, but the best bang for your buck in terms of performance comes from swapping your Mac’s hard drive for a solid-state drive, or SSD.

What’s an SSD? As the name implies, it’s a storage device that has no moving parts—no spinning disks and no read/write heads skimming along just a few nanometers above the disk surfaces. Instead, SSDs use flash memory, a type of non-volatile memory whose chips retain data even without power.

SSDs have two huge advantages over traditional hard drives. The first is reliability, particularly in laptops that are picked up and set down many times a day. Drop your MacBook Pro on the desk a little too hard, particularly while it’s on and the drive is spinning, and that read/write head could hit the surface of the disk—the very definition of a hard disk crash. With no moving parts, SSDs aren’t nearly as vulnerable to physical damage.
But the second advantage is why SSDs have become so popular—they’re fast, really fast. One SSD vendor advertises them as up to 92 times faster than hard drives. Obviously, the specifics can vary quite a bit, but in system benchmarks, swapping an SSD in for a hard drive can improve overall performance by 50 percent or more. Drive-intensive activities like booting see the most benefit—you’ll be shocked at how much faster your Mac boots with an SSD! Boot times can go from 45 seconds or more, down to 10 seconds or less.

So if you’re trying to goose the performance of your older Mac, look into an SSD. Your mac will feel brand new again! If your interested in getting an SSD installed in your iMac or MacBookPro, let me know, and we can get it set up. The clients that have done so, are more than pleased!