Showing posts with label IOS. Show all posts

Sunday, March 11, 2018

Quick Tip - Stop Paying Too Much for a Family’s iCloud Drive Storage

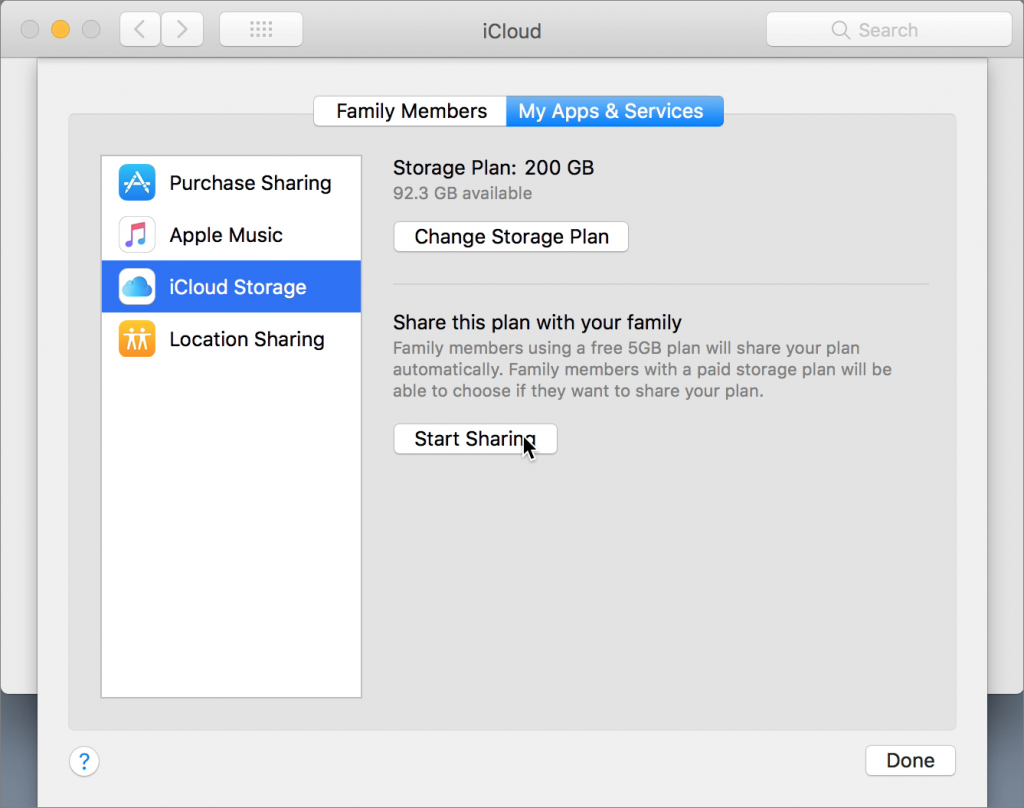
Apple gives iCloud users 5 GB of free storage, but that fills up fast with iCloud Photo Library, iOS backups, iBooks, and more. Until iOS 11 and macOS 10.13 High Sierra, each person in a family had to buy extra iCloud space separately. Happily, Apple has now made it so everyone in a Family Sharing group can share a single 200 GB ($2.99 per month) or 2 TB ($9.99 per month) plan. 

The family organizer can start sharing storage in High Sierra or iOS 11 as follows: on the Mac, go to System Preferences > iCloud > Manage Family > My Apps & Services > iCloud Storage; in iOS, go to Settings > Your Name > Family Sharing > iCloud Storage. Any other family member can then cancel their paid plan and join the Family Sharing plan using their iCloud Storage screen. Its a great money saving tip!

Saturday, July 29, 2017

Quick Tip - Try This Easier Method of Flipping between iPhone Camera Modes


The Camera app on the iPad, iPhone, and iPod touch can take three kinds of video and three types of photos, and the interface suggests that you switch between them by tapping or swiping on the labels below the viewfinder. 

Unfortunately, those labels are small and can be difficult to swipe accurately. If you’ve found moving between modes frustrating, try swiping left or right on the entire viewfinder, which has the same effect as swiping on the labels but with a much larger swipe area. And, if your Camera app occasionally takes an unexpected type of photo, an errant swipe could explain it.


Swipe-on-viewfinder

Monday, July 17, 2017

Quick Tip - PSA: Hot Cars Can Kill iPhones


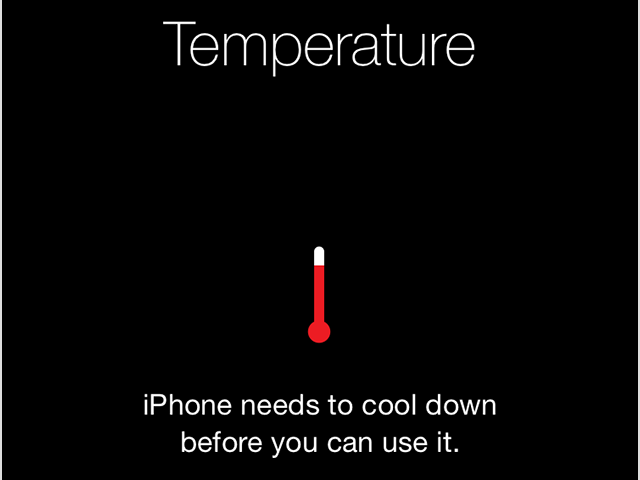
Just as you wouldn’t leave your pooch in a car parked in the sun, you should be careful with your iPhone. It’s rated for use at up to 95℉ (35℃) and can be stored at up to 113℉ (45℃), but temperatures inside a parked car on a sunny day can exceed 130℉ (55℃) within 30–60 minutes. That can both temporarily disable your iPhone and damage the battery more permanently. 

If your iPhone gets too hot, it warns you, “iPhone needs to cool down before you can use it.” It also stops charging, dims or turns off the display, puts its radios in a low-power state and disables the camera flash, although audible turn-by-turn directions will continue. Turn it off and let it cool down for a while.

temperature_cool_down

Friday, July 14, 2017

Going into Airplane Mode: Flying with Technology


Since 2013, we’ve been able to use handheld electronic devices such as the iPhone, iPad, and Kindle at pretty much all times during airplane flights, including takeoff and landing. That was a big change from previous policy, which banned the use of personal electronic devices below 10,000 feet, forcing passengers to occupy themselves with books and magazines at the start and end of flights.


But now flight attendants ask us to put our devices into “airplane mode.” You probably know how to do this on your iOS device, but if not, here’s how. Swipe up from the bottom of the screen to bring up Control Center and tap the airplane button at the top left. Alternatively, you can open the Settings app and enable the Airplane Mode switch (it’s the first switch in the list). When you land, use the same controls to turn it off again.

What does airplane mode do? It disables certain wireless features of your device. Specifically, it turns off the cellular voice and data features of your iPhone or iPad, and on all iOS devices it turns off both Wi-Fi and Bluetooth. However, only the cellular features are important to your airline—you can re-enable both Wi-Fi and Bluetooth at any time. That might be useful if you want to use the airplane’s Wi-Fi network for Internet access (usually for a fee) or Bluetooth to play music over wireless headphones.

To turn these wireless features back on, tap the grayed-out Wi-Fi and Bluetooth buttons in Control Center, or flip their switches in Settings > Wi-Fi and Settings > Bluetooth. Don’t bother turning them on unless you’re going to use them, though, since you’ll save a little battery life by leaving them off for the duration of a long flight.

Why do the airlines care about cellular? It has little to do with airplane safety; the prohibition originated from the U.S. Federal Communications Commission, not the Federal Aviation Administration. The reason is that fast-moving cell phones used high in the air may light up many cell towers at once, which can confuse the mobile phone network.

The technical solution is akin to what the airlines do to provide Internet access now; a device called a “picocell” would be installed on the airplane to provide connectivity with the phone network, and cell phones on the plane would communicate with it instead of individual cell towers on the ground below. Will it happen, though?

In the past, there have been proposals to allow cell phone use on properly equipped planes. However, the thought of fellow passengers having non-stop phone conversations during flight fills many people with dread. Many lawmakers in the United States oppose allowing passengers to make and receive phone calls during flight, citing concerns about cabin safety, a worry echoed by the flight attendants union. Even former FCC Chairman Tom Wheeler acknowledged this, saying “I get it. I don’t want the person in the seat next to me yapping at 35,000 feet any more than anyone else.” So don’t expect that rule to change any time soon.

If you’re allowed to use Wi-Fi and Bluetooth, why do the airlines make you stow your MacBook Air during takeoff and landing? It has nothing to do with the technology—the airlines ban laptops during times when there could be an emergency landing because they could, like carry-on luggage or lowered tray tables, impede evacuation or cause injury during turbulence.

Tuesday, July 11, 2017

Get Ready for iOS 11 by Identifying Old Apps that Won’t Work


Now that Apple has released a public beta of iOS 11, we have confirmation that Apple is kicking some old apps off the back of the train. If you’ve been using an iPhone or iPad for more than a few years, it’s possible that some of your apps won’t even launch in iOS 11. Here’s what’s going to happen, and what you can do about it.

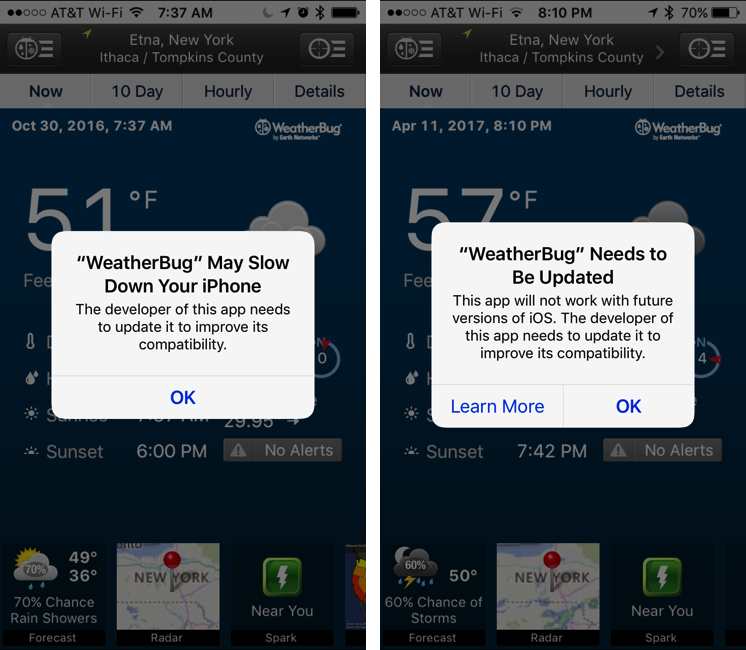
Through the iPhone 5, fourth-generation iPad, original iPad mini, and fifth-generation iPod touch, Apple used 32-bit processors. However, in 2013, Apple instead began putting 64-bit chips in all new iOS devices. The company encouraged developers to make their apps run in 64-bit mode but kept iOS 7 compatible with older 32-bit apps. Starting in 2015, Apple required apps to run in 64-bit mode to receive App Store approval. And iOS 10 initially warned that 32-bit apps might slow down your device and later said that 32-bit apps would need to be updated.


First off, don’t worry about what 32-bit and 64-bit mean—all you need to know is that 32-bit apps are old and won’t run in iOS 11, and that 64-bit apps will continue to work as they always have.
How do you know which of your apps are 32-bit? For apps that you use regularly, you’ve probably seen one of those warnings. But other apps you may open only occasionally—how can you figure out which of those are destined for the chopping block?

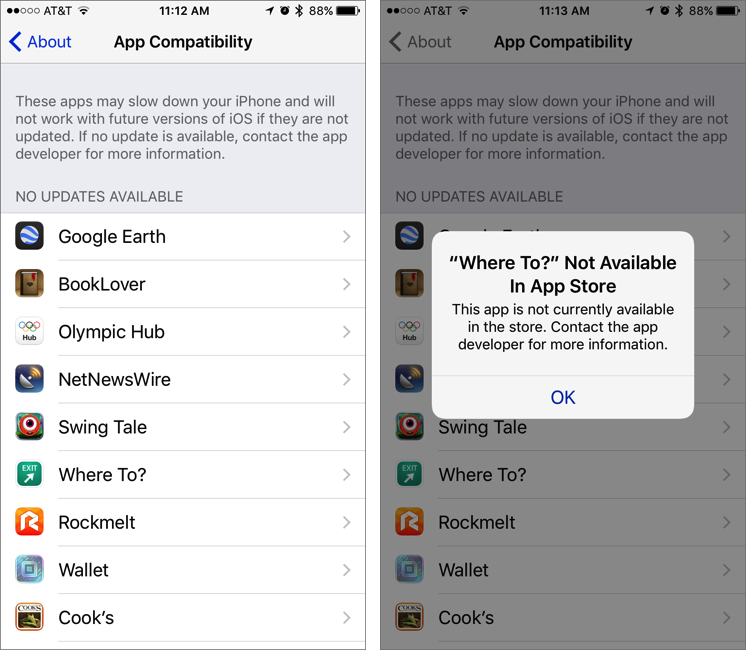
In iOS 10.3, Apple added a feature to call out these apps. Navigate to Settings > General > About > Applications to see a list of 32-bit apps that don’t have direct updates available (if Applications isn’t tappable, either you still need to upgrade your device to iOS 10.3 or your device doesn’t contain any 32-bit apps). Tap an app in the list to load it in the App Store, where you may be able to find more info or a support link for the developer. Unfortunately, many old apps aren’t in the App Store anymore.


Now that you know which of your apps won’t survive the transition to iOS 11, what should you do? You have a few options:

  • Delete the app. If you haven’t used an app in years, or don’t remember what it does, there’s no reason to keep it around. To get rid of it, back on the Home screen, press and hold on any app icon until all the icons start to wiggle, and then tap the X badge on the icon you want to delete. Press the Home button to stop the wiggling.
  • Look for an update that’s a new app. Because Apple doesn’t let developers charge for updates, many developers have been forced to make their updates into new apps so they can afford future development. To see if this has happened, search in the App Store for the app and see if a new version appears. Or look for information on the company’s Web site.
  • Look for an alternative app. Few iOS apps are truly unique, so you may be able to find an alternative that does basically the same thing.
  • Don’t upgrade to iOS 11. Or, at least, don’t upgrade right away. In general, you should stay up to date with new versions of iOS to ensure that you’re protected from security vulnerabilities that Apple has discovered and patched. But there’s no harm in delaying an upgrade for a little while as you wait for an app to be updated or look for an alternative.
  • Stick with an older device. If you have an extra iOS device that can’t run iOS 11 anyway, keep the app on that device. This approach may not work for an app you need on your primary iPhone, for instance, but it would for an old game that you could play on an elderly iPad 2.
Take a few minutes now so you won’t be surprised if one or more of your favorite apps can’t make the transition to iOS 11 when it ships in a few months!

Monday, July 3, 2017

Quick Tip - How to Find Buried Options in the iOS Settings App

How to Find Buried Options in the iOS Settings App

iOS offers about 40 top-level categories in its Settings app and countless options in those categories. How can you find that little-used setting, particularly since Apple sometimes moves options during major iOS releases? The answer is the Settings app’s hidden Search field. 

To reveal it, pull down on the main settings screen (iPhone) or left sidebar (iPad). Tap the Search field, enter text describing the setting you want to find (try typing Fa to find Facebook, FaceTime, and Safari Favorites, among others), and the results appear immediately. Tap a result to jump to it, but also notice that each result shows a path, so you can learn how to find that setting manually in the future.

Wednesday, June 21, 2017

Supercharge Your iPhone’s Keyboard with Google’s Gboard


As much as Apple keeps improving typing on the iPhone and iPad, most people find tapping characters on the on-screen keyboard slower and more error-prone than on a physical computer keyboard. Voice dictation is one solution, but there are plenty of places where it’s inappropriate to talk to your iPhone, and some people just don’t like dictating. iOS 8 first allowed third-party software keyboards, and while developers have released lots of interesting keyboards that aim to improve your typing experience, most have proved quirky and disappointing.

Bucking that trend is the free Gboard keyboard from search giant Google, which combines a highly competent keyboard with the innovative feature of being able to search Google from the keyboard in any app. Why would searching from the keyboard be useful? Imagine you’re meeting a friend for dinner, and you need to text her the location of the restaurant. Rather than searching for the address via Siri or in Safari and then laboriously copying and pasting it into Messages, you can just tap Gboard’s Google button, search for the restaurant, and tap the result card to insert the restaurant’s linked address into a message.
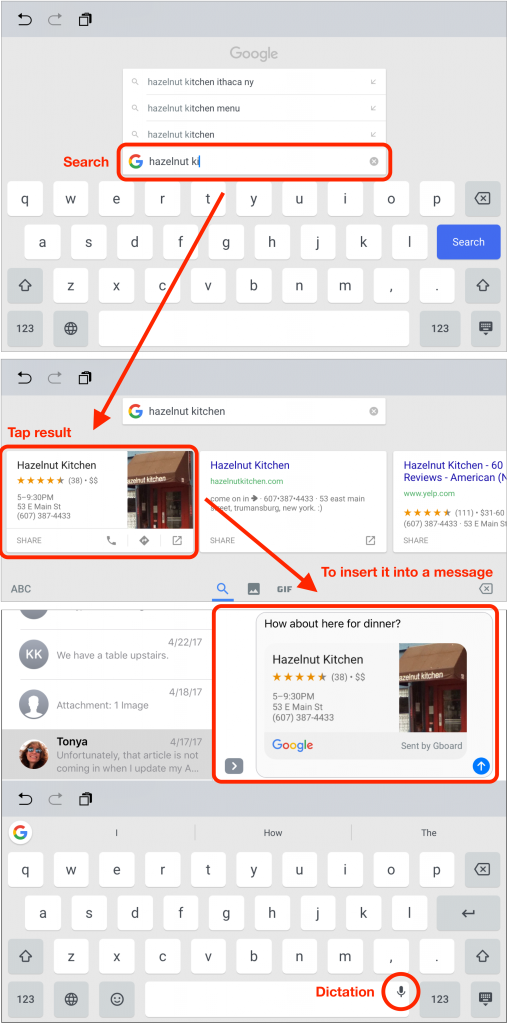
 

You aren’t limited to location searches, so Gboard is great for sending links to news articles, images, YouTube videos, or anything else you can bring up in a Google search. Google is transparent about the privacy aspects of Gboard—it collects search queries and anonymous statistics, but nothing else you type.

Speaking of which, Gboard’s basic text entry works as you’d expect, complete with suggestions like Apple’s keyboard. However, Gboard also supports “glide typing,” where you slide your finger from letter to letter in a word without picking up until you’ve completed the word. The order of the characters you swipe over enables Gboard to guess at the word you mean, and it’s highly accurate.
If Gboard guesses wrong, or if it doesn’t know a word at all, a single tap on the Delete key removes the entire word so you don’t have to backspace over every character. When you type a word manually, Gboard learns it for future use. Even better, if you want to edit what you’ve written, just slide your finger left or right along the Space bar to move the insertion point within the text—far easier than trying to tap between characters on IOS keyboard!

Although Gboard doesn’t include the standard iOS dictation button, it provides its own, in the corner of the Space bar. Press it for a little longer than a normal tap to invoke Google’s transcription engine, which might even work better for you.

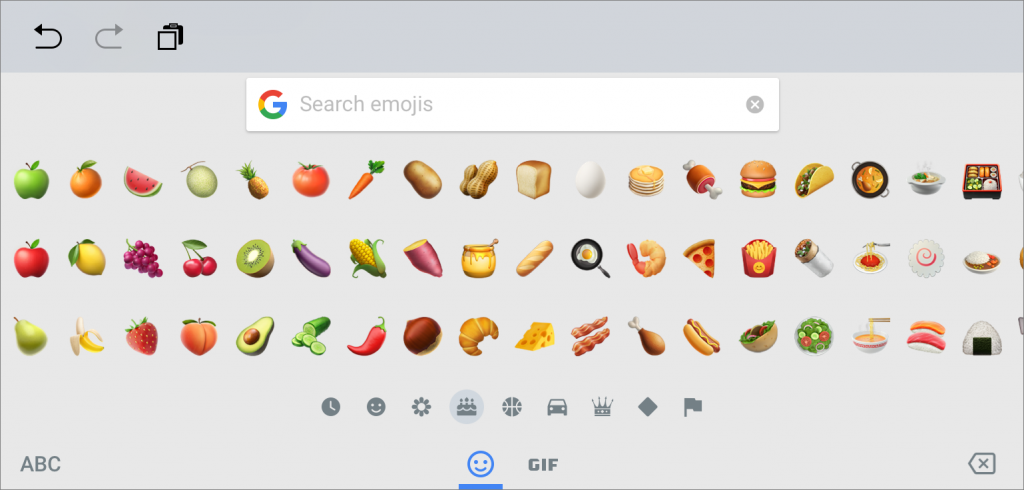
For those who like dressing up their messages, a tap on the smiley face Gboard-emoji-button button displays Gboard’s built-in emoji keyboard. If you have trouble finding the right picture to accompany your latest witticism, Gboard suggests emoji and lets you search for emoji. Take it one step further by tapping the GIF button below the emoji keyboard, which enables you to search for and insert animated GIFs. Gboard won’t display GIFs that are NSFW, so you don’t have to worry about what might pop up.


To install and use Gboard, first download it from the App Store to your iPhone or iPad. Then tap Settings > General > Keyboard > Keyboards > Add New Keyboard, and under the Third-Party Keyboards heading, tap Gboard to add it to the list of active keyboards. Next, tap Gboard in the active list and enable Allow Full Access. Then, in any app in which the keyboard appears, tap the Next Keyboard Gboard-keyboard-button button in the lower-left corner, which usually looks like a globe or indicates that the next keyboard is a letter Gboard-ABC-button keyboard. You’ll know you’re in Gboard when you see the round Google search Gboard-Google-search-button button in the upper-left corner of the keyboard.

The main downside of using Gboard? Although Gboard does have a trackpad mode (press and hold on the keyboard to move the insertion point), it lets you move only left and right, not up and down, and it doesn’t let you select text like Apple’s trackpad mode. But that may be a minor annoyance given all of Gboard’s other benefits—it offers the best third-party typing experience in iOS. Give it a try!

Friday, June 16, 2017

Say “Cheese!” Tips for Taking Mac and iOS Screenshots

Say “Cheese!” Tips for Taking Mac and iOS Screenshots

Did you ever want to capture a picture of what’s on your screen, or at least a part of it? Screenshots aren’t just for technical writers trying to document app behavior—you might also use them to provide feedback on a photo, to document an error message for someone who helps you with your Mac, or to record a particularly funny auto-correct fail in Messages on your iPhone.

macOS and iOS have both long included built-in screenshot features that make it easy to take a high-resolution picture of what you see onscreen. (You can, of course, use a camera to take a photo of your screen, but that will never look as good.)

Taking a screenshot in iOS is super simple, and it works the same on an iPhone, iPad, or iPod touch. Just press the Home and Sleep/Wake buttons simultaneously. The screen flashes, and iOS saves the screenshot to your Photos app—look at the bottom of the Photos collection or, if you’ve turned on iCloud Photo Library, the All Photos album.

The same technique works on the Apple Watch, where you press both the digital crown and the side button simultaneously. (Accidental presses of those buttons explains why random Apple Watch screenshots might appear in Photos.)

On the Mac, you can take your pick from three built-in methods of taking screenshots:

 
If you take a lot of screenshots, consider memorizing macOS’s keyboard shortcuts. For a full-screen screenshot, press Command-Shift-3. For a screenshot of an arbitrary size, press Command-Shift-4 and drag out a rectangle. To capture just an object like a window, press Command-Shift-4, hover the pointer over the window, press the Space bar to show the camera cursor over the highlighted object, and then click to take the screenshot.
A few notes:
  • The Command-Shift-4 shortcut is the only way to capture a menu.
  • On a MacBook Pro with a Touch Bar, after you press Command-Shift-4, notice the helpful buttons on the Touch Bar.
  • All screenshots are saved as PNG files on your Desktop and named with the date.
Grab-iconIf those keyboard shortcuts sound hard to remember, try Apple’s Grab app, which is hidden away in the Utilities folder inside your Applications folder. It’s a simple app, but it can take full-screen, window, and selection screenshots, and it walks you through the process. You can also use Grab to capture a full-screen screenshot with a timer, which is handy if what you want to record appears only while you’re dragging an icon or another object, for instance. Captured screenshots appear in Grab as Untitled TIFF documents that you can close, copy, save, or print.

PDF-Preview-iconWant to mark up a screenshot with circles and arrows and a paragraph of text? For that, use Apple’s surprisingly powerful Preview app, which takes screenshots as editable graphic documents. Choose File > Take Screenshot > From Selection, From Window, or From Entire Screen. That last option takes a timed screenshot so you can set up any temporary conditions while the timer counts down. It’s the only way to capture the pointer in a screenshot. To access the tools you need to add shapes or text to your screenshot, choose View > Show Markup Toolbar. When you’re done, you can save the screenshot in a variety of formats. For more about what you can do with Preview, read Take Control of Preview.

You can also take screenshots using a cornucopia of third-party screenshot utilities. In general, they don’t offer much more than Apple’s options when it comes to capturing screenshots. Where they stand out is providing better tools for marking up and manipulating screenshots, and in offering an interface for managing and sharing screenshots. Choosing among them is largely a matter of personal preference, but check out Evernote’s free Skitch (My Favorite), the free Monosnap, and Global Delight’s $29.99 Capto. 

Whatever method you choose, remember that a picture may be worth a thousand words, but the right screenshot is even more valuable.

Saturday, May 20, 2017

Break the iPad’s Virtual Keyboard in Half for Thumb Typing

The iPad’s onscreen keyboard is an awkward size—too small for adults to type on like a regular keyboard in landscape mode, but too large to thumb-type on like an iPhone in portrait mode unless you have large hands like a pro basketball player. If you fall into the thumb-typing camp, there’s a hidden feature in iOS just for you. 

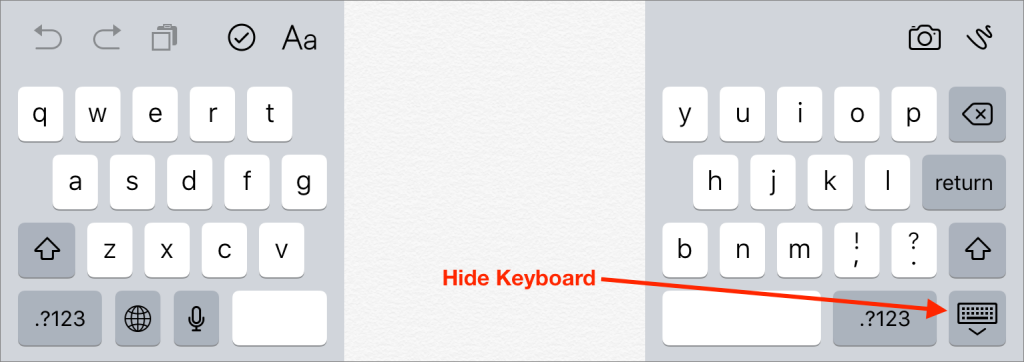
When you’re looking at the keyboard, press and hold the Hide Keyboard button in the lower-right corner, and then slide up to the Split option. The keyboard breaks in half and moves up the screen. (You can also just swipe outward quickly with both thumbs.) Now you can cradle the iPad in your palms and type with your thumbs. To rejoin the two halves of the keyboard, press and hold on Hide Keyboard again and tap Merge. (Or, swipe inward quickly with both thumbs.) Alternatively, tap Dock and Merge, or drag down on the Hide Keyboard button until it docks at the bottom of the screen. Enjoy!

Sunday, April 30, 2017

Build Relationships in iOS with Siri - Call your Mother


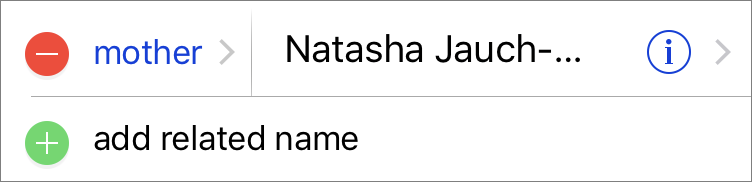
When giving commands to Siri, you can refer to people by relationship, rather than name. So, if you want to call your mother on your iPhone, you can say “call my mother” instead of something like “call Natasha Jauch-Hoechstetter.” But to do this, you need to introduce Siri to your family. 

First, make sure you have a “card” in the Contacts app for yourself, and then go into Settings > Contacts, scroll down to find and tap My Info, and select your card so Siri knows who you are. Next, make sure you have a contact card for your mother, and then tell Siri, “Natasha Jauch-Hoechstetter is my mother.” Or, if Siri doesn’t hear you correctly, open Contacts, open your card (not your mother’s!), tap Edit, scroll down, tap “add related name,” tap the default relationship to pick “mother,” tap the info “i” icon, select your mother’s card, and tap Done.

Wednesday, April 26, 2017

Why You Shouldn’t (Usually) Quit Apps on Your iPhone

On the Mac, when you’re done with an app you quit it. Many people think the same is true on the iPhone, where you can double-press the Home button to access the App Switcher and then swipe up on an app to quit it. But just because you can do it doesn’t mean you should. Worse, contrary to what some people believe, quitting iPhone apps will likely hurt battery life.

iOS thinks differently about how apps run. When you’re using an app—say, Safari—it’s accessing the iPhone’s CPU and radios and thus using battery power. However, a few seconds after you press the Home button to return to the Home screen or lock the screen by pressing the Sleep/Wake button, iOS puts the app into a state of suspended animation. In that state, it’s not using CPU or battery power, but it does remain resident in memory, which turns out to be important.

Imagine that you next open Notes, which becomes the active app and starts consuming CPU, memory, and battery resources. Tap a Web link in a note, and iOS activates Safari and suspends Notes. Because Safari was suspended and thus is still in memory, it’s faster and easier for iOS to activate it than to launch it from scratch. 

As you continue switching among apps, there won’t be enough memory for each app to remain suspended, so iOS quits apps to free up enough memory. There’s no way to know when iOS has done this; it’s invisible to the user. If you try to help iOS by quitting apps manually, you’ll force it to waste more resources later when those apps have to be launched afresh. You can get a sense of this by swiping far to the right in the App Switcher; it probably lists many more apps than you’d expect. That’s not a list of running apps; it’s a list of previously used apps.

So, 98% of the time, there’s nothing to gain and some speed and battery life to lose by quitting apps. But there are two legitimate reasons to quit apps: to restart a frozen or confused app, or to prevent certain background apps from using power unnecessarily.

Although it’s unusual for iOS apps to freeze or misbehave, it can happen, so if an app isn’t responding, or if it’s acting weirdly, quit it. That usually solves the problem; if it doesn’t, restart, or you might need to download an update or delete the app and reinstall it from the App Store.

iOS allows some apps to run in the background instead of being suspended. For instance, if you use Maps, you want it to keep tracking your location and providing turn-by-turn navigation even if you’re using Podcasts. Similarly, iOS allows some apps, like Skype, to listen for incoming calls in the background. There are a few other categories of allowed background apps—audio apps like Podcasts, for instance—but in all cases, if you’re trying to preserve as much battery life as possible, consider quitting background apps whose services you don’t need. For example, if you park before arriving at your destination, you might quit Maps to ensure that it doesn’t continue to track your location. And if missing an incoming call is less important than saving some battery power, quit Skype.

But these are infrequent exceptions to the rule. Most of the time, quitting apps is a waste of both your time and your iPhone’s battery.

Friday, April 14, 2017

Build Travel Time into Your Calendar Alerts

Build Travel Time into Your Calendar Alerts

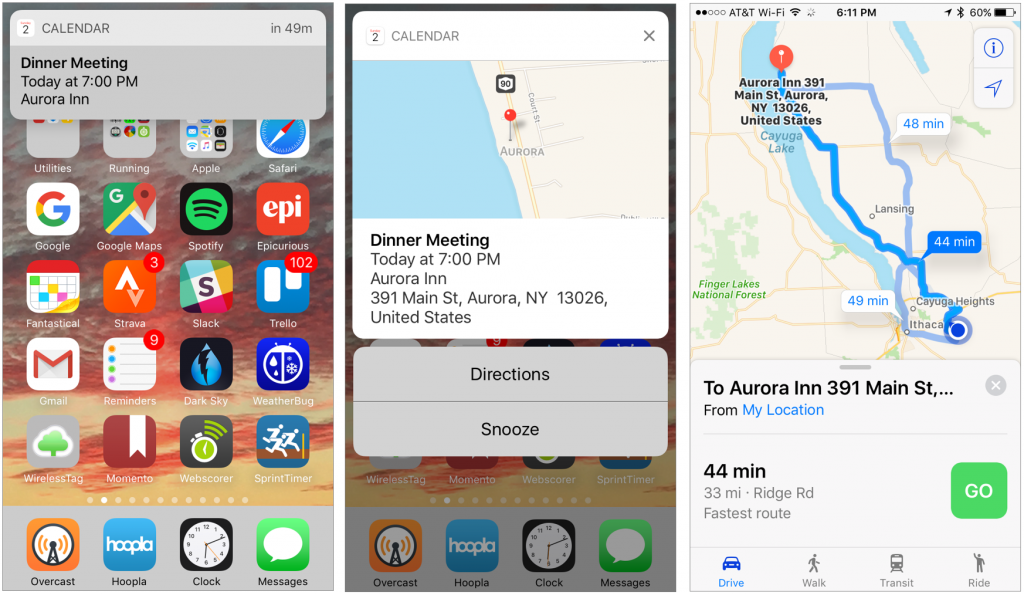
We’ve all done it. You swing into a meeting late, and as everyone looks up at you accusingly, you mutter, “Sorry. Traffic was terrible.” Maybe it was, but if you’d left at the right time for the traffic conditions, you could have arrived on time. Happily, the Calendar apps in both macOS and iOS can build travel time into event alerts so you can leave at the right time. There’s a bit of setup, but once you form the habit of attaching locations to your events, you’ll get a reputation for punctuality.

First, if you’re working on an iOS device, make sure Calendar can access your location by going to Settings > Privacy > Location Services > Calendar and selecting While Using the App.
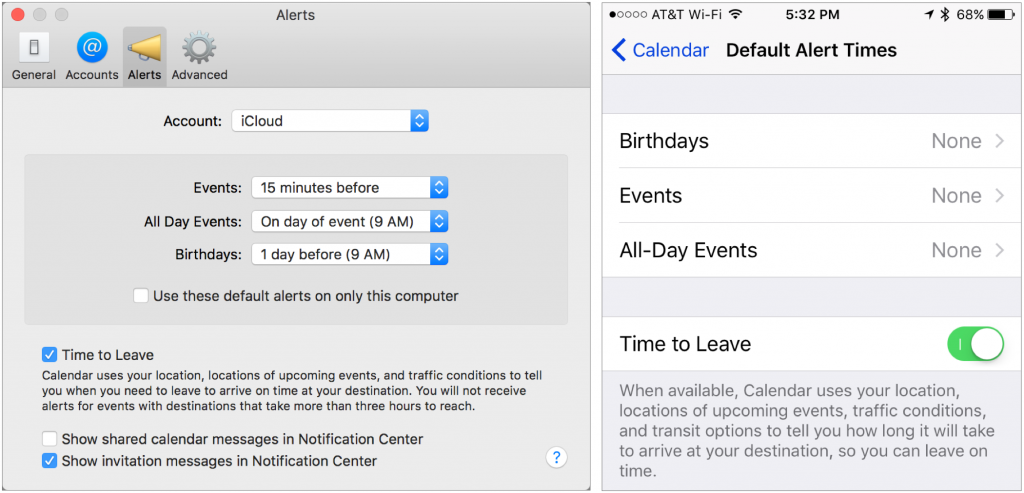
Next, you need to make sure the Time to Leave option is turned on. On the Mac, choose Calendar > Preferences > Alerts and select the Time to Leave checkbox. In iOS, go to Settings > Calendar > Default Alert Times and enable Time to Leave.


Now follow these steps:
  1. Create a new event, and enter a title and the start time. Travel time doesn’t work with all-day events.
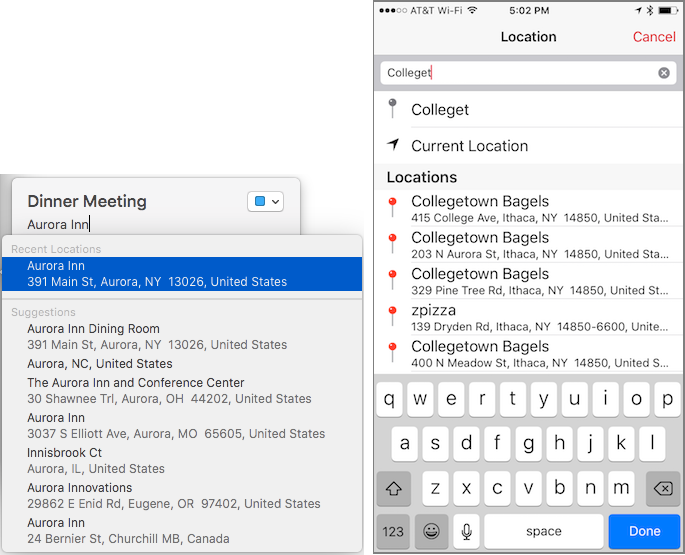
  2. In the Location field, start typing your destination’s name or address. You must be able to reach the destination within 3 hours to receive alerts about when to leave. 
    Calendar is smart about this, offering matches from your contacts, from recently visited places, and then from place names and addresses near you. So you could type a friend’s name and pick their card from Contacts, or a place name like “Tompkins County Public Library,” or even a specific address, like “806 State Street.”
    Calendar-PickLocation

  3. Regardless, after typing a partial name or address, you must pick one of Calendar’s suggestions so it knows the exact location of your destination.
  4. The next step is a bit different between the Mac and iOS:
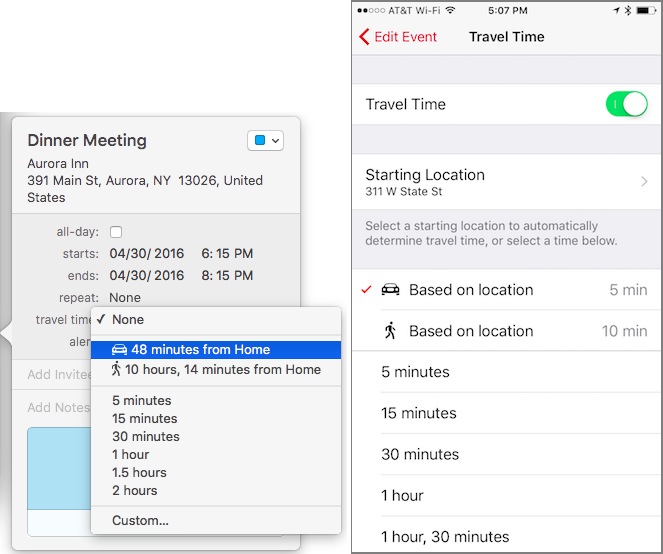
    • On the Mac, in the Travel Time pop-up menu (click once to reveal it), choose the automatically generated travel time for driving or walking, or, if your city is supported, public transit. You can’t change your starting location, which is based on the location of events in the previous 3 hours (it assumes you’re there!), your work address during work hours, your home address during off hours, or your computer’s location if all else fails. (The addresses come from the card in the Contacts app that is open when you choose Card > Make This My Card.)
    • In iOS, tap Travel Time and in the Travel Time screen, enable the Travel Time switch. A starting location may be picked for you, based on your current location and time of day, or based on a previous event, but you can always tap Starting Location and pick a different spot. Then tap a travel time based on location for walking, driving, or transit, which will reflect both your starting and ending locations, plus the traffic conditions.
      Calendar-SetTravelTime

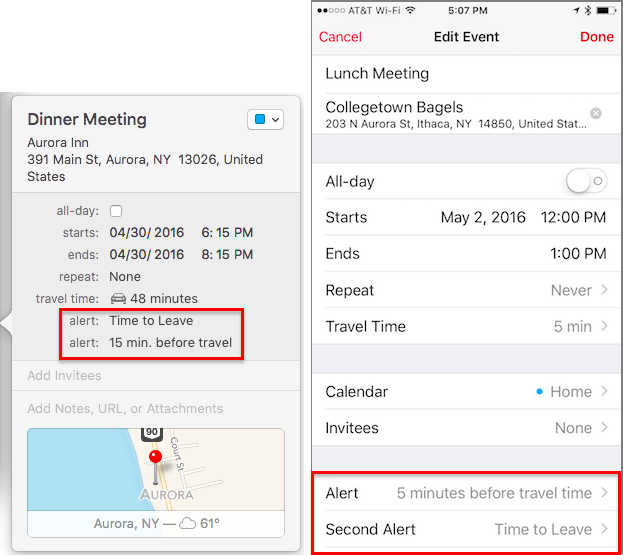
  5. Now it’s time to back out of the Travel Time screen and set alerts based on the travel time, which may take traffic conditions into account. By default, setting travel time creates an alert for Time to Leave, although you may wish to set a second alert that gives you a few minutes to get ready beforehand.
    Calendar-FinalEvent

That’s it, but with one important bonus. When you see the alert on an iPhone 6s or later, you can 3D Touch the alert to open a preview that has a link for directions; tap Directions to view the travel directions in the Maps app. If your iPhone doesn’t support 3D Touch, tap the alert to open the event in Calendar, after which you can tap the map preview to open the location in Maps.


Once you get the hang of setting up the events, getting alerts that are sensitive to travel time and include directions is like living in the future!

Wednesday, March 29, 2017

4 New Apple OS Features You Can Use Today

Apple just released new versions of all its operating systems—iOS, macOS, watchOS, and tvOS—fixing bugs, plugging security holes, and, best of all, adding a few new features. Here are four things you can do once you’ve updated. (If you’re concerned that installing the updates may cause other problems, check with me first.)

1: Sleep better after using your Mac late at night.

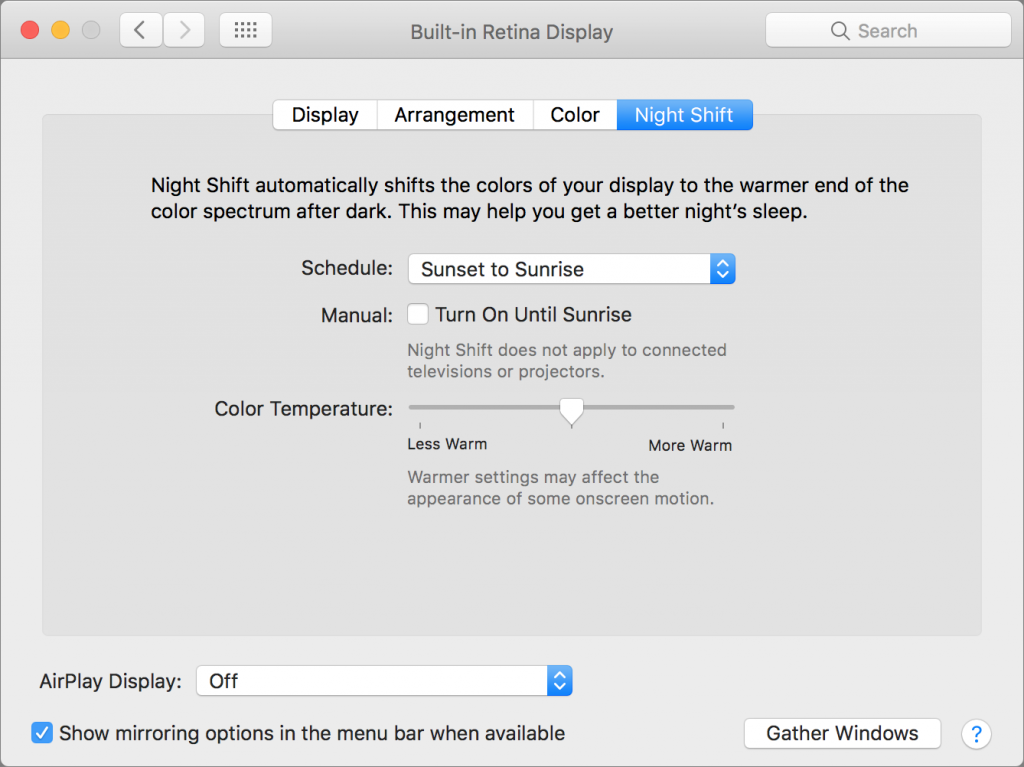
macOS 10.12.4 Sierra has gained Night Shift, a feature from iOS that automatically shifts the colors of the screen to the warmer end of the spectrum after dark. Night Shift may help you sleep better by reducing the amount of blue light that tricks your body into thinking it’s earlier than it is.
To set up Night Shift, open System Preferences > Displays > Night Shift and choose Sunset to Sunrise from the Schedule pop-up menu. Night Shift knows when the sun rises and sets wherever you are, but if you prefer, you can also set custom on and off times. (If you don’t see the Night Shift button in the Displays preference pane after upgrading to 10.12.4, your Mac is unfortunately too old to support Night Shift.)


If you’re working with graphics at night, or if video looks odd, you can turn off Night Shift manually. Do that either in the Displays preference pane or by scrolling down in Notification Center (click it in the upper-right corner of the screen) to see the Night Shift switch.

2: Find the AirPod that fell between the couch cushions.

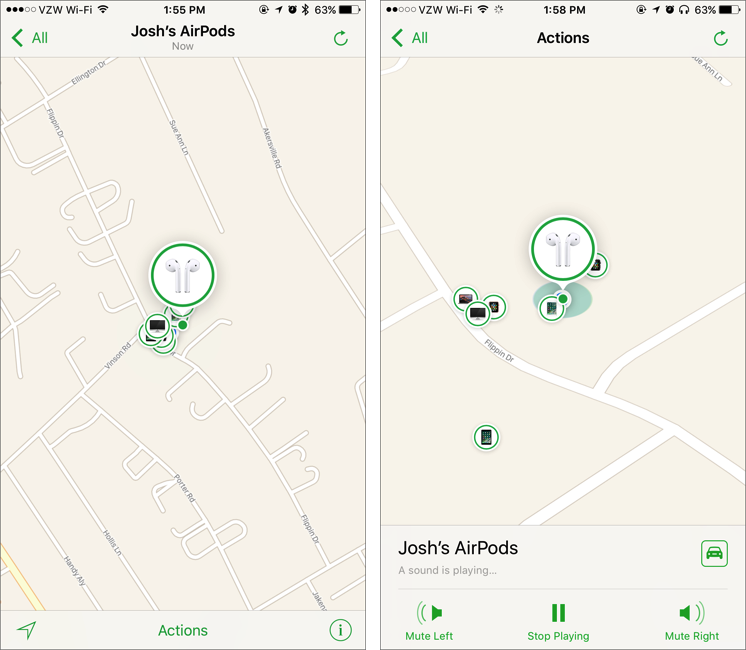
Apple’s wireless AirPods earbuds are cute, but they’re also easy to misplace. If you can’t find yours, iOS 10.3’s Find My iPhone app can help. Bring it up, tap the AirPods icon in the display, and then tap the Play Sound button to make them play a locator sound. If you’ve lost only one AirPod, you can mute the other so it’s easier to hear where the sound is coming from.


Note that Find My AirPods works only when in range of a paired iOS device, so it may not help if you lose an AirPod while running.

3: Don’t be “that person with the Apple Watch” at the theater.

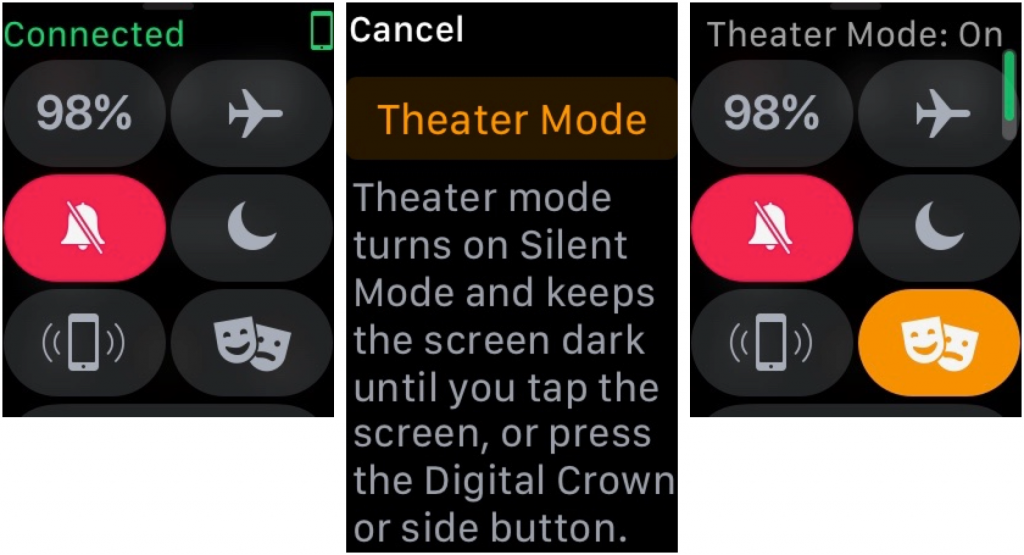
You’re in a darkened theater, at a movie or a play, and when you move in your seat or cover your mouth to cough, your Apple Watch’s screen turns on, annoying the people around you. Even worse is when a notification rolls in, causing the watch to make a sound. Embarrassing, we know. Happily, watchOS 3.2 adds Theater Mode, which turns on Silent mode and keeps the screen dark by disabling its standard “raise to wake” behavior.
To enable Theater mode, open Control Center by swiping up from the bottom of the screen. Then tap the Theater Mode button, which is emblazoned with theater masks. After the performance, you’ll need to disable Theater mode manually by tapping its button again.


If you do need to check the time surreptitiously (who knew this performance would go so long!), tap your Apple Watch’s screen, or press the Digital Crown or side button.

4: Ask Siri to find your car in a humongous parking lot

We’ve all been there. You parked at the mall, but got turned around while you were inside, and now you can’t find your car in the sea of automobiles. In iOS 10.3, you can now search for “parked car” in Maps, or just ask Siri, “Where did I park?”


And if you ever lose your car at a place like Disney World, this feature alone will be worth the price of the iPhone!

Note of caution - I typically tell my clients to wait a minimum of two weeks before installing any new updates such as these. Keep in mind the new releases are DAYS old (as of this post). May want to hold off on installing and see if there are any bugs that need worked out. But at least you know about some new features you can look forward to. Feel free to drop me a line if you are interested if its safe yet. ;-)