Tuesday, December 19, 2017

Watch Out for Phishing Attacks Hidden in Your Email

One of the most important things you can do to stay safe on the Internet is to be careful while reading email. That’s because online criminals know that we’re all busy, and we often don’t pay enough attention to what we’re reading or where we’re clicking.
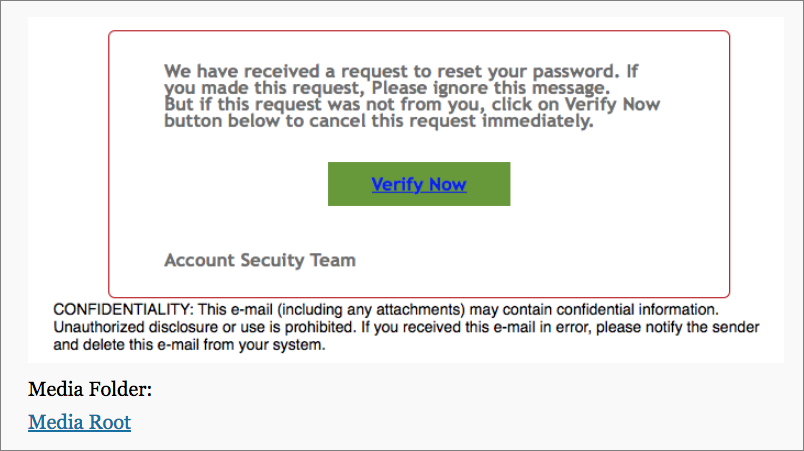
To take advantage of our inattention, these Internet information thieves forge email messages to look like they come from the likes of Apple, Facebook, and Amazon, along with well-known banks, payment services, retailers, and even government agencies. Even more dangerous are messages that appear to come from a trusted individual and include personal details—these messages are often targeted at executives and company managers. Generally speaking, these attacks are called phishing—you can see examples here.
The goal? Get you to click a link in the message and visit a malicious Web site. That site usually continues to masquerade as being run by a company or organization you trust. Its aim is to sucker you into revealing confidential information by asking you to log in, pay for a product or service, or fill out a survey. The site—or an attachment in the email message—might also try to install malware. Although macOS is quite secure, if you approve security prompts, it can still be infected.
Although phishing is a huge problem that costs businesses hundreds of millions of dollars every year, you can easily identify phishing messages by looking for telltale signs:
  • Be suspicious of email messages, particularly from people you don’t know or from well-known companies, that ask you to click a link and do something with an online account.
  • Look closely at email addresses and URLs (hover the pointer over a link to see the underlying URL). Phishing messages don’t use official domains, so instead of paypal.com, the addresses and links might use paypa1.com—close enough to pass a quick glance, but clearly a fake.
  • Watch out for highly emotional or urgent requests. They’re designed to make you act without thinking. Take any such messages with a grain of salt.
  • Channel your inner English teacher and look for poor grammar or odd phrasing, which are red flags for phishing messages. Email from real companies may not be perfect, but it won’t have multiple egregious errors.
So what do you do if you get a message that may be phishing for sensitive information? Most of the time you can just ignore it. If you’re worried that it might be legit, instead of clicking any links in the message, navigate to the site in question manually by typing the organization’s URL into your browser—use a URL that you know to be correct, not the one in the email message. Whatever you do, do not open attachments that you aren’t expecting and never send confidential information via email.
If you think you’ve fallen prey to a phishing attack and given away a password, you’ll want to change passwords on any affected accounts. If you’ve opened any attachments or approved any installs, run anti-malware software to determine whether your Mac has been infected. Contact me if you need help. And remember, regular backups protect you from a multitude of sins.


Friday, December 15, 2017

Make Your Holiday Cards with Apple’s Photos App This Year

It’s that time of year again, when we realize that if we’re going to do holiday cards, we should get started. You can take the easy way out and buy a few packs of generic reindeer cards at the drugstore, but with a little work in Apple’s Photos app on the Mac, you can instead send cards personalized with your favorite family photos from the past year. Here’s how.
  1. Select photos. Although you can add photos to your card project at any time, it’s easiest to make a new album and then spin through last year’s photos, adding 20 or so of the best candidates to your album. Don’t be picky at this point because it’s easier to choose the final images from within the card layout.
  2. Create the card. Select all the photos in your new album with Edit > Select All, and choose File > Create > Card. Then select one of the three choices: a 5×7 folded letterpress card for $2.99 each, a 5×7 folded card for $1.49 each, or a 4×6 flat double-sided card for $0.99 each. They all include envelopes.

     
  3. Select a theme. Photos loads themes over the Internet automatically, so if you see just a few themes, wait until more appear. Choose Holidays from the pop-up menu at the top, and click either Landscape or Portrait to pick the orientation before selecting a theme and clicking Create Card in the upper-right corner. 


    It’s easy to change your choices while working on the card by clicking the button next to Buy Card.

     
  4. Choose layouts. Although every card starts with a default layout, most have alternatives. Would you prefer a single image on the front, rather than a four-photo layout? Click the Options button below the card to open the Layout Options panel, and click the desired layout.

     
  5. Add photos. To add a photo to a spot on the card, drag it from the photo collection at the bottom of the screen, which shows the contents of your album. Dragging a photo on top of an already-placed image replaces it, or you can drag a photo from the card back to the collection at the bottom. Buttons let you clear placed photos (helpful when starting over with a new theme), auto-fill photos for quick placement, switch between showing unused and placed photos, and add more photos to the project.


    If Photos didn’t bring in all the photos from your album automatically, click the album in the sidebar, select all the photos, and drag them to the project entry in the sidebar. That’s much easier than adding them piecemeal via the Add Photos button.
  6. Edit photos. When you click a photo on the card, the Photo Options panel appears so you can apply filters, edit the photo with all of Photos’ editing tools, or zoom and crop. After zooming a photo with the slider, you can drag it within its spot on the card to position the subject properly.

     
  7. Add and edit text. Some text boxes in the layout can be edited; just click inside and type. Others can’t be changed. If you need to tweak the font, size, color, or orientation of text, select it and make your adjustments in the Text Options panel that appears.

     
  8. Buy your card. Once you’ve adjusted everything to your liking, click the Buy Card button in the upper-right corner of the window. Click Add Shipping Address, select a contact (likely yourself) to send the cards to, and then enter how many cards you’d like. When you’re done, click Place Order.


    Apple prints and mails you the cards, usually within a week or so. The print quality is, as you’d expect from Apple, top notch, and overall, the cards are a step up from those available from other photo services.
The hardest part of designing your own cards with Photos is figuring out which themes and layouts best match the photos you want to share. Some themes offer spots for only one or two photos, whereas others let you include a lot more, at the cost of making them much smaller. Similarly, some themes let you write a full letter, but others have room for just a few words of holiday cheer.
When you have a few minutes, sit down with a cup of eggnog and play with Photos’ card-making capabilities. If you missed it, check the previous article on creating labels from your address book on your Mac!

Tuesday, December 12, 2017

Print Labels for Your Holiday Cards with Apple’s Contacts App

If mailing your holiday cards (which you printed from Photos, right?) is made harder by having to write addresses on envelopes, you can skip the handwriting step this year with mailing labels. Although many people don’t realize this, it’s easy to print mailing labels on standard label stock using the Contacts app on the Mac. You can even add a personal touch by including a graphic and using a custom color and font choice. Here’s what you need to do:
  1. In Contacts, choose File > New Group to create an empty group into which you can collect your card recipients. Name the group something like Holiday Cards.
  2. Click All Contacts to see your full collection of contacts, and then drag your recipients from the center column to the Holiday Cards group. Note that you have to click and hold briefly before Contacts lets you start dragging a contact; if you drag too soon, Contacts assumes you want to select more contacts. You can drag contacts one at a time or select several at once and drag the entire selection. This doesn’t move contacts out of All Contacts—you’re just adding them to the Holiday Cards group, which functions much like an iTunes playlist.

     
  3. Once the Holiday Cards group is populated with all your recipients, click its name in the sidebar, and then choose File > Print to open the Print dialog.
  4. To set up your cards, you need to see details in the Print dialog, so at the bottom of the Print dialog, click the Show Details button (if it’s already called Hide Details, you’re all set). You also need to see the special controls for Contacts, so make sure Contacts is chosen from the pop-up menu underneath the page range fields. Then from the Style pop-up menu, choose Mailing Labels.

     
  5. Beneath the Style pop-up menu, make sure Layout is selected, and then in the Layout view, from the Page pop-up menus, choose the manufacturer of your labels and the number associated with the labels. (Avery 5160 is the most common label type and is readily available at office supply stores and online.)
  6. Click Label to switch to the Label view. From the Addresses pop-up menu, choose the type of address you’re using. Home is likely the most appropriate; if you choose All, Contacts will print both Home and Work addresses if available. You can also choose to print company and country here, and if you print country, you can exclude your own country, which makes it easy to include overseas friends and relatives without printing the country for most people.

     
  7. Although the defaults are fine, if you want, you can change the color of the label text, select a small image to print next to each contact, and change the font.
  8. It’s time to print, but not on your label stock just yet! Click the Print button to print a draft of your labels on plain paper. You’ll use this draft for two things—checking the addresses for accuracy and verifying that the labels will print properly on the label stock.

    To check if the labels will print correctly, stack a page from the draft on top of a sheet of blank labels, and then hold them up to a bright light or sunlit window. You should be able to see whether the positioning is right—it should be in most cases. If not, make sure you’ve chosen the right label in the Print dialog, and if all else fails, create a custom label with your own margins and gutters to make it work.
  9. Once you’ve fixed addresses for everyone who has moved recently and verified your positioning, you can print for real on your label stock.
That’s it! Most of the work comes in selecting people, making sure their addresses are right, and updating those that have changed—actually printing labels takes only a few minutes. As you stick your labels on envelopes, you can revel in the knowledge that it will go even faster next year! Happy Holidays!


Monday, December 4, 2017

Please, Please, Use iOS 11’s Do Not Disturb While Driving Feature

Distracted driving may not make headlines, but it’s a huge problem. In the United States in 2015, the National Highway Traffic Safety Administration says that 391,000 people were injured and 3477 killed in accidents caused by distracted driving. 
Many things can distract drivers, but the most concerning—and the most avoidable—is texting. Given that the iPhone has a 30–40% share of the market, it might have been involved in as many as 100,000 injuries and 1000 deaths in just 2015. Not good.
Apple has stepped up to the plate by introducing the Do Not Disturb While Driving (DNDWD) feature in iOS 11. You’ll be prompted to enable DNDWD when it first detects that you’re driving in a car after you install iOS 11. In normal use, it activates automatically when you’re driving, blocking notifications and preventing you from using apps until you stop the car. Here are answers to the most common questions we get about DNDWD.
How does the iPhone know that I’m driving?
The most reliable way is that your iPhone has connected to a car via Bluetooth. Obviously, that requires the car to support Bluetooth, and that you pair your iPhone with it. If there’s no Bluetooth connection, the iPhone uses its accelerometer and signals from nearby Wi-Fi networks to figure out that you’re driving.
In Settings > Do Not Disturb > Activate, you can choose from Automatically, When Connected to Car Bluetooth, or Manually. Stick with one of the first two options unless the iPhone regularly fails to detect that you’re driving, at which point you can add the Do Not Disturb While Driving button to Control Center, and activate DNDWD with it.
Will any notifications break through the DNDWD cone of silence?
Yes. As with standard Do Not Disturb, timers, alarms, and emergency alerts will still work. Plus, you can opt to receive urgent text messages. To enable this feature, go to Settings > Do Not Disturb > Auto-Reply To and choose a group (Recents, Favorites, or All Contacts). Those people will get an auto-reply—which you can personalize—when they text you, and if they reply to that auto-reply with the word “urgent,” the message will be delivered.
What about phone calls?
If your car has a Bluetooth hands-free system, phone calls will come in as they always have, and you can answer them via your steering wheel controls and carry on the conversation using the car’s built-in mic and speakers.
However, if you don’t have car Bluetooth or another hands-free accessory, DNDWD will block calls just as they would be by standard Do Not Disturb. That means you can allow calls from specific groups in Settings > Do Not Disturb > Allow Calls From and let anyone through if they call twice within 3 minutes.
Can I still use Maps to navigate?
Yes! Maps works on the Lock screen just as it always has, though it’s best started before you begin driving. If you keep your iPhone in a car mount so you can use it for navigating, DNDWD won’t get in the way.
Will Siri still work while in DNDWD?
Indeed it will, both via Hey Siri and by holding the Home button. But don’t do that—Hey Siri is safer than taking your hand off the wheel to press the Home button.
Siri won’t do some things for you while you’re driving, like open apps. Plus, Siri tries to respond to you so that you won’t have to look at the iPhone, reading all responses instead of displaying them on the screen.
How do I turn off DNDWD if I’m a passenger?
If DNDWD is on and you try to use your iPhone, an I’m Not Driving button appears. Tap it, and you can use your iPhone normally for the rest of the trip. If you’re always a passenger, go to Settings > Do Not Disturb > Activate, and select Manually. Then, if you do want to turn DNDWD on, you can use its Control Center button.
So hey, if you didn’t turn on Do Not Disturb While Driving when you first set up iOS 11, do us and everyone else on the road a favor and turn it on now. The life you save could be your own.


Friday, December 1, 2017

Quick Tip - The New Two-Swipe Shortcut for the Camera in iOS 11

When you want to capture that perfect action shot or incriminating video, it’s a mad rush to open the Camera app as quickly as possible. That’s why Apple lets you get to the camera in multiple ways: by swiping left on the Lock screen, using the Camera button in Control Center, and tapping the Camera icon on the Home screen. iOS 11 adds another shortcut that could be useful: from within any app, swipe down from above the top of the screen to display the Lock screen, and then swipe left to get to the camera. Enjoy!