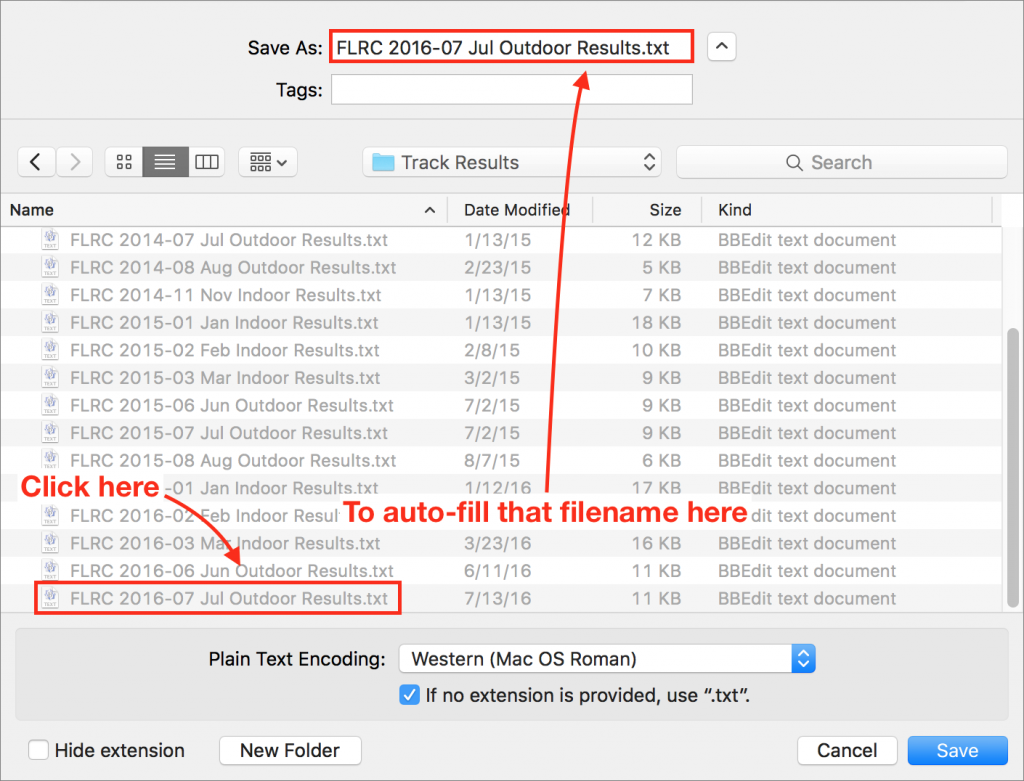
If you frequently create files
whose names vary from those of other files in the same folder by only a
date, sequence number, or the like, you can ensure regularized file
naming and save effort with this trick.
When saving your file, click a
grayed-out filename in the Save dialog’s list. That causes macOS to
auto-fill the clicked name in the Save As field, where you can tweak it
rather than typing a new name from scratch.
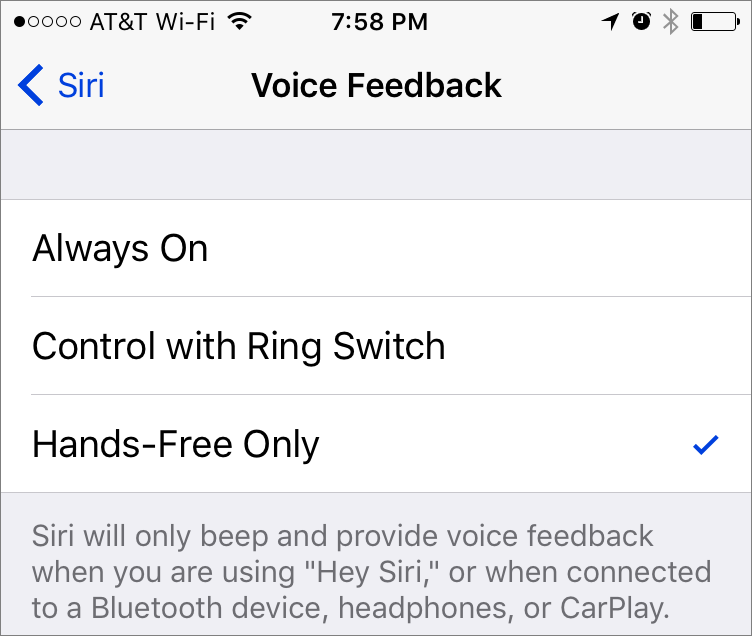
By default, Siri likes to chat,
confirming what you say and speaking the results of your commands when
appropriate. If you don’t like that, go to Settings > Siri > Voice
Feedback and select either Control with Ring Switch (the iPhone’s
physical switch) or Control with Mute Setting (iPad) to make Siri be
quiet when the device is muted.
Alternatively, choose Hands-Free Only to
silence Siri except when connected to Bluetooth, headphones or CarPlay.
Or set Siri to whisper—hold the Home button to invoke Siri and then
reduce the volume, which applies only to Siri’s voice.
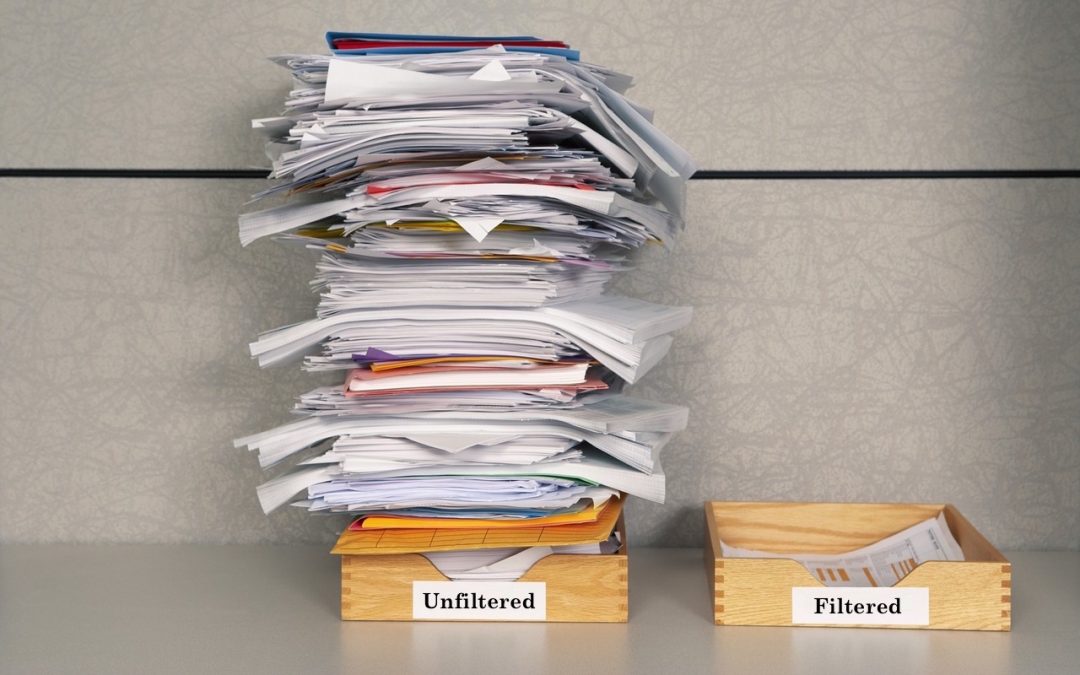
It can be difficult to stay
focused on a specific task in the Mail app when you keep getting
distracted by incoming messages. Fortunately, you can reduce these
distractions using the Filter feature that Apple added in macOS 10.12
Sierra and iOS 10—and you can look forward to working with it in the
upcoming 10.13 High Sierra and iOS 11.
These filters are different from
filters in other email programs that move messages between
mailboxes—those are equivalent to Mail’s rules. Instead, these filters
are more like searches, in that all they do is show messages in the
current mailbox that match the filter, hiding everything else. They
don’t move or modify messages in any way.
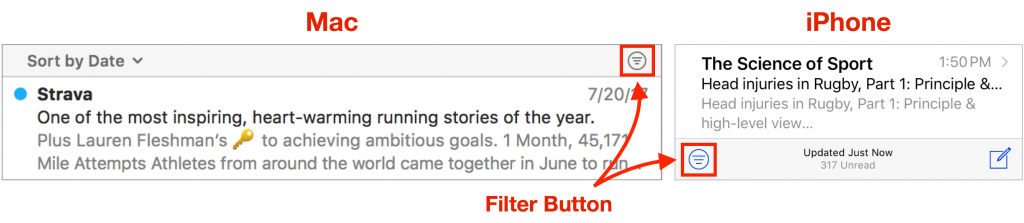
To start using these filters, on the
Mac, click the Filter button at the top of the message list in any
mailbox, or in iOS, tap the Filter button in the bottom-left corner.
 By default, mailboxes show only
unread messages. Click or tap Unread to bring up all the preset filter
choices, which fall into four categories:
By default, mailboxes show only
unread messages. Click or tap Unread to bring up all the preset filter
choices, which fall into four categories:
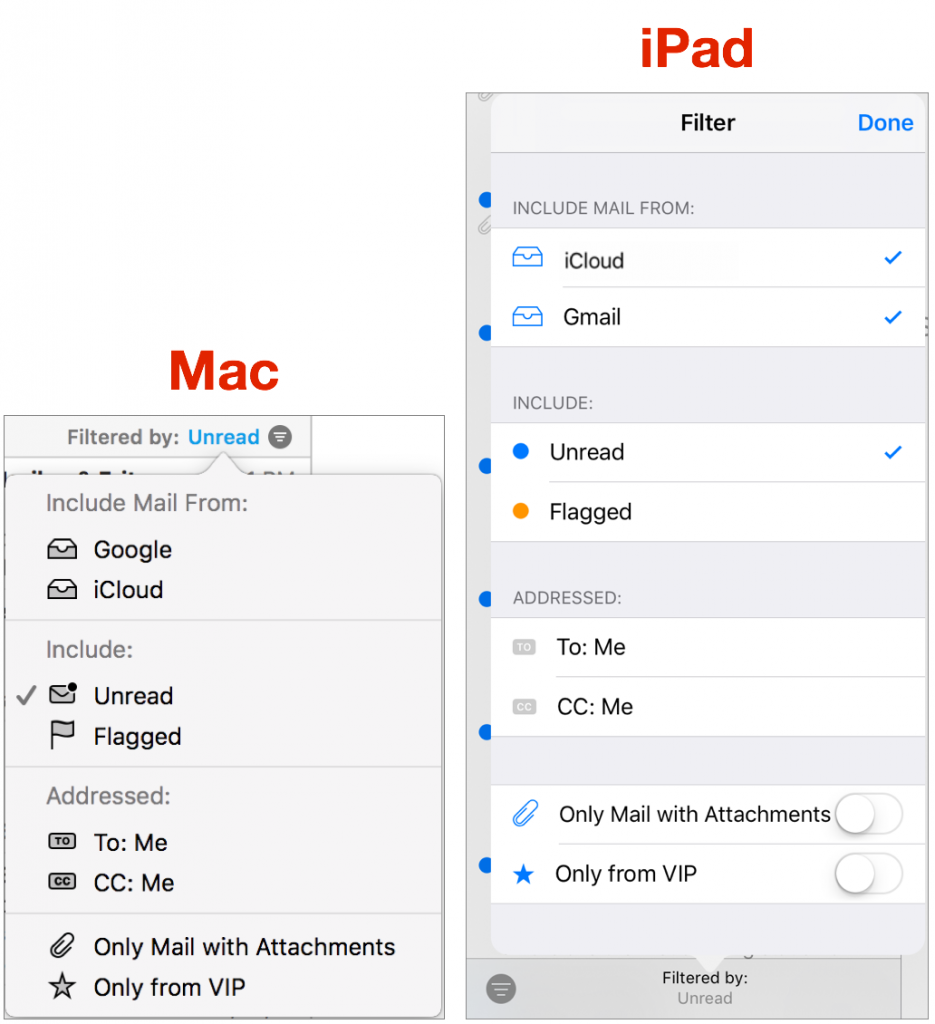 Email account:
This “Include Mail From” section appears only if Mail checks more than
one account, like iCloud and Gmail. These choices let you tell Mail to
show messages from only certain accounts, making it easy to focus on
work mail during the day, for instance, or only personal mail when
you’re home.
Email account:
This “Include Mail From” section appears only if Mail checks more than
one account, like iCloud and Gmail. These choices let you tell Mail to
show messages from only certain accounts, making it easy to focus on
work mail during the day, for instance, or only personal mail when
you’re home.- Status:
In this “Include” section, you’ll probably want to keep Unread selected
most of the time to show just new messages, but you can also select
Flagged to find messages you’ve marked previously.
- Addressed:
Sometimes it may be helpful to see only messages that have your address
in the To line, versus those where the sender CC’d you. These options
will also hide most mailing list messages, automated email, and
marketing offers.
- Attachments and VIPs:
These options are great in scenarios where, say, you want to see just
messages that contain attachments to find that presentation a colleague
sent last week or when you want to view mail that comes from the people
whom you’ve anointed as VIPs.
Since you can pick more than one of
these options, you can tell Mail to display just unread messages sent to
your work email account that have attachments and come from the people
who are on your VIP list. Imagine the possibilities!
Once you’ve gone through the filtered
list of messages, click or tap the Filter button again (Mail fills it
with gray or blue) to remove the filters and see all the messages in the
mailbox again. Happily, Mail remembers your filter settings, so
enabling filters again returns you to the same focused view you had
before.
iBooks in iOS has a built-in
sleep timer that can automatically pause playback after a specified
amount of time, which is great for listening to an audiobook as you go
to sleep (tap the Moon button below the volume slider). What if you
prefer listening to content that’s not in iBooks, like music or a
college lecture?
To set a sleep timer that works for Music, iTunes U, or
any other app that plays audio, open the Clock app and tap the Timer
button. Next, tap When Timer Ends (iPhone) or the selected sound (iPad),
scroll to the end of the list of sounds, and select Stop Playing. When
you’re ready to listen as you drift off to sleep, start the timer just
before or right after you press Play in your audio app.


As much as we hate to admit it,
when it comes to losing data, the question is not “if,” but “when.” If
you rely on your Mac for your job, or if your Mac contains valuable
information—and whose Mac doesn’t have at least irreplaceable
photos?—you must back up regularly or risk data loss. Seriously, full
backups of your entire Mac are not optional, they are mandatory!
Backups protect your data and help
you get back to work more quickly if your Mac is lost, stolen, dropped
on the floor, caught in a fire, soaked by a spilled cup, or compromised
by malicious hackers. They also save the day if your external drive goes
south, if an important file develops corruption, and even when you make
a mistake and delete essential data from a file without realizing until
Undo can no longer help.
It’s important to think through your
backup strategy. Don’t assume that a single backup to a hard drive on
your desk is good enough—it’s not because a fire or flood will likely
damage any backup hardware attached to your Mac. Another common error is
not realizing that if you rely on your Mac to get your work done, you
may not want to wait as long as it will take to restore from certain
types of backups. My triple-play strategy will help you avoid these
problems.
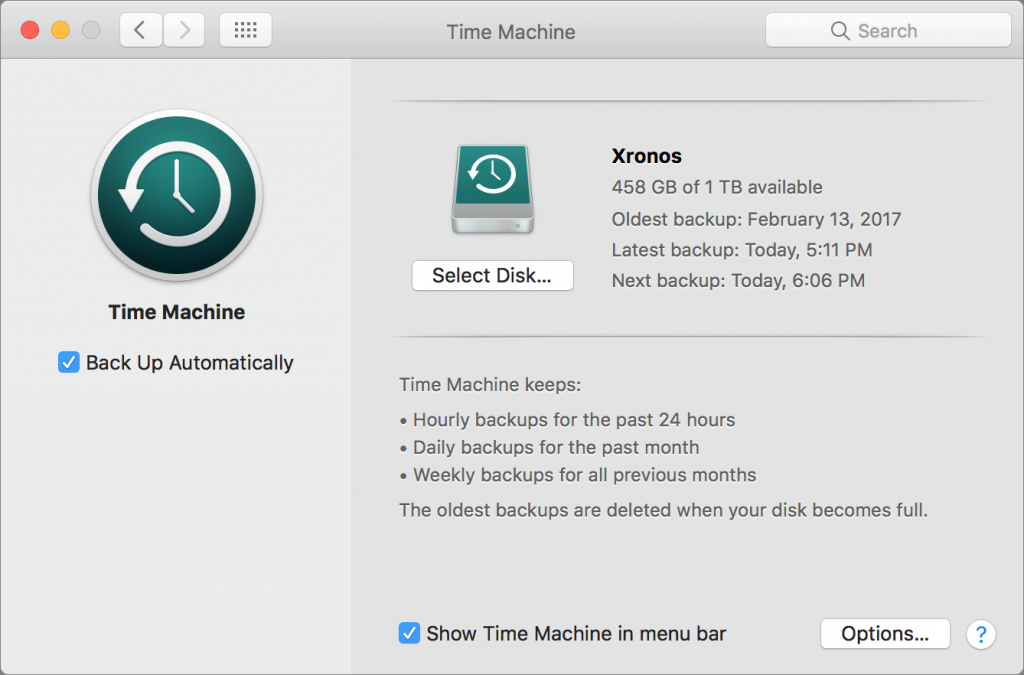
Backup #1: Time Machine
Apple has been making backups easier
since 2007 by providing the Time Machine backup software with the Mac.
Set it up with an external drive and it will cheerfully create versioned backups,
which contain multiple copies of each file as it changes over time.
With versioned backups, you can restore a lost or damaged file to its
most recent state, or to any previous state. That’s essential if
corruption crept in unnoticed and you’ve been backing up a corrupt file
for some time. Time Machine also enables you to restore an entire drive
as of the latest backup, which you might do if you have to reformat or
replace your drive, or get a replacement computer.
 Time Machine backups, useful as they are, can’t help you in two situations:
- If your
Mac’s main drive dies, but you need to keep working in order to meet a
deadline, you won’t want to wait for hours while you reformat and
restore—or longer if you must first install a new drive. To keep working
with minimal interruption, you need a bootable duplicate, which is an exact clone of your drive.
- Should you
be so unlucky as to experience a burglary, fire, or flood that affects
your Mac, it’s likely that your Time Machine drive—and your bootable
duplicate—will suffer the same fate and thus be useless as a backup. To
protect against that unhappy possibility, you need an offsite backup.
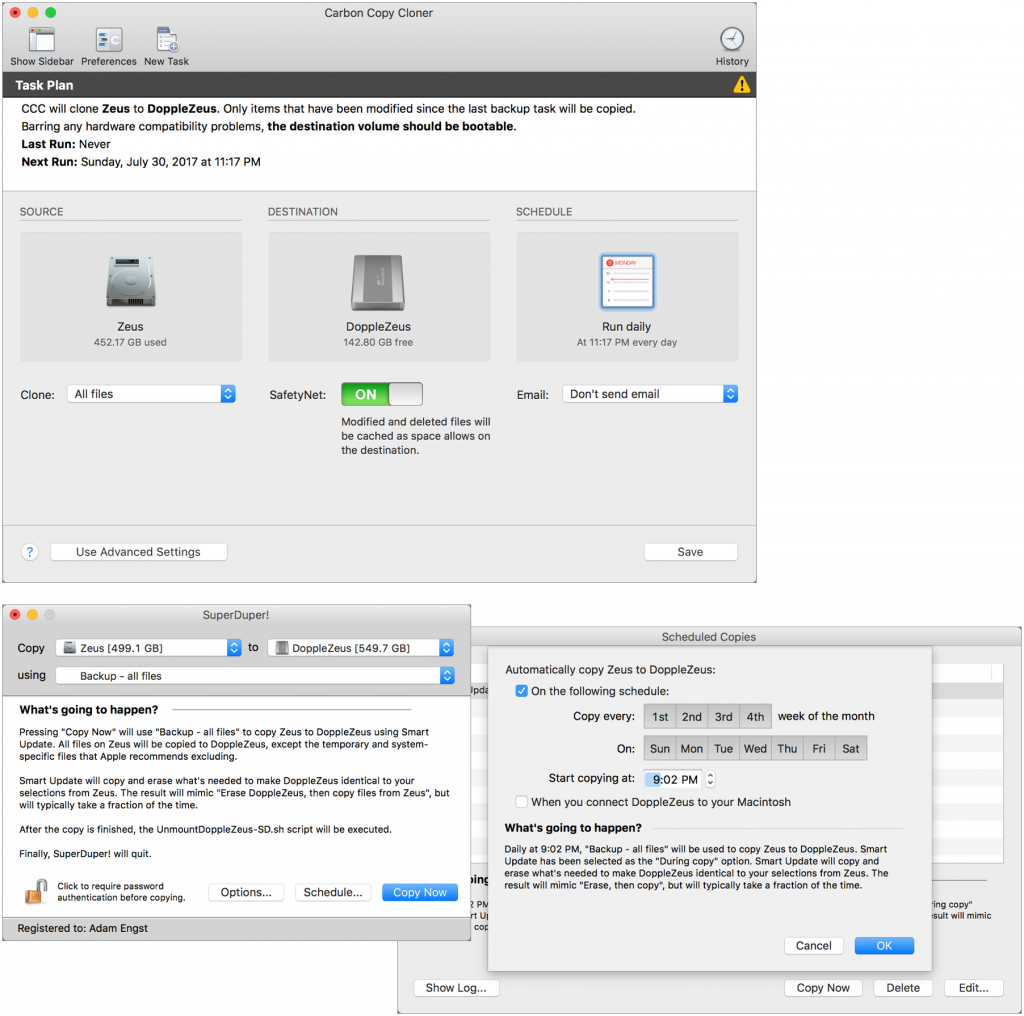
Backup #2: Bootable Duplicate
If you don’t have time to deal with a
dead startup drive until you meet a deadline, you can work from your
bootable duplicate instead. To make one, you need an external drive
that’s as large as your Mac’s internal drive, or at least a good bit
bigger than the amount of data on your drive. If you have a really large
drive, you could partition it in Disk Utility and use one partition for
Time Machine and the other for a bootable duplicate.
You also need backup software that can create a bootable duplicate. The leading contenders are Carbon Copy Cloner ($39.99) and SuperDuper! ($27.95). Both are easy to set up and can update your bootable duplicate reliably on a regular schedule—nightly is best.
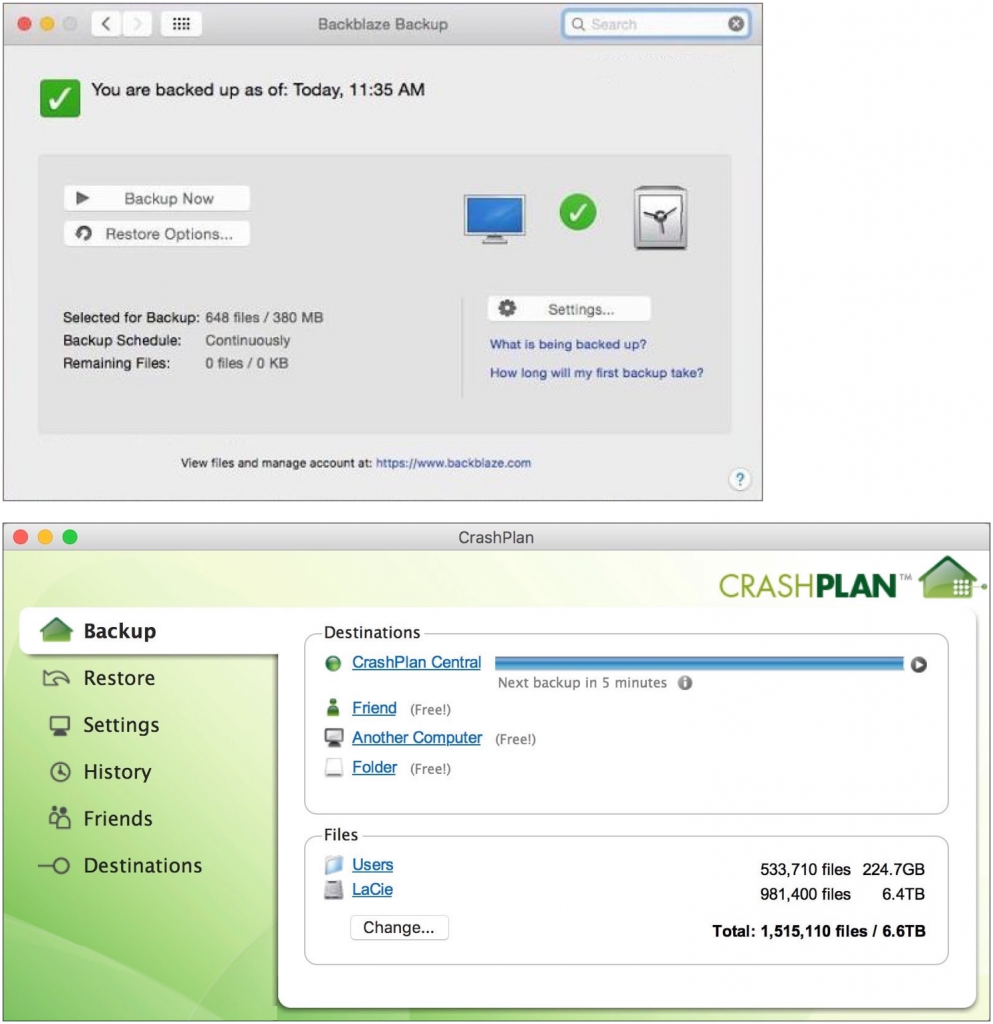
Backup #3: Offsite Backup
If disaster strikes both your Mac and
its attached backup drive, you’ll be ecstatic that you stored a backup
elsewhere. When it comes to offsite backups, you have two basic choices:
- Set up two
or three backup drives with Time Machine, or with Time Machine and a
bootable duplicate on separate partitions, and store one of them in
another location, such as a trusted friend’s house or your office across
town. A safe deposit box also works well.
Then, on a regular basis, swap the drives such that you’re backing up to
one, and keeping another off-site.
- Use a
cloud backup service, which you can back up to and restore from over the
Internet. The two leading services with good Mac apps are Backblaze and CrashPlan.
Plans for both start at about $5 per month or $50 per year for one
computer. These apps back up constantly in the background, so you’re
always protected. Their main downside is that they’re slow in both
directions, but in the event of a four-alarm fire that melts your Mac,
retrieving your data slowly is better than not getting it back at all.
 So there you have it. Use Time
Machine for continual protection of your data, a bootable duplicate so
you can return to work quickly if your drive dies, and an offsite backup
in case of catastrophe. If you have questions or want hands-on help
setting up a sensible backup system, just contact us.
So there you have it. Use Time
Machine for continual protection of your data, a bootable duplicate so
you can return to work quickly if your drive dies, and an offsite backup
in case of catastrophe. If you have questions or want hands-on help
setting up a sensible backup system, just contact us.