Monday, January 22, 2018

Five Things You Should Never Do with Passwords (and Three You Should)

Passwords are the bane of our modern existence. Nearly anything you want to do, it seems, calls for a password. As the Internet’s reach extends beyond computers and into phones, TVs, appliances, and even toys, we have to enter passwords with increasing frequency and in ever more annoying ways.
To make dealing with passwords easier and more secure, everyone should use a password manager like 1Password (my personal favorite) or LastPass. Such apps generate random long passwords like kD*SSDcCl7^6FN*F, store those passwords securely, and automatically enter them for you when you need to log in to a Web site. They are essential in today’s world.
You’ll still need a few passwords you can remember and type manually—for instance, the master password for your password manager and your Apple ID password. Make sure those passwords are at least 12 characters, and we recommend going to at least 16 characters.
If you’re unsure of the best way to create a strong password, try taking the first letter of each word in a sentence you can remember, and also change a few words to digits. Then “Now is the time for all good men to come to the aid of the party!” becomes a password along the lines of Nitt4agm2c2ta0tp!. So that no eavesdroppers learn your password, avoid saying your sentence out loud whenever you enter it! Or, combine four or five unrelated dictionary words, like correct-horse-battery-staple, that add up to at least 28 characters. (Don’t use the examples in this paragraph!)
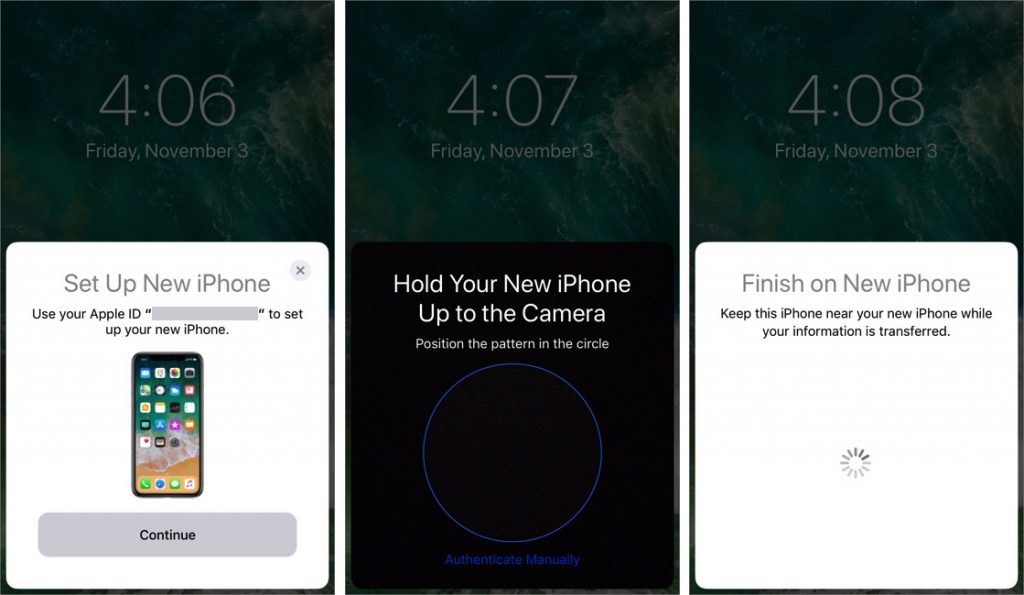
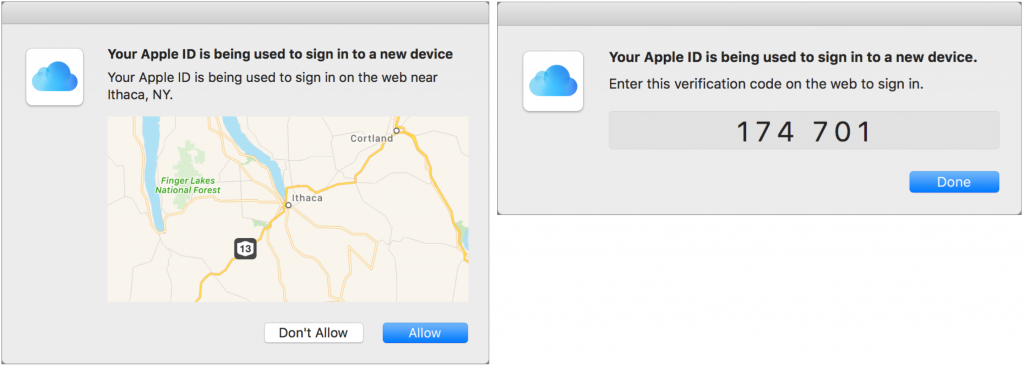
When possible, take advantage of two-factor authentication on sites like Apple, Google, Dropbox, Facebook, Twitter, and more. Accounts protected by two-factor authentication essentially require that you enter a second, time-expiring password as part of the login process. You’ll get that second password via text message, authenticator app, or other notification method when you log in.
But what I really want to talk about today is what you should not do with passwords. Follow these tips to avoid making mistakes that can undermine even the security provided by a password manager.
  1. Don’t use the same password twice. This is key, because if the bad guys get your password—no matter how strong—for one site, they’ll try it on other sites.
  2. Don’t share passwords with anyone you don’t trust completely. That’s especially true of passwords to accounts that contain sensitive information or that can be used to impersonate you, like email and social media. However, sometimes you have to share a password, such as to a club blog with multiple authors. In that case…
  3. Don’t send passwords to shared sites via email or text message. If someone hacks into your recipient’s email or steals their phone, the password could be compromised. Instead, use a site like One-Time Secret to share a link that shows the password only once, after which the recipient should put the password into their password manager.
  4. Don’t write your passwords on sticky notes. Yeah, it’s a cliché, but people still do it. Similarly, don’t put all your passwords in a text file on your computer. That’s what password managers are for—if someone steals your computer, they can’t break into your password manager, whereas they could open that text file easily.
  5. Don’t change passwords regularly if you don’t have to. As long as every site has a strong, unique password, changing a password is a waste of time, especially if doing so makes you write down the password or communicate it insecurely. If you do have to update a password regularly, a password manager makes the task much easier.
I realize that it’s tempting to take the easy road and share a password with a friend via email or write a particularly gnarly one on a sticky note. But today’s easy road leads directly to identity theft and is paved with insecure password habits. You might think no one would pay attention to little old you, but times have changed, and organized crime is interested in any Internet account that can be cracked.

Monday, January 15, 2018

How to Split Restaurant Checks with Apple Pay Cash

You’re out to lunch with tech-savvy friends, one of whom picks up the check and says, “Just send me your share via Apple Pay Cash.” Say what?
Apple Pay Cash is Apple’s new person-to-person payment service, designed to make it easy for individuals to send and receive money. It’s perfect for repaying a friend who buys concert tickets or a relative who picks up some groceries for you. Or rather, it’s perfect if your friends and relatives use iPhones with iOS 11.2 or later—for green-bubble Android acquaintances, you can instead rely on cross-platform services like VenmoCircle, and Square Cash. Here’s how to start using Apple Pay Cash.
First, if you haven’t yet enabled Apple Pay, go to Settings > Wallet & Apple Pay > Add Credit or Debit Card, and follow the prompts to add at least a debit card. You’ll also need two-factor authentication turned on in Settings > Your Name > Password & Security—regardless of Apple Pay, two-factor authentication is essential for security. With Apple Pay enabled, tap Settings > Wallet & Apple Pay > Apple Pay Cash and run through the setup process. You might also be asked to verify your identity after setup—it’s necessary to send or receive more than $500 in total.
When you’re done, you’ll end up with a new Apple Pay Cash card in the Wallet app. It’s a virtual card that stores money you receive and works like any other debit card for payments. If it doesn’t have enough money on it to cover a payment, you can choose any other debit or credit card you’ve added to Apple Pay. You can also add money to it or withdraw money to a linked bank account. You’ll want to use a debit card when adding money or paying beyond your balance with Apple Pay Cash, since then there is no transaction fee. A credit card incurs a 3% fee.
To send or request money via Apple Pay Cash, you use its Messages app, which is installed automatically. While in an iMessage thread (blue bubbles) with the person with whom you want to exchange money, make sure the app drawer is showing (tap the app button if necessary) and then tap the Apple Pay button in the drawer.
A panel appears with a dollar amount, + and – buttons, and buttons for Request and Pay. Use the + and – buttons to set the amount, or tap the dollar amount to show a keypad where you can enter an exact amount, with cents if necessary. Then tap Request or Pay to insert the transaction into the message. It won’t be sent until you tap the black send button, so if you change your mind, you can tap the little x to delete. Lastly, you’ll be prompted to verify the transaction in the usual Apple Pay fashion, which means authenticating with Face ID on the iPhone X or Touch ID on all other iPhones.
You can even use Siri to initiate transfers—“Send my mother $15.” or “Ask my sister for $4.99.” And if you have an Apple Watch with watchOS 4.2 or later, you can also send money from the Messages app, or send or request money via Siri. On the watch, double-press the side button to confirm the transaction.
Honestly, the only downside to Apple Pay Cash is that it works only within the Apple world. But as long as you want to exchange money with Apple-using friends and relatives, it’s fast, easy, reliable, and one less reason to visit the ATM.


Saturday, January 13, 2018

Quick Tip - Apple Lowers Battery-Replacement Pricing for iPhone 6 and Later

Did you hear about the battery-related controversy swirling around Apple at the end of 2017? There has been much hue and cry about how, starting with iOS 10.2.1, iOS has been slowing down iPhones with old, weak batteries to avoid unexpected shutdowns. 
In response, Apple posted A Message to Our Customers about iPhone Batteries and Performance to explain what was going on. Apple announced that it would reduce the price of out-of-warranty battery replacements for the iPhone 6 and later from $79 to $29 through December 2018. The company also said that an upcoming iOS update would give users more visibility into the health of their iPhone battery. 
The practical upshot of this is that if you have an iPhone 6 or later that suffers from short battery life or unexpected shutdowns, make sure to take advantage of the $29 replacement price this year. (There have even been reports of iPhone 7 battery replacements.)
If you would like to check the health of your battery now, check out CoconutBattery.

Quick Tip - Amazon Prime Video Finally Comes to the Apple TV

A $99-per-year Amazon Prime membership provides various perks, including free 2-day shipping from the Amazon online store and streaming access to Amazon’s media libraries. But for Apple TV users, accessing Prime Video content has been frustrating, because there was no Amazon app for the Apple TV. That has all changed now, and if you have an Amazon Prime membership and an Apple TV, it’s time to download the new Amazon Prime Video app. It gives you a boatload of additional video content, including Amazon’s original programming (like The Marvelous Mrs. Maisel, which is hilarious). Find it on your fourth-generation Apple TV or Apple TV 4K in the App Store app. If you are still using a third-generation Apple TV, Amazon Prime Video should appear automatically on your Apple TV Home screen.

Wednesday, January 3, 2018

Quick Tip - Here’s the Fastest Way to Set Up a New iPhone

When you’re unboxing a new iPhone, it’s time to think about how you’ll move your digital life from your old iPhone to the new one. If your old iPhone is running iOS 11, you can use Quick Start, a new iOS 11 feature that makes the transfer easy. Just turn on the new iPhone, set it next to the old one, and tap Continue when asked whether you want to use your Apple ID to set up your new iPhone. An animation appears on the new iPhone for you to scan with the old iPhone—once you’ve done that, follow the rest of the instructions to enable Touch ID or Face ID and then restore your data and settings from your most recent iCloud backup (you can update the backup first if necessary). Leave the two iPhones next to each other while data is being transferred, and if possible, keep the new one plugged in and on Wi-Fi after setup so it can download your apps, photos, and music from Apple’s cloud-based services.