
You’re out to lunch with tech-savvy friends, one of whom picks up the check and says, “Just send me your share via Apple Pay Cash.” Say what?
Apple Pay Cash is Apple’s new person-to-person payment service, designed to make it easy for individuals to send and receive money. It’s perfect for repaying a friend who buys concert tickets or a relative who picks up some groceries for you. Or rather, it’s perfect if your friends and relatives use iPhones with iOS 11.2 or later—for green-bubble Android acquaintances, you can instead rely on cross-platform services like Venmo, Circle, and Square Cash. Here’s how to start using Apple Pay Cash.
First, if you haven’t yet enabled Apple Pay, go to Settings > Wallet & Apple Pay > Add Credit or Debit Card, and follow the prompts to add at least a debit card. You’ll also need two-factor authentication turned on in Settings > Your Name > Password & Security—regardless of Apple Pay, two-factor authentication is essential for security. With Apple Pay enabled, tap Settings > Wallet & Apple Pay > Apple Pay Cash and run through the setup process. You might also be asked to verify your identity after setup—it’s necessary to send or receive more than $500 in total.
When you’re done, you’ll end up with a new Apple Pay Cash card in the Wallet app. It’s a virtual card that stores money you receive and works like any other debit card for payments. If it doesn’t have enough money on it to cover a payment, you can choose any other debit or credit card you’ve added to Apple Pay. You can also add money to it or withdraw money to a linked bank account. You’ll want to use a debit card when adding money or paying beyond your balance with Apple Pay Cash, since then there is no transaction fee. A credit card incurs a 3% fee.
To send or request money via Apple Pay Cash, you use its Messages app, which is installed automatically. While in an iMessage thread (blue bubbles) with the person with whom you want to exchange money, make sure the app drawer is showing (tap the app button if necessary) and then tap the Apple Pay button in the drawer.
A panel appears with a dollar amount, + and – buttons, and buttons for Request and Pay. Use the + and – buttons to set the amount, or tap the dollar amount to show a keypad where you can enter an exact amount, with cents if necessary. Then tap Request or Pay to insert the transaction into the message. It won’t be sent until you tap the black send button, so if you change your mind, you can tap the little x to delete. Lastly, you’ll be prompted to verify the transaction in the usual Apple Pay fashion, which means authenticating with Face ID on the iPhone X or Touch ID on all other iPhones.
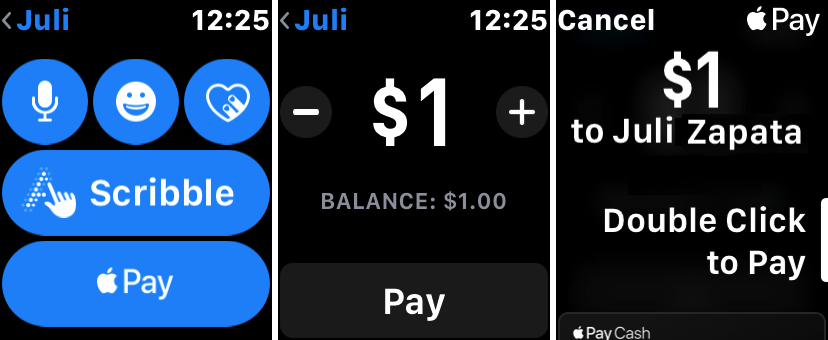
You can even use Siri to initiate transfers—“Send my mother $15.” or “Ask my sister for $4.99.” And if you have an Apple Watch with watchOS 4.2 or later, you can also send money from the Messages app, or send or request money via Siri. On the watch, double-press the side button to confirm the transaction.
Honestly, the only downside to Apple Pay Cash is that it works only within the Apple world. But as long as you want to exchange money with Apple-using friends and relatives, it’s fast, easy, reliable, and one less reason to visit the ATM.

1 comments:
Everything looks fantastic.Amazing i m really impress with your content and very useful it. looklethuthuy
Post a Comment